The AWS Machine Learning Research Awards (MLRA) is pleased to announce the 21 recipients for the 2020 Q1/Q2 call-for-proposal cycle.Read More
Using container images to run PyTorch models in AWS Lambda
PyTorch is an open-source machine learning (ML) library widely used to develop neural networks and ML models. Those models are usually trained on multiple GPU instances to speed up training, resulting in expensive training time and model sizes up to a few gigabytes. After they’re trained, these models are deployed in production to produce inferences. They can be synchronous, asynchronous, or batch-based workloads. Those endpoints must be highly scalable and resilient in order to process from zero to millions of requests. This is where AWS Lambda can be a compelling compute service for scalable, cost-effective, and reliable synchronous and asynchronous ML inferencing. Lambda offers benefits such as automatic scaling, reduced operational overhead, and pay-per-inference billing.
This post shows you how to use any PyTorch model with Lambda for scalable inferences in production with up to 10 GB of memory. This allows us to use ML models in Lambda functions up to a few gigabytes. For the PyTorch example, we use the Huggingface Transformers, open-source library to build a question-answering endpoint.
Overview of solution
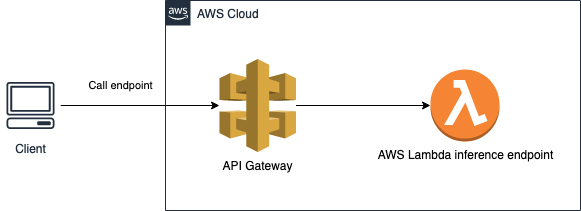
Lambda is a serverless compute service that lets you run code without provisioning or managing servers. Lambda automatically scales your application by running code in response to every event, allowing event-driven architectures and solutions. The code runs in parallel and processes each event individually, scaling with the size of the workload, from a few requests per day to hundreds of thousands of workloads. The following diagram illustrates the architecture of our solution.

You can package your code and dependencies as a container image using tools such as the Docker CLI. The maximum container size is 10 GB. After the model for inference is Dockerized, you can upload the image to Amazon Elastic Container Registry (Amazon ECR). You can then create the Lambda function from the container image stored in Amazon ECR.
Prerequisites
For this walkthrough, you should have the following prerequisites:
- An AWS account
- The AWS Command Line Interface (AWS CLI) installed and configured to interact with AWS services locally
- The AWS Serverless Application Model (AWS SAM) CLI installed
- The Docker CLI
Implementing the solution
We use a pre-trained language model (DistilBERT) from Huggingface. Huggingface provides a variety of pre-trained language models; the model we’re using is 250 MB large and can be used to build a question-answering endpoint.
We use the AWS SAM CLI to create the serverless endpoint with an Amazon API Gateway. The following diagram illustrates our architecture.
To implement the solution, complete the following steps:
- On your local machine, run
sam init. - Enter
1for the template source (AWS Quick Start Templates) - As a package type, enter
2for image. - For the base image, enter
3 - amazon/python3.8-base. - As a project name, enter
lambda-pytorch-example. - Change your
workdirtolambda-pytorch-exampleand copy the following code snippets into thehello_worldfolder.
The following code is an example of a requirements.txt file to run PyTorch code in Lambda. Huggingface has as a dependency PyTorch so we don’t need to add it here separately. Add the requirements to the empty requirements.txt in the folder hello_world.
# List all python libraries for the lambda
transformers[torch]==4.1.1
The following is the code for the app.py file:
import json
from transformers import AutoTokenizer, AutoModelForQuestionAnswering
import torch

tokenizer = AutoTokenizer.from_pretrained("model/")
model = AutoModelForQuestionAnswering.from_pretrained("model/")

def lambda_handler(event, context):

    body = json.loads(event['body'])

    question = body['question']
    context = body['context']

    inputs = tokenizer.encode_plus(question, context,add_special_tokens=True, return_tensors="pt")
    input_ids = inputs["input_ids"].tolist()[0]

    output = model(**inputs)
    answer_start_scores = output.start_logits
    answer_end_scores = output.end_logits

    answer_start = torch.argmax(answer_start_scores)
    answer_end = torch.argmax(answer_end_scores) + 1

    answer = tokenizer.convert_tokens_to_string(tokenizer.convert_ids_to_tokens(input_ids[answer_start:answer_end]))

    print('Question: {0}, Answer: {1}'.format(question, answer))

    return {
        'statusCode': 200,
        'body': json.dumps({
            'Question': question,
            'Answer': answer
        })
    }
The following Dockerfile is an example for Python 3.8, which downloads and uses the DistilBERT language model fine-tuned for the question-answering task. For more information, see DistilBERT base uncased distilled SQuAD. You can use your custom models by copying them to the model folder and referencing it in the app.py.
# Pull the base image with python 3.8 as a runtime for your Lambda
FROM public.ecr.aws/lambda/python:3.8

# Copy the earlier created requirements.txt file to the container
COPY requirements.txt ./

# Install the python requirements from requirements.txt
RUN python3.8 -m pip install -r requirements.txt

# Copy the earlier created app.py file to the container
COPY app.py ./

# Load the BERT model from Huggingface and store it in the model directory
RUN mkdir model
RUN curl -L https://huggingface.co/distilbert-base-uncased-distilled-squad/resolve/main/pytorch_model.bin -o ./model/pytorch_model.bin
RUN curl https://huggingface.co/distilbert-base-uncased-distilled-squad/resolve/main/config.json -o ./model/config.json
RUN curl https://huggingface.co/distilbert-base-uncased-distilled-squad/resolve/main/tokenizer.json -o ./model/tokenizer.json
RUN curl https://huggingface.co/distilbert-base-uncased-distilled-squad/resolve/main/tokenizer_config.json -o ./model/tokenizer_config.json

# Set the CMD to your handler
CMD ["app.lambda_handler"]
Change your working directory back to lambda-pytorch-example and copy the following content into the template.yaml file:
AWSTemplateFormatVersion: '2010-09-09'
Transform: AWS::Serverless-2016-10-31
Description: >
  python3.8

  Sample SAM Template for lambda-pytorch-example

Resources:
  pytorchEndpoint:
    Type: AWS::Serverless::Function
    Properties:
      PackageType: Image
      MemorySize: 5000
      Timeout: 300
      Events:
        ApiEndpoint:
          Type: HttpApi
          Properties:
            Path: /inference
            Method: post
            TimeoutInMillis: 29000
    Metadata:
      Dockerfile: Dockerfile
      DockerContext: ./hello_world
      DockerTag: python3.8-v1

Outputs:
  InferenceApi:
    Description: "API Gateway endpoint URL for Prod stage for inference function"
    Value: !Sub "https://${ServerlessHttpApi}.execute-api.${AWS::Region}.amazonaws.com/inference"
Now we need to create an Amazon ECR repository in AWS and register the local Docker to it. The repositoryUri is displayed in the output; save it for later.
# Create an ECR repository
aws ecr create-repository --repository-name lambda-pytorch-example --image-scanning-configuration scanOnPush=true --region <REGION>

# Register docker to ECR
aws ecr get-login-password --region <REGION> | docker login --username AWS --password-stdin <AWS_ACCOUNT_ID>.dkr.ecr.<REGION>.amazonaws.com
Deploying the application
The following steps deploy the application to your AWS account:
- Run
sam build && sam deploy –-guided. - For Stack Name, enter
pytorch-lambda-example. - Choose the same Region that you created the Amazon ECR repository in.
- Enter the image repository for the function (enter the earlier saved
repositoryUriof the Amazon ECR repository). - For Confirm changes before deploy and Allow SAM CLI IAM role creation, keep the defaults.
- For pytorchEndpoint may not have authorization defined, Is this okay?, select y.
- Keep the defaults for the remaining prompts.
AWS SAM uploads the container images to the Amazon ECR repository and deploys the application. During this process, you see a change set along with the status of the deployment. For a more detailed description about AWS SAM and container images for Lambda, see Using container image support for AWS Lambda with AWS SAM.
When the deployment is complete, the stack output is displayed. Use the InferenceApi endpoint to test your deployed application. The endpoint URL is displayed as an output during the deployment of the stack.
Overcoming a Lambda function cold start
Because the plain language model is already around 250 MB, the initial function run can take up to 25 seconds and may even exceed the maximum API timeout of 29 seconds. That time can also be reached when the function wasn’t called for some time and therefore is in a cold start mode. When the Lambda function is in a hot state, one inference run takes about 150 milliseconds.
There are multiple ways to mitigate the runtime of Lambda functions in a cold state. Lambda supports provisioned concurrency to keep the functions initialized. Another way is to create an Amazon CloudWatch event that periodically calls the function to keep it warm.
Make sure to change <API_GATEWAY_URL> to the URL of your API Gateway endpoint. In the following example code, the text is copied from the Wikipedia page on cars. You can change the question and context as you like and check the model’s answers.
curl --header "Content-Type: application/json" --request POST --data '{"question": "When was the car invented?","context": "Cars came into global use during the 20th century, and developed economies depend on them. The year 1886 is regarded as the birth year of the modern car when German inventor Karl Benz patented his Benz Patent-Motorwagen. Cars became widely available in the early 20th century. One of the first cars accessible to the masses was the 1908 Model T, an American car manufactured by the Ford Motor Company. Cars were rapidly adopted in the US, where they replaced animal-drawn carriages and carts, but took much longer to be accepted in Western Europe and other parts of the world."}' <API_GATEWAY_URL>The response shows the correct answer to the question:
{"Question": "When was the car invented?", "Answer": "1886"}Conclusion
Container image support for Lambda allows you to customize your function even more, opening up many new use cases for serverless ML. You can bring your custom models and deploy them on Lambda using up to 10 GB for the container image size. For smaller models that don’t need much computing power, you can perform online training and inference purely in Lambda. When the model size increases, cold start issues become more and more important and need to be mitigated. There is also no restriction on the framework or language with container images; other ML frameworks such as TensorFlow, Apache MXNet, XGBoost, or Scikit-learn can be used as well!
If you do require GPU for your inference, you can consider using containers services such as Amazon Elastic Container Service (Amazon ECS), Kubernetes, or deploy the model to an Amazon SageMaker endpoint
About the Author
 Jan Bauer is a Cloud Application Developer at AWS Professional Services. His interests are serverless computing, machine learning, and everything that involves cloud computing.
AWS scientist Li Zhang awarded IEEE INFOCOM test of time paper award
Zhang and co-authors are honored for paper that focused on improving the network scalability of cloud data centers through an optimized traffic-aware algorithm for placing virtual machines on host machines.Read More
3D Scene Understanding with TensorFlow 3D
Posted by Alireza Fathi, Research Scientist and Rui Huang, AI Resident, Google Research
The growing ubiquity of 3D sensors (e.g., Lidar, depth sensing cameras and radar) over the last few years has created a need for scene understanding technology that can process the data these devices capture. Such technology can enable machine learning (ML) systems that use these sensors, like autonomous cars and robots, to navigate and operate in the real world, and can create an improved augmented reality experience on mobile devices. The field of computer vision has recently begun making good progress in 3D scene understanding, including models for mobile 3D object detection, transparent object detection, and more, but entry to the field can be challenging due to the limited availability tools and resources that can be applied to 3D data.
In order to further improve 3D scene understanding and reduce barriers to entry for interested researchers, we are releasing TensorFlow 3D (TF 3D), a highly modular and efficient library that is designed to bring 3D deep learning capabilities into TensorFlow. TF 3D provides a set of popular operations, loss functions, data processing tools, models and metrics that enables the broader research community to develop, train and deploy state-of-the-art 3D scene understanding models.
TF 3D contains training and evaluation pipelines for state-of-the-art 3D semantic segmentation, 3D object detection and 3D instance segmentation, with support for distributed training. It also enables other potential applications like 3D object shape prediction, point cloud registration and point cloud densification. In addition, it offers a unified dataset specification and configuration for training and evaluation of the standard 3D scene understanding datasets. It currently supports the Waymo Open, ScanNet, and Rio datasets. However, users can freely convert other popular datasets, such as NuScenes and Kitti, into a similar format and use them in the pre-existing or custom created pipelines, and can leverage TF 3D for a wide variety of 3D deep learning research and applications, from quickly prototyping and trying new ideas to deploying a real-time inference system.
 |
| An example output of the 3D object detection model in TF 3D on a frame from Waymo Open Dataset is shown on the left. An example output of the 3D instance segmentation model on a scene from ScanNet dataset is shown on the right. |
Here, we will present the efficient and configurable sparse convolutional backbone that is provided in TF 3D, which is the key to achieving state-of-the-art results on various 3D scene understanding tasks. Furthermore, we will go over each of the three pipelines that TF 3D currently supports: 3D semantic segmentation, 3D object detection and 3D instance segmentation.
3D Sparse Convolutional Network
The 3D data captured by sensors often consists of a scene that contains a set of objects of interest (e.g. cars, pedestrians, etc.) surrounded mostly by open space, which is of limited (or no) interest. As such, 3D data is inherently sparse. In such an environment, standard implementation of convolutions would be computationally intensive and consume a large amount of memory. So, in TF 3D we use submanifold sparse convolution and pooling operations, which are designed to process 3D sparse data more efficiently. Sparse convolutional models are core to the state-of-the-art methods applied in most outdoor self-driving (e.g. Waymo, NuScenes) and indoor benchmarks (e.g. ScanNet).
We also use various CUDA techniques to speed up the computation (e.g., hashing, partitioning / caching the filter in shared memory, and using bit operations). Experiments on the Waymo Open dataset shows that this implementation is around 20x faster than a well-designed implementation with pre-existing TensorFlow operations.
TF 3D then uses the 3D submanifold sparse U-Net architecture to extract a feature for each voxel. The U-Net architecture has proven to be effective by letting the network extract both coarse and fine features and combining them to make the predictions. The U-Net network consists of three modules, an encoder, a bottleneck, and a decoder, each of which consists of a number of sparse convolution blocks with possible pooling or un-pooling operations.
 |
| A 3D sparse voxel U-Net architecture. Note that a horizontal arrow takes in the voxel features and applies a submanifold sparse convolution to it. An arrow that is moving down performs a submanifold sparse pooling. An arrow that is moving up will gather back the pooled features, concatenate them with the features coming from the horizontal arrow, and perform a submanifold sparse convolution on the concatenated features. |
The sparse convolutional network described above is the backbone for the 3D scene understanding pipelines that are offered in TF 3D. Each of the models described below uses this backbone network to extract features for the sparse voxels, and then adds one or multiple additional prediction heads to infer the task of interest. The user can configure the U-Net network by changing the number of encoder / decoder layers and the number of convolutions in each layer, and by modifying the convolution filter sizes, which enables a wide range of speed / accuracy tradeoffs to be explored through the different backbone configurations
3D Semantic Segmentation
The 3D semantic segmentation model has only one output head for predicting the per-voxel semantic scores, which are mapped back to points to predict a semantic label per point.
 |
| 3D semantic segmentation of an indoor scene from ScanNet dataset. |
3D Instance Segmentation
In 3D instance segmentation, in addition to predicting semantics, the goal is to group the voxels that belong to the same object together. The 3D instance segmentation algorithm used in TF 3D is based on our previous work on 2D image segmentation using deep metric learning. The model predicts a per-voxel instance embedding vector as well as a semantic score for each voxel. The instance embedding vectors map the voxels to an embedding space where voxels that correspond to the same object instance are close together, while those that correspond to different objects are far apart. In this case, the input is a point cloud instead of an image, and it uses a 3D sparse network instead of a 2D image network. At inference time, a greedy algorithm picks one instance seed at a time, and uses the distance between the voxel embeddings to group them into segments.
3D Object Detection
The 3D object detection model predicts per-voxel size, center, and rotation matrices and the object semantic scores. At inference time, a box proposal mechanism is used to reduce the hundreds of thousands of per-voxel box predictions into a few accurate box proposals, and then at training time, box prediction and classification losses are applied to per-voxel predictions. We apply a Huber loss on the distance between predicted and the ground-truth box corners. Since the function that estimates the box corners from its size, center and rotation matrix is differentiable, the loss will automatically propagate back to those predicted object properties. We use a dynamic box classification loss that classifies a box that strongly overlaps with the ground-truth as positive and classifies the non-overlapping boxes as negative.
 |
| Our 3D object detection results on ScanNet dataset. |
In our recent paper, “DOPS: Learning to Detect 3D Objects and Predict their 3D Shapes”, we describe in detail the single-stage weakly supervised learning algorithm used for object detection in TF 3D. In addition, in a follow up work, we extended the 3D object detection model to leverage temporal information by proposing a sparse LSTM-based multi-frame model. We go on to show that this temporal model outperforms the frame-by-frame approach by 7.5% in the Waymo Open dataset.
 |
| The 3D object detection and shape prediction model introduced in the DOPS paper. A 3D sparse U-Net is used to extract a feature vector for each voxel. The object detection module uses these features to propose 3D boxes and semantic scores. At the same time, the other branch of the network predicts a shape embedding that is used to output a mesh for each object. |
Ready to Get Started?
We’ve certainly found this codebase to be useful for our 3D computer vision projects, and we hope that you will as well. Contributions to the codebase are welcome and please stay tuned for our own further updates to the framework. To get started please visit our github repository.
Acknowledgements
The release of the TensorFlow 3D codebase and model has been the result of widespread collaboration among Google researchers with feedback and testing from product groups. In particular we want to highlight the core contributions by Alireza Fathi and Rui Huang (work performed while at Google), with special additional thanks to Guangda Lai, Abhijit Kundu, Pei Sun, Thomas Funkhouser, David Ross, Caroline Pantofaru, Johanna Wald, Angela Dai and Matthias Niessner.

Uncovering Unknown Unknowns in Machine Learning
Posted by Lora Aroyo and Praveen Paritosh, Research Scientists, Google Research
The performance of machine learning (ML) models depends both on the learning algorithms, as well as the data used for training and evaluation. The role of the algorithms is well studied and the focus of a multitude of challenges, such as SQuAD, GLUE, ImageNet, and many others. In addition, there have been efforts to also improve the data, including a series of workshops addressing issues for ML evaluation. In contrast, research and challenges that focus on the data used for evaluation of ML models are not commonplace. Furthermore, many evaluation datasets contain items that are easy to evaluate, e.g., photos with a subject that is easy to identify, and thus they miss the natural ambiguity of real world context. The absence of ambiguous real-world examples in evaluation undermines the ability to reliably test machine learning performance, which makes ML models prone to develop “weak spots”, i.e., classes of examples that are difficult or impossible for a model to accurately evaluate, because that class of examples is missing from the evaluation set.
To address the problem of identifying these weaknesses in ML models, we recently launched the Crowdsourcing Adverse Test Sets for Machine Learning (CATS4ML) Data Challenge at HCOMP 2020 (open until 30 April, 2021 to researchers and developers worldwide). The goal of the challenge is to raise the bar in ML evaluation sets and to find as many examples as possible that are confusing or otherwise problematic for algorithms to process. CATS4ML relies on people’s abilities and intuition to spot new data examples about which machine learning is confident, but actually misclassifies.
What are ML “Weak Spots”?
There are two categories of weak spots: known unknowns and unknown unknowns. Known unknowns are examples for which a model is unsure about the correct classification. The research community continues to study this in a field known as active learning, and has found the solution to be, in very general terms, to interactively solicit new labels from people on uncertain examples. For example, if a model is not certain whether or not the subject of a photo is a cat, a person is asked to verify; but if the system is certain, a person is not asked. While there is room for improvement in this area, what is comforting is that the confidence of the model is correlated with its performance, i.e., one can see what the model doesn’t know.
Unknown unknowns, on the other hand, are examples where a model is confident about its answer, but is actually wrong. Efforts to proactively discover unknown unknowns (e.g., Attenberg 2015 and Crawford 2019) have helped uncover a multitude of unintended machine behaviours. In contrast to such approaches for the discovery of unknown unknowns, generative adversarial networks (GANs) generate unknown unknowns for image recognition models in the form of optical illusions for computers that cause deep learning models to make mistakes beyond human perception. While GANs uncover model exploits in the event of an intentional manipulation, real-world examples can better highlight a model’s failures in its day-to-day performance. These real-world examples are the unknown unknowns of interest to CATS4ML — the challenge aims to gather unmanipulated examples that humans can reliably interpret but on which many ML models would confidently disagree.
 |
| Example illustrating how optical illusions for computers caused by adversarial noise help discover machine manipulated unknown unknowns for ML models (based on Brown 2018). |
First Edition of CATS4ML Data Challenge: Open Images Dataset
The CATS4ML Data Challenge focuses on visual recognition, using images and labels from the Open Images Dataset. The target images for the challenge are selected from the Open Images Dataset along with a set of 24 target labels from the same dataset. The challenge participants are invited to invent new and creative ways to explore this existing publicly available dataset and, focussed on a list of pre-selected target labels, discover examples of unknown unknowns for ML models.
 |
| Examples from the Open Images Dataset as possible unknown unknowns for ML models. |
CATS4ML is a complementary effort to FAIR’s recently introduced DynaBench research platform for dynamic data collection. Where DynaBench tackles issues with static benchmarks using ML models with humans in the loop, CATS4ML focuses on improving evaluation datasets for ML by encouraging the exploration of existing ML benchmarks for adverse examples that can be unknown unknowns. The results will help detect and avoid future errors, and also will give insights to model explainability.
In this way, CATS4ML aims to raise greater awareness of the problem by providing dataset resources that developers can use to uncover the weak spots of their algorithms. This will also inform researchers on how to create benchmark datasets for machine learning that are more balanced, diverse and socially aware.
Get Involved
We invite the global community of ML researchers and practitioners to join us in the effort of discovering interesting, difficult examples from the Open Images Dataset. Register on the challenge website, download the target images and labeled data, contribute the images you discover and join the competition for the winning participant!
To score points in this competition, participants should submit a set of image-label pairs that will be confirmed by human-in-the-loop raters, whose votes should be in disagreement with the average machine score for the label over a number of machine learning models.
 |
| An example of how a submitted image can score points. The same image can score as a false positive (Left) and as a false negative (Right) with two different labels. In both cases the human verification is in disagreement with the machine score. Participants score on submitted image-label pairs, which means that one and the same image can be an example of an ML unknown unknown for different labels. |
The challenge is open until 30 April, 2021 to researchers and developers worldwide. To learn more about CATS4ML and how to join, please review these slides and visit the challenge website.
Acknowledgements
The release of the CATS4ML Data Challenge has been possible thanks to the hard work of a lot of people including, but not limited to, the following (in alphabetical order of last name): Osman Aka, Ken Burke, Tulsee Doshi, Mig Gerard, Victor Gomes, Shahab Kamali, Igor Karpov, Devi Krishna, Daphne Luong, Carey Radebaugh, Jamie Taylor, Nithum Thain, Kenny Wibowo, Ka Wong, and Tong Zhou.
Facebook’s UX research internship demystified
The post Facebook’s UX research internship demystified appeared first on Facebook Research.
A Capital Calculator: Upstart Credits AI with Advancing Loans
With two early hits and the promise of more to come, it feels like a whole new ballgame in lending for Grant Schneider.
The AI models he helped create as vice president of machine learning for Upstart are approving more personal loans at lower interest rates than the rules traditional banks use to gauge credit worthiness.
What’s more, he’s helping the Silicon Valley startup, now one of the newest public companies in the U.S., pioneer a successful new hub of AI development in Columbus, Ohio.
A Mentor in the Midwest
Schneider’s career has ridden an AI rocket courtesy of two simple twists of fate.
“In the 2009 downturn, I was about to graduate from Ohio State in finance and there were no finance jobs, but a mentor convinced me to take some classes in statistics,” he said.
He wound up getting a minor, a master’s and then a Ph.D. in the field in 2014, just as machine learning was emerging as the hottest thing in computing.
“Then I read about Upstart in a random news article, sent them a cold email and got a response — I was blown away by the team,” he said.
A Breakthrough with Big Data
Schneider signed on as a data scientist, experimenting with ways to process online loan requests from the company’s website. He trained AI models on publicly available datasets while the startup slowly curated its own private trove of data.
The breakthrough came with the first experiment training a model on Upstart’s own data. “Overnight our approval rates nearly doubled … and over time it became clear we were actually moving the needle in improving access to credit,” he said.
As the business grew, Upstart gathered more data. That data helped make models more accurate so it could extend credit to more borrowers at lower rates. And that attracted more business.
Riding the Virtuous Cycle of AI
The startup found itself on a flywheel it calls the virtuous cycle of AI.
“One of the coolest parts of working on AI models is they directly drive the interest rates we can offer, so as we get better at modeling we extend access to credit — that’s a powerful motivator for the team,” he said.
Borrowers like it, too. More than 620,000 of them were approved by Upstart’s models to get a total $7.8 billion in personal loans so far, about 27 percent more than would’ve been approved by traditional credit models, at interest rates 16 percent below average, according to a study from the U.S. Consumer Financial Protection Bureau.
The figures span all demographic groups, regardless of age, race or ethnicity. “Our AI models are getting closer to the truth of credit worthiness than traditional methods, and that means there should be less bias,” Schneider said.
Betting on the Buckeyes
As it grew, the Silicon Valley company sought a second location where it could expand its R&D team. A study showed the home of Schneider’s alma mater could be a good source of tech talent, so the Ohio State grad boomeranged back to the Midwest.
Columbus exceeded expectations even for a bullish Schneider. What was going to be a 140-person office in a few years has already hit nearly 250 people primarily in AI, software engineering and operations with plans to double to 500 soon.
“Having seen the company when it was 20 people in a room below a dentist’s office, that’s quite a change,” Schneider said.
GPUs Slash Test Time
Upstart has experience with nearly a dozen AI modeling techniques and nearly as many use cases. These days neural networks and gradient-boosted trees are driving most of the gains.
The models track as many as 1,600 variables across data from millions of transactions. So Upstart can use billions of data points to test competing models.
“At one point, these comparisons took more than a day to run on a CPU, but our research found we could cut that down by a factor of five by porting the work to GPUs,” Schneider said.
These days, Upstart trains and evaluates new machine-learning models in a few hours instead of days.
The Power of Two
Looking ahead, the company’s researchers are experimenting with NVIDIA RAPIDS, libraries that quickly move data science jobs to GPUs.
Schneider gives a glowing report of the “customer support on steroids” his team gets from solution architects at NVIDIA.
“It’s so nice for our research team to have experts helping us solve our problems. Having a proactive partner who understands the technology’s inner workings frees us up to focus on interesting business problems and turn around model improvements that affect our end users,” he said.
Early Innings for AI Banking
As a startup, the company built and tested models on GPU-powered laptops. These days it uses the cloud to handle its scaled up AI work, but Schneider sees the potential for another boomerang in the future with some work hosted on the company’s own systems.
Despite its successful IPO in December, it’s still early innings for Upstart. For example, the company started offering auto loans in September.
Going public amid a global pandemic “was a very surreal and exciting experience and a nice milestone validating years of work we’ve put in, but were still early in this company’s lifecycle and the most exciting things are still ahead of us,” he said. “We’re still far from perfectly predicting the future but that’s what we’re aiming at,” he added.
Visit NVIDIA’s financial services industry page to learn more.
The post A Capital Calculator: Upstart Credits AI with Advancing Loans appeared first on The Official NVIDIA Blog.
Fetching AI Data: Researchers Get Leg Up on Teaching Dogs New Tricks with NVIDIA Jetson
AI is going to the dogs. Literally.
Colorado State University researchers Jason Stock and Tom Cavey have published a paper on an AI system to recognize and reward dogs for responding to commands.
The graduate students in computer science trained image classification networks to determine whether a dog is sitting, standing or lying. If a dog responds to a command by adopting the correct posture, the machine dispenses it a treat.
The duo relied on the NVIDIA Jetson edge AI platform for real-time trick recognition and treats.
Stock and Cavey see their prototype system as a dog trainer’s aid — it handles the treats — or a way to school dogs on better behavior at home.
“We’ve demonstrated the potential for a future product to come out of this,” Stock said
Fetching Dog Training Data
The researchers needed to fetch dog images that exhibited the three postures. They found the Stanford Dogs datasets had more than 20,000 at many positions and image sizes, requiring preprocessing. They wrote a program to help quickly label them.
To refine the model, they applied features of dogs from ImageNet to enable transfer learning. Next, they applied post-training and optimization techniques to boost the speed and reduce model size.
For optimizations, they tapped into NVIDIA’s Jetpack SDK on Jetson, offering an easy way to get it up and running quickly and to access the TensorRT and cuDNN libraries, Stock said. NVIDIA TensorRT optimization libraries offered “significant improvements in speed,” he added.
Tapping into the university’s computing system, Stock trained the model overnight on two 24GB NVIDIA RTX 6000 GPUs.
“The RTX GPU is a beast — with 24GB of VRAM, the entire dataset can be loaded into memory,” he said. “That makes the entire process way faster.”
Deployed Models on Henry
The researchers tested their models on Henry, Cavey’s Australian Shepherd.
They achieved model accuracy in tests of up to 92 percent and an ability to make split-second inference at nearly 40 frames per second.
Powered by the NVIDIA Jetson Nano, the system makes real-time decisions on dog behaviors and reinforces positive actions with a treat, transmitting a signal to a servo motor to release a reward.
“We looked at Raspberry Pi and Coral but neither was adequate, and the choice was obvious for us to use Jetson Nano,” said Cavey.
Biting into Explainable AI
Explainable AI helps provide transparency about the makeup of neural networks. It’s becoming more common in the financial services industry to understand fintech models. Stock and Cavey included model interpretation in their paper to provide explainable AI for the pet industry.
They do this with images of the videos that show the posture analysis. One set of images relies on GradCAM — a common technique to display where a convolutional neural network model is focused. Another set of images explains the model by tapping into Integrated Gradients, which helps analyze pixels.
The researchers said it was important to create a trustworthy and ethical component of the AI system for trainers and general users. Otherwise, there’s no way to explain your methodology should it come into question.
“We can explain what our model is doing, and that might be helpful to certain stakeholders — otherwise how can you back up what your model is really learning?” said Cavey.
The NVIDIA Deep Learning Institute offers courses in computer vision and the Jetson Nano.
The post Fetching AI Data: Researchers Get Leg Up on Teaching Dogs New Tricks with NVIDIA Jetson appeared first on The Official NVIDIA Blog.
GFN Thursday Shines Ray-Traced Spotlight on Sweet Six-Pack of RTX Games
If Wednesday is hump day, GFN Thursday is the new official beginning of the weekend. We have a great lineup of games streaming from the cloud this week, with more details on that below.
This GFN Thursday also spotlights some of the games using NVIDIA RTX tech, including a sweet six-pack that you’ll want to check out (okay, you’ve probably already played Cyberpunk 2077, but you get the idea).
What Is RTX?
NVIDIA RTX GPUs introduced real-time ray tracing and AI to PC gaming.
Ray tracing provides realistic lighting by simulating the physical behavior of light, adding cinematic-quality rendering to scenes in a game. Normally these effects are computationally expensive, but RTX GPUs’ dedicated hardware allows for ray-tracing acceleration in real time.

Real-time ray tracing is only one benefit, though. NVIDIA DLSS provides GeForce NOW the performance headroom to maximize visual settings, while maintaining smooth frame rates, and stream those benefits to members.
RTX On Any Device
When a game joins GeForce NOW with RTX support, Founders members can play with cinematic, real-time ray tracing and NVIDIA DLSS support — even on devices that don’t have an RTX-capable GPU. That means adding RTX ON on your Macbook Air. Love your Chromebook and Android phone but wish they could play the latest games? Thanks to the cloud, they can.
Last week, we announced that the Outriders demo would launch on GeForce NOW later this month. Paired with last month’s announcement of a technical partnership, it means PC gamers, GeForce RTX users and GFN members will get the best possible experience.

The GeForce NOW library already supports some of the best examples of RTX ON available in gaming. Here are six amazing games that you can play in unprecedented graphical glory across all of your devices, right now:
- A landmark PC game, Cyberpunk 2077 presents the vibrant future metropolis of Night City with the power of RTX. Tech inside: ray-traced reflections, ambient occlusion, shadows, diffuse illumination, global illumination and DLSS.
- Control, a former Game of the Year winner, is another landmark title for ray tracing. Explore other dimensions within the mysterious “Oldest House” with RTX. Tech inside: ray-traced reflections, contact shadows, indirect diffuse lighting and DLSS.
- The blockbuster title Watch Dogs: Legion with GeForce RTX showcases near-future London in all of its glory. Tech inside: ray-traced reflections and DLSS.
- A multiple Game of the Year nominee, Metro Exodus immerses gamers in a stark and frightening post-apocalyptic world, brought to life in stunning realism. Tech inside: ray-traced ambient occlusion, diffuse global illumination, emissive lighting and DLSS.
- For binge players of the six Tomb Raider games on GeForce NOW, keep an eye out for the incredible RTX visuals in Shadow of the Tomb Raider Definitive Edition. Relive Lara Croft’s defining moment as she becomes the Tomb Raider with game-changing RTX technologies. Tech inside: ray-traced shadows and DLSS.
- Ray tracing has landed in Deliver Us The Moon. Explore the future of space and PC graphics in an unforgettably immersive experience with GeForce RTX. Tech inside: ray-traced shadows, reflections and DLSS.
These RTX ON favorites deserve to be played if they’re sitting in your backlog, and GeForce NOW Founders members can play them with real-time ray tracing across any of their supported devices.
And with GeForce NOW, there’s always more.
Our friends at Cloud Gaming Xtreme take a look at even more of the RTX-enabled games on GeForce NOW.
Let’s Play Today
No GFN Thursday is complete without new additions to the GeForce NOW Library. Here are a few highlights, and check out the full list below.
Everspace (Steam)
Everspace combines fast-paced combat with roguelike elements, great visuals and a captivating story. It takes gamers on a challenging journey through an ever-changing, beautifully crafted universe full of surprises. Shoot, craft and loot your way to victory while the odds are stacked against you.
Legend of Heroes In The Sky: Trials of Cold Steel III (Steam)
Experience an epic story developed across three titles, and crafted for new and old fans alike. Also includes an interactive introduction to catch up new players to the ongoing story so anyone can dive right in to the world of Trails of Cold Steel.
South Park: The Fractured But Whole (Steam)
Spend your staycation exploring South Park with Cartman, Kyle, Kenny and Stan by playing through South Park: The Stick of Truth and the newly added sequel, South Park: The Fractured But Whole. From the creators of South Park, Trey Parker and Matt Stone, both games are routinely found their way onto RPG of the Year lists.
In addition, members can look for the following:


- CRSED: F.O.A.D. (Epic Games Store)
- Danganronpa Another Episode: Ultra Despair Girls (Steam)
- Farm Manager 2018 (Steam)
- Farmer’s Dynasty (Steam)
- Fate Seeker (Steam)
- Lara Croft and the Temple of Osiris (Steam)
- Metro: Last Light Redux (Epic Games Store)
- Stay Out (Steam)
- Thea 2: The Shattering (Steam)
What are you planning to play this weekend? Let us know on Twitter or in the comments below.
The post GFN Thursday Shines Ray-Traced Spotlight on Sweet Six-Pack of RTX Games appeared first on The Official NVIDIA Blog.
Building secure machine learning environments with Amazon SageMaker
As businesses and IT leaders look to accelerate the adoption of machine learning (ML) and artificial intelligence (AI), there is a growing need to understand how to build secure and compliant ML environments that meet enterprise requirements. One major challenge you may face is integrating ML workflows into existing IT and business work streams. A second challenge is bringing together stakeholders from business leadership, data science, engineering, risk and compliance, and cybersecurity to define the requirements and guardrails for the organization. Third, because building secure ML environments in the cloud is a relatively new topic, understanding recommended practices is also helpful.
In this post, we introduce a series of hands-on workshops and associated code artifacts to help you build secure ML environments on top of Amazon SageMaker, a fully managed service that provides every developer and data scientist with the ability to build, train, and deploy ML models quickly. The objective of these workshops is to address the aforementioned challenges by helping bring together different IT stakeholders and data scientists and provide best practices to build and operate secure ML environments. These workshops are a summary of recommended practices from large enterprises and small and medium businesses. You can access these workshops on Building Secure Environments, and you can find the associated code on GitHub. We believe that these workshops are valuable for the following primary teams:
- Cloud engineering – This team is responsible for creating and maintaining a set of enterprise-wide guardrails for operating in the cloud. Key requirements for these teams include isolation from public internet, restriction of data traffic flows, use of strict AWS Identity and Access Management (IAM) controls to allow only authorized and authenticated users the ability to access project resources, and the use of defense-in-depth methodologies to detect and mitigate potential threats. This team can use tools like AWS Service Catalog to build repeatable patterns using infrastructure as code (IaC) practices via AWS CloudFormation.
- ML platform: This team is responsible for building and maintaining the infrastructure for supporting ML services, such as provisioning notebooks for data scientists to use, creating secure buckets for storing data, managing costs for ML from various lines of business (LOBs), and more.
- Data science COE: Data scientists within an AI Center of Excellence (COE) or embedded within the LOBs are responsible for building, training, and deploying models. In regulated industries, data scientists need to adhere to the organization’s security boundaries, such as using encrypted buckets for data access, use of private networking for accessing APIs, committing code to source control, ensuring all their experiments and trials are properly logged, enforcing encryption of data in transit, and monitoring deployed models.
The following diagram is the architecture for the secure environment developed in this workshop.

In the Building Secure Environments workshop aimed at the cloud engineering and ML platform teams, we cover how this architecture can be set up in Labs 1–2. Specifically, we use AWS Service Catalog to provision a Shared Services Amazon Virtual Private Cloud (Amazon VPC), which hosts a private PyPI package repository to pull packages from an Amazon Simple Storage Service (Amazon S3) bucket via a secure VPC endpoint.
After the environment is provisioned, the following architecture diagram illustrates the typical data scientist workflow within the project VPC, which is covered in detail in the workshop Using Secure Environments aimed at data scientists.

This workshop quickly sets up the secure environment (Steps 1–3) and then focuses on using SageMaker notebook instances to securely explore and process data (Steps 4–5). Following that, we train a model (Steps 6–7) and deploy and monitor the model and model metadata (8–9) while enforcing version control (Step 4).
The workshops and associated code let you implement recommended practices and patterns and help you to quickly get started building secure environments, and improve productivity with the ability to securely build, train, deploy and monitor ML models. Although the workshop is built using SageMaker notebook instances, in this post we highlight how you can adapt this to Amazon SageMaker Studio. Although the workshop is built using SageMaker notebook instances, in this post we highlight how you can adapt this to Amazon SageMaker Studio, the first integrated development environment for machine learning on AWS.
Workshop features
The workshop is a collection of feature implementations grouped together to provide a coherent starting point for customers looking to build secure data science environments. The features implemented are broadly categorized across seven areas:
- Enforce your existing IT policies in your AWS account and data science environment to mitigate risks
- Create environments with least privilege access to sensitive data in the interest of reducing the blast radius of a compromised or malicious actor
- Protect sensitive data against data exfiltration using a number of controls designed to mitigate the data exfiltration risk
- Encrypt sensitive data and intellectual property at rest and in transit as part of a defense-in-depth strategy
- Audit and trace activity in your environment
- Reproduce results in your environment by tracking the lineage of ML artifacts throughout the lifecycle and using source and version control tools such as AWS CodeCommit
- Manage costs and allow teams to self service using a combination of tagging and the AWS Service Catalog to automate building secure environments
In the following sections, we cover in more depth how these different features have been implemented.
Enforcing existing IT policies
When entrusting sensitive data to AWS services, you need confidence that you can govern your data to the same degree with the managed service as if you were running the service yourself. A typical starting point to govern your data in an AWS environment is to create a VPC that is tailored and configured to your standards in terms of information security, firewall rules, and routing. This becomes a starting point for your data science environment and the services that projects use to deliver on their objectives. SageMaker, and many other AWS services, can be deployed into your VPC. This allows you to use network-level controls to manage the Amazon Elastic Compute Cloud (Amazon EC2)-based resources that reside within the network. To learn about how to set up SageMaker Studio in a private VPC, see Securing Amazon SageMaker Studio connectivity using a private VPC.
The network-level controls deployed as a part of this workshop include the following:
- Security groups to manage which resources and services, such as SageMaker, can communicate with other resources in the VPC
- VPC endpoints to grant explicit access to specific AWS services from within the VPC, like Amazon S3 or Amazon CloudWatch
- VPC endpoints to grant explicit access to customer-managed shared services such as a PyPi repository server
The shared service PyPi repository demonstrates how you can create managed artifact repositories that can then be shared across project environments. Because the environments don’t have access to the open internet, access to common package and library repositories is restricted to your repositories that hold your packages. This limits any potential threats from unapproved packages entering your secure environment.
With the launch of AWS CodeArtifact, you can now use CodeArtifact as your private PyPi repository. CodeArtifact provides VPC endpoints to maintain private networking. To learn more about how to integrate CodeArtifact with SageMaker notebook instances and Studio notebooks, see Private package installation in Amazon SageMaker running in internet-free mode.
In addition to configuring a secure network environment, this workshop also uses IAM policies to create a preventive control that requires that all SageMaker resources be provisioned within a customer VPC. An AWS Lambda function is also deployed as a corrective control to stop any SageMaker resources that are provisioned without a VPC attachment.
One of the unique elements of SageMaker notebooks is that they are managed EC2 instances in which you can tailor the operating system. This workshop uses SageMaker lifecycle configuration policies to configure the Linux operating system of the SageMaker notebook to be inline with IT policy, such as disabling root access for data scientists. For SageMaker Studio, you can enforce your IT policies of using security approved containers and packages for running notebooks by bringing your own custom image. SageMaker handles versioning of the images, and provides data scientists with a user-friendly drop-down to select the custom image of their choice.
Labs 1–3 in the Building Secure Environments and Labs 1–2 in the Using Secure Environments workshops focus on how you can enforce IT policies on your ML environments.
Least privilege access to sensitive data
In the interest of least privileged access to sensitive data, it’s simpler to provide isolated environments to any individual project. These isolated environments provide a method of restricting access to customer-managed assets, datasets, and AWS services on a project-by-project basis, with a lower risk of cross-project data movement. The following discusses some of the key mechanisms used in the workshops to provide isolated, project-specific environments. The workshop hosts multiple projects in a single AWS account, but given sufficient maturity of automation, you could provide the same level of isolation using project-specific AWS accounts. Although you can have multiple SageMaker notebook instances within a single account, you can only have one Studio domain per Region in an account. You can therefore use a domain to create isolated project-specific environments in separate accounts.
To host multiple projects in a single AWS account, the workshop dedicates a private, single-tenant VPC to each project. This creates a project-specific network boundary that grants access to specific AWS resources and services using VPC endpoints and endpoint policies. This combination creates logically isolated single-tenant project environments that are dedicated to a project team.
In addition to a dedicated network environment, the workshop creates AWS resources that are dedicated to individual projects. S3 buckets, for instance, are created per project and bound to the VPC for the project. An S3 bucket policy restricts the objects in the bucket to only be accessed from within the VPC. Equally, the endpoint policy associated with the Amazon S3 VPC endpoint within the VPC only allows principals in the VPC to communicate with those specific S3 buckets. This could be expanded as needed in order to support accessing other buckets, perhaps in conjunction with an Amazon S3-based data lake.
Other AWS resources that are created on behalf of an individual project include IAM roles that govern who can access the project environment and what permissions they have within the environment. This prevents other project teams from accessing resources in the AWS account that aren’t dedicated to that other project.
To manage intellectual property developed by the project, a CodeCommit repository is created to provide the project with a dedicated Git repository to manage and version control their source code. We use CodeCommit to commit any code developed in notebooks by data scientists in Labs 3–4 in the Using Secure Environments workshop.
Protecting against data exfiltration
As described earlier, project teams have access to AWS services and resources like Amazon S3 and objects in Amazon S3 through the VPC endpoints in the project’s VPC. The isolated VPC environment gives you full control over the ingress and egress of data flowing across the network boundary. The workshop uses security groups to govern which AWS resources can communicate with specific AWS services. The workshop also uses VPC endpoint policies to limit the AWS resources that can be accessed using the VPC endpoints.
When data is in Amazon S3, the bucket policy applied to the bucket doesn’t allow resources from outside the VPC to read data from the bucket, ensuring that it’s bound, as a backing store, to the VPC.
Data protection
The application of ML technologies is often done using sensitive customer data. This data may contain commercially sensitive, personal identifiable, or proprietary information that must be protected over the data’s lifetime. SageMaker and associated services such as Amazon Elastic Container Registry (Amazon ECR), Amazon S3, and CodeCommit all support end-to-end encryption both at rest and in transit.
Encryption at rest
SageMaker prefers to source information from Amazon S3, which supports multiple methods of encrypting data. For the purposes of this workshop, the S3 buckets are configured to automatically encrypt objects with a specified customer master key (CMK) that is stored in AWS Key Management Service (AWS KMS). A preventive control is also configured to require that data put into Amazon S3 is encrypted using a KMS key. These two mechanisms ensure that data stored in Amazon S3 is encrypted using a key that is managed and controlled by the customer.
Similar to Amazon S3, Amazon ECR is also used to store customer-built Docker containers that are likely to contain intellectual property. Amazon ECR supports the encryption of images at rest using a CMK. This enables you to support PCI-DSS compliance requirements for separate authentication of the storage and cryptography. With this feature enabled, Amazon ECR automatically encrypts images when pushed, and decrypts them when pulled.
As data is moving into SageMaker-managed resources from Amazon S3, it’s important to ensure that the encryption at rest of the data persists. SageMaker supports this by allowing the specification of KMS CMKs for encrypting the EBS volumes that hold the data retrieved from Amazon S3. Encryption keys can be specified to encrypt the volumes of all Amazon EC2-based SageMaker resources, such as processing jobs, notebooks, training jobs, and model endpoints. A preventive control is deployed in this workshop, which allows the provisioning of SageMaker resources only if a KMS key has been specified to encrypt the volumes.
Encryption in transit
AWS makes extensive use of HTTPS communication for its APIs. The services mentioned earlier are no exception. In addition to passing all API calls through a TLS encrypted channel, AWS APIs also require that requests are signed using the Signature version 4 signing process. This process uses client access keys to sign every API request, adding authentication information as well as preventing tampering of the request in flight.
As services like SageMaker, Amazon S3, and Amazon ECR interact with one another, they must also communicate using Signature V4 signed packets over encrypted HTTPS channels. This ensures that communication between AWS services is encrypted to a known standard, protecting customer data as it moves between services.
When communicating with SageMaker resources such as notebooks or hosted models, the communication is also performed over authenticated and signed HTTPS requests as with other AWS services.
Intra-node encryption
SageMaker provides added benefit to secure your data when training using distributed clusters. Some ML frameworks when performing distributed training pass coefficients between the different instances of the algorithm in plain text. This shared state is not your training data, but is the information that the algorithms require to stay synchronized with one another. You can instruct SageMaker to automatically encrypt inter-node communication for your training job. The data passed between nodes is then passed over an encrypted tunnel without your algorithm having to take on responsibility for encrypting and decrypting the data. To enable inter-node encryption, ensure that your security groups are configured to permit UDP traffic over port 500 and that you have set EnableInterContainerTrafficEncryption to True. For more detailed instructions, see Protect Communications Between ML Compute Instances in a Distributed Training Job.
Ensuring encryption at rest and in transit during the ML workflow is covered in detail in Labs 3–4 of the Using Secure Environments workshop.
Traceability, reproducibility, and auditability
A common pain point that you may face is a lack of recommended practices around code and ML lifecycle traceability. Often, this can arise from data scientists not being trained in MLOps (ML and DevOps) best practices, and the inherent experimental nature of the ML process. In regulated industries such as financial services, regulatory bodies such as the Office of the Comptroller of the Currency (OCC) and Federal Reserve Board (FRB) have documented guidelines on managing the risk of analytical models.
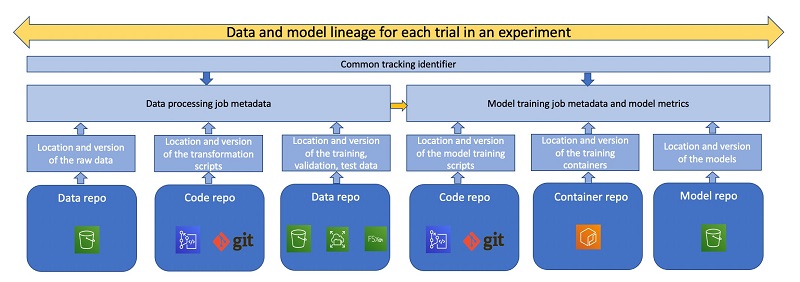
Lack of best practices around documenting the end-to-end ML lifecycle can lead to lost cycles in trying to trace the source code, model hyperparameters, and training data. The following figure shows the different steps in the lineage of a model that may be tracked for traceability and reproducibility reasons.
Traceability refers to the ability to map outputs from one step in the ML cycle to the inputs of another, thereby having a record of the entire lineage of a model. Enforcing data scientists to use source and version control tools such as Git or BitBucket to regularly check in code, and not approve or promote models until code has been checked in, can help mitigate this issue. In this workshop, we provision a private CodeCommit repository for use by data scientists, along with their notebook instance. Admins can tag these repositories to the users, to identify the users responsible for the commits, and ensure code is being frequently checked into source control. One way to do this is to use project-specific branches, and ensure that the branch has been merged with the primary branch in the shared services environment prior to being promoted to pre-production or test. Data scientists should not be allowed to directly promote code from dev to production without this intermediate step.
In addition to versioning code, versioning data used for training models is important as well. All the buckets created in this workshop have versioning automatically enabled to enforce version control on any data stored there, such as training data, processed data, and training, validation and test data. SageMaker Experiments automatically keeps track of the pointer to the specific version of the training data used during model training.
Data scientists often tend to explore data in notebooks, and use notebooks to engineer features as well. In this workshop, we demonstrate how to use SageMaker Processing to not only offload the feature engineering code from the notebook instance onto separate compute instances to run at scale, but also to subsequently track parameters used for engineering features in SageMaker Experiments for reproducibility reasons. SageMaker recently launched SageMaker Clarify, which allows you to detect bias in your data as well as extract feature importances. You can run these jobs as you would run SageMaker Processing jobs using the Clarify SDK.
Versioning and tagging experiments, hyperparameter tuning jobs, and data processing jobs allow data scientists to collaborate faster. SageMaker Experiments automatically tracks and logs metadata from SageMaker training, processing, and batch transform jobs, and surfaces relevant information such as model hyperparameters, model artifact location, model container metadata in a searchable way. For more information, see Amazon SageMaker Experiments – Organize, Track And Compare Your Machine Learning Trainings.
Additionally, it keeps track of model metrics that allow data scientists to compare different trained models and identify the ones that meet their business objectives. You can also use SageMaker Experiments to track which user launched a training job and use IAM condition keys to enforce resource tags on the Experiment APIs.
Additionally, in SageMaker Studio, SageMaker Experiments tracks the user profile of the user launching jobs, providing additional auditability. We demonstrate the use of SageMaker Experiments and how you can use Experiments to search for specific trials and extract the model metadata in Labs 3–4 of the Using Secure Environments workshop.
Although accurately capturing the lineage of ML models can certainly help reproduce the model outputs, depending on the model’s risk level, you may also be required to document feature importance from your models. In this workshop, we demonstrate one methodology for doing so, using Shapley values. We note however that this approach is by no means exhaustive and you should work with your risk, legal, and compliance teams to assess legal, ethical, regulatory, and compliance requirements for, and implications of, building and using ML systems.
Deployed endpoints should be monitored against data drift as a best practice. In these workshops, we demonstrate how SageMaker Model Monitor automatically extracts the statistics from the features as a baseline, captures the input payload and the model predictions, and checks for any data drift against the baseline at regular intervals. The detected drift can be visualized using SageMaker Studio and used to set thresholds and alarms to re-trigger model retraining or alert developers of model drift.
To audit ML environments, admins can monitor instance-level metrics related to training jobs, processing jobs, and hyperparameter tuning jobs using CloudWatch Events. You can use lifecycle configurations to also publish Jupyter logs to CloudWatch. Here we demonstrate the use of detective and preventive controls to prevent data scientists from launching training jobs outside the project VPC. Additional preventive controls using IAM condition keys such as sagemaker:InstanceTypes may be added to prevent data scientists from misusing certain instance types (such as the more expensive GPU instances) or enforcing that data scientists only train models using AWS Nitro System instances, which offer enhanced security. Studio notebook logs are automatically published to CloudWatch.
Self-service
Customers are rapidly adopting IaC best practices using tools such as AWS CloudFormation or HashiCorp Terraform to ensure repeatability across their cloud workflows. However, a consistent pain point for data science and IT teams across enterprises has been the challenge to create repeatable environments that can be easily scaled across the organization.
AWS Service Catalog allows you to build products that abstract the underlying CloudFormation templates. These products can be shared across accounts, and a consistent taxonomy can be enforced using the TagOptions Library. Administrators can design products for the data science teams to run in their accounts that provision all the underlying resources automatically, while allowing data scientists to customize resources such as underlying compute instances (GPU or CPU) required for running notebooks, but disallowing data scientists from creating notebook instances any other way. Similarly, admins can enforce that data scientists enter their user information while creating products to have visibility on who is creating notebooks.
To allow teams to move at speed and to free constrained cloud operations teams from easily automated work, this workshop uses the AWS Service Catalog to automate common activities such as SageMaker notebook creation. AWS Service Catalog provides you with a way to codify your own best practice for deploying logically grouped assets, such as a project team environment, and allow project teams to deploy these assets for themselves.
The AWS Service Catalog allows cloud operations teams to give business users a way to self-service and obtain on-demand assets that are deployed in a manner compliant with internal IT policies. Business users no longer have to submit tickets for common activities and wait for the ticket to be serviced by the cloud operations team. Additionally, AWS Service Catalog provides the cloud operations team with a centralized location to understand who has deployed various assets and manage those deployed assets to ensure that, as IT policy evolves, updates can be provided across provisioned products. This is covered in detail in Labs 1–2 of the Building Secure Environments workshop.
Cost management
It’s important to be able to track expenses during the lifecycle of a project. To demonstrate this capability, the workshop uses cost tags to track all resources associated with any given project. The cost tags used in this workshop tag resources like SageMaker training jobs, VPCs, and S3 buckets with the project name and the environment type (development, testing, production). You can use these tags to identify a project’s costs across services and your environments to ensure that teams are accountable for their consumption. You can also use SageMaker Processing to offload feature engineering tasks and SageMaker Training jobs to train models at scale, and use lightweight notebooks and further save on costs. As we show in this workshop, admins can enforce this directly by allowing data scientists to create notebooks only via AWS Service Catalog using approved instance types only.
Conclusion
In this series of workshops, we have implemented a number of features and best practices that cover the most common pain points that CTO teams face when provisioning and using secure environments for ML. For a detailed discussion on ML governance as it applies to regulated industries such as financial services, see Machine Learning Best Practices in Financial Services. Additionally, you may want to look at the AWS Well-Architected guidelines as they apply to machine learning and financial services, respectively. Feel free to connect with the authors and don’t hesitate to reach out to your AWS account teams if you wish to run these hands-on labs.
Further reading
About the Authors
 Jason Barto works as a Principal Solutions Architect with AWS. Jason supports customers to accelerate and optimize their business by leveraging cloud services. Jason has 20 years of professional experience developing systems for use in secure, sensitive environments. He has led teams of developers and worked as a systems architect to develop petabyte scale analytics platforms, real-time complex event processing systems, and cyber-defense monitoring systems. Today he is working with financial services customers to implement secure, resilient, and self-healing data and analytics systems using open-source technologies and AWS services
 Stefan Natu is a Sr. AI/ML Specialist Solutions Architect at Amazon Web Services. He is focused on helping financial services customers build end-to-end machine learning solutions on AWS. In his spare time, he enjoys reading machine learning blogs, playing the guitar, and exploring the food scene in New York City.