Demonstrating the Fundamentals of Quantum Error Correction

Posted by Jimmy Chen, Quantum Research Scientist and Matt McEwen, Student Researcher, Google Quantum AI

The Google Quantum AI team has been building quantum processors made of superconducting quantum bits (qubits) that have achieved the first beyond-classical computation, as well as the largest quantum chemical simulations to date. However, current generation quantum processors still have high operational error rates — in the range of 10-3 per operation, compared to the 10-12 believed to be necessary for a variety of useful algorithms. Bridging this tremendous gap in error rates will require more than just making better qubits — quantum computers of the future will have to use quantum error correction (QEC).

The core idea of QEC is to make a logical qubit by distributing its quantum state across many physical data qubits. When a physical error occurs, one can detect it by repeatedly checking certain properties of the qubits, allowing it to be corrected, preventing any error from occurring on the logical qubit state. While logical errors may still occur if a series of physical qubits experience an error together, this error rate should exponentially decrease with the addition of more physical qubits (more physical qubits need to be involved to cause a logical error). This exponential scaling behavior relies on physical qubit errors being sufficiently rare and independent. In particular, it’s important to suppress correlated errors, where one physical error simultaneously affects many qubits at once or persists over many cycles of error correction. Such correlated errors produce more complex patterns of error detections that are more difficult to correct and more easily cause logical errors.

Our team has recently implemented the ideas of QEC in our Sycamore architecture using quantum repetition codes. These codes consist of one-dimensional chains of qubits that alternate between data qubits, which encode the logical qubit, and measure qubits, which we use to detect errors in the logical state. While these repetition codes can only correct for one kind of quantum error at a time1, they contain all of the same ingredients as more sophisticated error correction codes and require fewer physical qubits per logical qubit, allowing us to better explore how logical errors decrease as logical qubit size grows.

In “Removing leakage-induced correlated errors in superconducting quantum error correction”, published in Nature Communications, we use these repetition codes to demonstrate a new technique for reducing the amount of correlated errors in our physical qubits. Then, in “Exponential suppression of bit or phase flip errors with repetitive error correction”, published in Nature, we show that the logical errors of these repetition codes are exponentially suppressed as we add more and more physical qubits, consistent with expectations from QEC theory.

Layout of the repetition code (21 qubits, 1D chain) and distance-2 surface code (7 qubits) on the Sycamore device.

Leaky Qubits
The goal of the repetition code is to detect errors on the data qubits without measuring their states directly. It does so by entangling each pair of data qubits with their shared measure qubit in a way that tells us whether those data qubit states are the same or different (i.e., their parity) without telling us the states themselves. We repeat this process over and over in rounds that last only one microsecond. When the measured parities change between rounds, we’ve detected an error.

However, one key challenge stems from how we make qubits out of superconducting circuits. While a qubit needs only two energy states, which are usually labeled |0 and |1, our devices feature a ladder of energy states, |0, |1, |2, |3, and so on. We use the two lowest energy states to encode our qubit with information to be used for computation (we call these the computational states). We use the higher energy states (|2, |3 and higher) to help achieve high-fidelity entangling operations, but these entangling operations can sometimes allow the qubit to “leak” into these higher states, earning them the name leakage states.

Population in the leakage states builds up as operations are applied, which increases the error of subsequent operations and even causes other nearby qubits to leak as well — resulting in a particularly challenging source of correlated error. In our early 2015 experiments on error correction, we observed that as more rounds of error correction were applied, performance declined as leakage began to build.

Mitigating the impact of leakage required us to develop a new kind of qubit operation that could “empty out” leakage states, called multi-level reset. We manipulate the qubit to rapidly pump energy out into the structures used for readout, where it will quickly move off the chip, leaving the qubit cooled to the |0 state, even if it started in |2 or |3. Applying this operation to the data qubits would destroy the logical state we’re trying to protect, but we can apply it to the measure qubits without disturbing the data qubits. Resetting the measure qubits at the end of every round dynamically stabilizes the device so leakage doesn’t continue to grow and spread, allowing our devices to behave more like ideal qubits.

Applying the multi-level reset gate to the measure qubits almost totally removes leakage, while also reducing the growth of leakage on the data qubits.

Exponential Suppression
Having mitigated leakage as a significant source of correlated error, we next set out to test whether the repetition codes give us the predicted exponential reduction in error when increasing the number of qubits. Every time we run our repetition code, it produces a collection of error detections. Because the detections are linked to pairs of qubits rather than individual qubits, we have to look at all of the detections to try to piece together where the errors have occurred, a procedure known as decoding. Once we’ve decoded the errors, we then know which corrections we need to apply to the data qubits. However, decoding can fail if there are too many error detections for the number of data qubits used, resulting in a logical error.

To test our repetition codes, we run codes with sizes ranging from 5 to 21 qubits while also varying the number of error correction rounds. We also run two different types of repetition codes — either a phase-flip code or bit-flip code — that are sensitive to different kinds of quantum errors. By finding the logical error probability as a function of the number of rounds, we can fit a logical error rate for each code size and code type. In our data, we see that the logical error rate does in fact get suppressed exponentially as the code size is increased.

Probability of getting a logical error after decoding versus number of rounds run, shown for various sizes of phase-flip repetition code.

We can quantify the error suppression with the error scaling parameter Lambda (Λ), where a Lambda value of 2 means that we halve the logical error rate every time we add four data qubits to the repetition code. In our experiments, we find Lambda values of 3.18 for the phase-flip code and 2.99 for the bit-flip code. We can compare these experimental values to a numerical simulation of the expected Lambda based on a simple error model with no correlated errors, which predicts values of 3.34 and 3.78 for the bit- and phase-flip codes respectively.

Logical error rate per round versus number of qubits for the phase-flip (X) and bit-flip (Z) repetition codes. The line shows an exponential decay fit, and Λ is the scale factor for the exponential decay.

This is the first time Lambda has been measured in any platform while performing multiple rounds of error detection. We’re especially excited about how close the experimental and simulated Lambda values are, because it means that our system can be described with a fairly simple error model without many unexpected errors occurring. Nevertheless, the agreement is not perfect, indicating that there’s more research to be done in understanding the non-idealities of our QEC architecture, including additional sources of correlated errors.

What’s Next
This work demonstrates two important prerequisites for QEC: first, the Sycamore device can run many rounds of error correction without building up errors over time thanks to our new reset protocol, and second, we were able to validate QEC theory and error models by showing exponential suppression of error in a repetition code. These experiments were the largest stress test of a QEC system yet, using 1000 entangling gates and 500 qubit measurements in our largest test. We’re looking forward to taking what we learned from these experiments and applying it to our target QEC architecture, the 2D surface code, which will require even more qubits with even better performance.


1A true quantum error correcting code would require a two dimensional array of qubits in order to correct for all of the errors that could occur. 

Read More

From Our Kitchen to Yours: NVIDIA Omniverse Changes the Way Industries Collaborate

Talk about a magic trick. One moment, NVIDIA CEO Jensen Huang was holding forth from behind his sturdy kitchen counter.

The next, the kitchen and everything in it slid away, leaving Huang alone with the audience and NVIDIA’s DGX Station A100, a glimpse at an alternate digital reality.

For most, the metaverse is something seen in sci-fi movies. For entrepreneurs, it’s an opportunity. For gamers, a dream.

For NVIDIA artists, researchers and engineers on an extraordinarily tight deadline last spring, it was where they went to work — a shared virtual world they used to tell their story and a milestone for the entire company.

Designed to inform and entertain, NVIDIA’s GTC keynote is filled with cutting-edge demos highlighting advancements in supercomputing, deep learning and graphics.

“GTC is, first and foremost, our opportunity to highlight the amazing work that our engineers and other teams here at NVIDIA have done all year long,” said Rev Lebaredian, vice president of Omniverse engineering and simulation at NVIDIA.

With this short documentary, “Connecting in the Metaverse: The Making of the GTC Keynote,” viewers get the story behind the story. It’s a tale of how NVIDIA Omniverse, a tool for connecting to and describing the metaverse, brought it all together this year.

To be sure, you cant have a keynote without a flesh and blood person at the center. Through all but 14 seconds of the hour and 48 minute presentation from 1:02:41 to 1:02:55 — Huang himself spoke in the keynote.

Creating a Story in Omniverse

It starts with building a great narrative. Bringing forward a keynote-worthy presentation always takes intense collaboration. But this was unlike any other — packed not just with words and pictures — but with beautifully rendered 3D models and rich textures.

With Omniverse, NVIDIA’s team was able to collaborate using different industry content-creation tools like Autodesk Maya or Substance Painter while in different places.

Keynote slides were packed with beautifully rendered 3D models and rich textures.

“There are already great tools out there that people use every day in every industry that we want people to continue using,” said Lebaredian. “We want people to take these exciting tools and augment them with our technologies.”

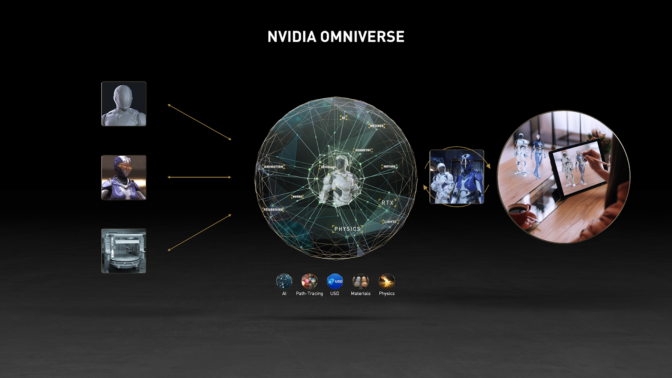
These were enhanced by a new generation of tools, including Universal Scene Description (USD), Material Design Language (MDL) and NVIDIA RTX real-time ray-tracing technologies. Together, they allowed NVIDIA’s team to collaborate to create photorealistic scenes with physically accurate materials and lighting.

An NVIDIA DGX Station A100 Animation

Omniverse can create more than beautiful stills. The documentary shows how, accompanied by industry tools such as Autodesk Maya, Foundry Nuke, Adobe Photoshop, Adobe Premiere, and Adobe After Effects, it could stage and render some of the world’s most complex machines to create realistic cinematics.

With Omniverse, NVIDIA was able to turn a CAD model of the NVIDIA DGX Station A100 into a physically accurate virtual replica Huang used to give the audience a look inside.

Typically this type of project would take a team months to complete and weeks to render. But with Omniverse, the animation was chiefly completed by a single animator and rendered in less than a day.

Omniverse Physics Montage

More than just machines, though, Omniverse can model the way the world works by building on existing NVIDIA technologies. PhysX, for example, has been a staple in the NVIDIA gaming world for well over a decade. But its implementation in Omniverse brings it to a new level.

For a demo highlighting the current capabilities of PhysX 5 in Omniverse, plus a preview of advanced real-time physics simulation research, the Omniverse engineering and research teams re-rendered a collection of older PhysX demos in Omniverse.

The demo highlights key PhysX technologies such as Rigid Body, Soft Body Dynamics, Vehicle Dynamics, Fluid Dynamics, Blast’s Destruction and Fracture, and Flow’s combustible fluid, smoke and fire. As a result, viewers got a look at core Omniverse technologies that can do more than just show realistic-looking effects — they are true to reality, obeying the laws of physics in real-time.

DRIVE Sim, Now Built on Omniverse

Simulating the world around us is key to unlocking new technologies, and Omniverse is crucial to NVIDIA’s self-driving car initiative. With its PhysX and Photorealistic worlds, Omniverse creates the perfect environment for training autonomous machines of all kinds.

For this year’s DRIVE Sim on Omniverse demo, the team imported a map of the area surrounding a Mercedes plant in Germany. Then, using the same software stack that runs NVIDIA’s fleet of self-driving cars, they showed how the next generation of Mercedes cars would perform autonomous functions in the real world.

With DRIVE Sim, the team was able to test numerous lighting, weather and traffic conditions quickly — and show the world the results.

Creating the Factory of the Future with BMW Group

The idea of a “digital twin” has far-reaching consequences for almost every industry.

This year’s GTC featured a spectacular visionary display that exemplifies what the idea can do when unleashed in the auto industry.

The BMW Factory of the Future demo shows off the digital twin of a BMW assembly plant in Germany. Every detail, including layout, lighting and machinery, is digitally replicated with physical accuracy.

This “digital simulation” provides ultra-high fidelity and accurate, real-time simulation of the entire factory. With it, BMW can reconfigure assembly lines to optimize worker safety and efficiency, train factory robots to perform tasks, and optimize every aspect of plant operations.

Virtual Kitchen, Virtual CEO

The surprise highlight of GTC21 was a perfect virtual replica of Huang’s kitchen — the setting of the past three pandemic-era “kitchen keynotes” — complete with a digital clone of the CEO himself.

The demo is the epitome of what GTC represents: It combined the work of NVIDIA’s deep learning and graphics research teams with several engineering teams and the company’s incredible in-house creative team.

To create a virtual Jensen, teams did a full face and body scan to create a 3D model, then trained an AI to mimic his gestures and expressions and applied some AI magic to make his clone realistic.

Digital Jensen was then brought into a replica of his kitchen that was deconstructed to reveal the holodeck within Omniverse, surprising the audience and making them question how much of the keynote was real, or rendered.

“We built Omniverse first and foremost for ourselves here at NVIDIA,” Lebaredian said. “We started Omniverse with the idea of connecting existing tools that do 3D together for what we are now calling the metaverse.”

More and more of us will be able to do the same, accelerating more of what we do together. “If we do this right, we’ll be working in Omniverse 20 years from now,” Lebaredian said.

The post From Our Kitchen to Yours: NVIDIA Omniverse Changes the Way Industries Collaborate appeared first on The Official NVIDIA Blog.

Read More

Watch: Making Masterpieces in the Cloud With Virtual Reality

Immersive 3D design and character creation are going sky high this week at SIGGRAPH, in a demo showcasing NVIDIA CloudXR running on Google Cloud.

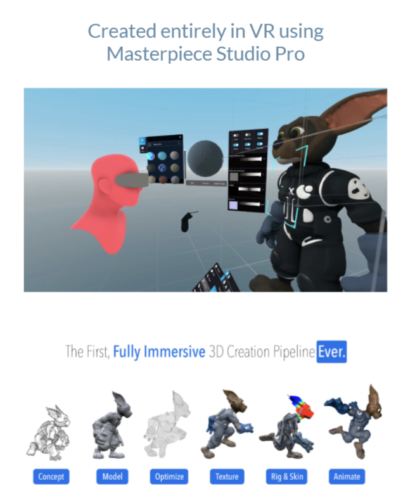
The clip shows an artist with an untethered VR headset creating a fully rigged character with Masterpiece Studio Pro, which is running remotely in Google Cloud and interactively streamed to the artist using CloudXR.

Bringing Characters to Life in XR

The demo focuses on an interactive technique known as digital sculpting, which uses software to create and refine a 3D model as if it were made of a real-life substance such as clay. But moving digital sculpting into a VR space creates a variety of challenges.

First, setting up the VR environment can be complicated and expensive. It typically requires dedicated physical space for wall-mounted sensors. If an artist wants to interact with the 3D model or move the character around, they can get tangled up in the cord that connects their VR headset to their workstation.

CloudXR, hosted from Google Cloud on a tetherless HMD, addresses these challenges by providing artists with the freedom to create from virtually anywhere. With a good internet connection, there’s no need for users to be physically tethered to an expensive workstation to have a seamless design session in an immersive environment.

Masterpiece Studio Pro is a fully immersive 3D creation pipeline that simplifies the character design process. From blocking in basic shapes to designing a fully textured and rigged character, artists can easily work on a character face-to-face in VR, providing a more intuitive experience.

In Masterpiece Studio Pro, artists can work on characters at any scale and use familiar tools and hand gestures to sculpt and pose models — just like they would with clay figures in real life. And drawing bones in position couldn’t be easier, because artists can reach right into the limbs of the creature to place them.

Getting Your Head in the Cloud

Built on NVIDIA RTX technology, CloudXR solves immersive design challenges by cutting the cord. Artists can work with a wireless, all-in-one headset, like the HTC VIVE Focus 3, without having to deal with the hassles of setting up a VR space.

And with CloudXR on Google Cloud, artists can rent an NVIDIA GPU on a Google Cloud Virtual Workstation, powered by NVIDIA RTX Virtual Workstation technology, and stream their work remotely. The VIVE Focus 3 is HTC’s latest standalone headset, which has 5K visuals and active cooling for long design sessions.

“We’re excited to show how complex creative workflows and high-quality graphics come together in the ultimate immersive experience — all running in the cloud,” said Daniel O’Brien, general manager at HTC Americas. “NVIDIA CloudXR and the VIVE Focus 3 provide a high quality experience to immerse artists in a seamless streaming experience.”

With Masterpiece Studio Pro running on Google Cloud, and streaming with NVIDIA CloudXR, users can enhance the workflow of creating characters in an immersive environment — one that’s more intuitive and productive than before.

Check out our other demos at SIGGRAPH, and learn more about NVIDIA CloudXR on Google Cloud.

The post Watch: Making Masterpieces in the Cloud With Virtual Reality appeared first on The Official NVIDIA Blog.

Read More

Lending a Helping Hand: Jules Anh Tuan Nguyen on Building a Neuroprosthetic

With deep learning, amputees can now control their prosthetics by simply thinking through the motion.

Jules Anh Tuan Nguyen spoke with NVIDIA AI Podcast host Noah Kravitz about his efforts to allow amputees to control their prosthetic limb — right down to the finger motions — with their minds.

Using neural decoders and deep learning, this system allows humans to control just about anything digital with their thoughts, including playing video games and a piano.

Nguyen is a postdoctoral researcher in the biomedical engineering department at the University of Minnesota. His work with his team is detailed in a paper titled “A Portable, Self-Contained Neuroprosthetic Hand with Deep Learning-Based Finger Control.”

Key Points From This Episode:

  • Nguyen and his team created an AI-based system using receptors implanted in the arm to translate the electrical information from the nerves into commands to execute the appropriate arm, hand and finger movements — all built into the arm.
  • The two main objectives of the system are to make the neural interface wireless and to optimize the AI engine and neural decoder to consume less power — enough for a person to use it for at least eight hours a day before having to recharge it.

Tweetables:

“To make the amputee move and feel just like a real hand, we have to establish a neural connection for the amputee to move their finger and feel it just like a missing hand.” — Jules Anh Tuan Nguyen [7:24]

“The idea behind it can extend to many things. You can control virtual reality. You can control a robot, a drone — the possibility is endless. With this nerve interface and AI neural decoder, suddenly you can manipulate things with your mind.” — Jules Anh Tuan Nguyen [22:07]

You Might Also Like:

AI for Hobbyists: DIYers Use Deep Learning to Shoo Cats, Harass Ants

Robots recklessly driving cheap electric kiddie cars. Autonomous machines shining lasers at ants — and spraying water at bewildered cats — for the amusement of cackling grandchildren. Listen in to hear NVIDIA engineer Bob Bond and Make: Magazine Executive Editor Mike Senese explain how they’re entertaining with deep learning.

A USB Port for Your Body? Startup Uses AI to Connect Medical Devices to Nervous System

Think of it as a USB port for your body. Emil Hewage is the co-founder and CEO at Cambridge Bio-Augmentation Systems, a neural engineering startup. The U.K. startup is building interfaces that use AI to help plug medical devices into our nervous systems.

Behind the Scenes at NeurIPS With NVIDIA and CalTech’s Anima Anandkumar

Anima Anandkumar, NVIDIA’s director of machine learning research and Bren professor at CalTech’s CMS Department, talks about NeurIPS and discusses the transition from supervised to unsupervised and self-supervised learning, which she views as the key to next-generation AI.

Tune in to the AI Podcast

Get the AI Podcast through iTunes, Google Podcasts, Google Play, Castbox, DoggCatcher, Overcast, PlayerFM, Pocket Casts, Podbay, PodBean, PodCruncher, PodKicker, Soundcloud, Spotify, Stitcher and TuneIn. If your favorite isn’t listed here, drop us a note.

Tune in to the Apple Podcast Tune in to the Google Podcast Tune in to the Spotify Podcast

Make the AI Podcast Better

Have a few minutes to spare? Fill out this listener survey. Your answers will help us make a better podcast.

The post Lending a Helping Hand: Jules Anh Tuan Nguyen on Building a Neuroprosthetic appeared first on The Official NVIDIA Blog.

Read More

All AI Do Is Win: NVIDIA Research Nabs ‘Best in Show’ with Digital Avatars at SIGGRAPH

In a turducken of a demo, NVIDIA researchers stuffed four AI models into a serving of digital avatar technology for SIGGRAPH 2021’s Real-Time Live showcase — winning the Best in Show award.

The showcase, one of the most anticipated events at the world’s largest computer graphics conference, held virtually this year, celebrates cutting-edge real-time projects spanning game technology, augmented reality and scientific visualization. It featured a lineup of jury-reviewed interactive projects, with presenters hailing from Unity Technologies, Rensselaer Polytechnic Institute, the NYU Future Reality Lab and more.

Broadcasting live from our Silicon Valley headquarters, the NVIDIA Research team presented a collection of AI models that can create lifelike virtual characters for projects such as bandwidth-efficient video conferencing and storytelling.

The demo featured tools to generate digital avatars from a single photo, animate avatars with natural 3D facial motion and convert text to speech.

“Making digital avatars is a notoriously difficult, tedious and expensive process,” said Bryan Catanzaro, vice president of applied deep learning research at NVIDIA, in the presentation. But with AI tools, “there is an easy way to create digital avatars for real people as well as cartoon characters. It can be used for video conferencing, storytelling, virtual assistants and many other applications.”

AI Aces the Interview

In the demo, two NVIDIA research scientists played the part of an interviewer and a prospective hire speaking over video conference. Over the course of the call, the interviewee showed off the capabilities of AI-driven digital avatar technology to communicate with the interviewer.

The researcher playing the part of interviewee relied on an NVIDIA RTX laptop throughout, while the other used a desktop workstation powered by RTX A6000 GPUs. The entire pipeline can also be run on GPUs in the cloud.

While sitting in a campus coffee shop, wearing a baseball cap and a face mask, the interviewee used the Vid2Vid Cameo model to appear clean-shaven in a collared shirt on the video call (seen in the image above). The AI model creates realistic digital avatars from a single photo of the subject — no 3D scan or specialized training images required.

“The digital avatar creation is instantaneous, so I can quickly create a different avatar by using a different photo,” he said, demonstrating the capability with another two images of himself.

Instead of transmitting a video stream, the researcher’s system sent only his voice — which was then fed into the NVIDIA Omniverse Audio2Face app. Audio2Face generates natural motion of the head, eyes and lips to match audio input in real time on a 3D head model. This facial animation went into Vid2Vid Cameo to synthesize natural-looking motion with the presenter’s digital avatar.

Not just for photorealistic digital avatars, the researcher fed his speech through Audio2Face and Vid2Vid Cameo to voice an animated character, too. Using NVIDIA StyleGAN, he explained, developers can create infinite digital avatars modeled after cartoon characters or paintings.

The models, optimized to run on NVIDIA RTX GPUs, easily deliver video at 30 frames per second. It’s also highly bandwidth efficient, since the presenter is sending only audio data over the network instead of transmitting a high-resolution video feed.

Taking it a step further, the researcher showed that when his coffee shop surroundings got too loud, the RAD-TTS model could convert typed messages into his voice — replacing the audio fed into Audio2Face. The breakthrough text-to-speech, deep learning-based tool can synthesize lifelike speech from arbitrary text inputs in milliseconds.

RAD-TTS can synthesize a variety of voices, helping developers bring book characters to life or even rap songs like “The Real Slim Shady” by Eminem, as the research team showed in the demo’s finale.

SIGGRAPH continues through Aug. 13. Check out the full lineup of NVIDIA events at the conference and catch the premiere of our documentary, “Connecting in the Metaverse: The Making of the GTC Keynote,” on Aug. 11.

The post All AI Do Is Win: NVIDIA Research Nabs ‘Best in Show’ with Digital Avatars at SIGGRAPH appeared first on The Official NVIDIA Blog.

Read More

Run your TensorFlow job on Amazon SageMaker with a PyCharm IDE

As more machine learning (ML) workloads go into production, many organizations must bring ML workloads to market quickly and increase productivity in the ML model development lifecycle. However, the ML model development lifecycle is significantly different from an application development lifecycle. This is due in part to the amount of experimentation required before finalizing a version of a model. Amazon SageMaker, a fully managed ML service, enables organizations to put ML ideas into production faster and improve data scientist productivity by up to 10 times. Your team can quickly and easily train and tune models, move back and forth between steps to adjust experiments, compare results, and deploy models to production-ready environments.

Amazon SageMaker Studio offers an integrated development environment (IDE) for ML. Developers can write code, track experiments, visualize data, and perform debugging and monitoring all within a single, integrated visual interface, which significantly boosts developer productivity. Within Studio, you can also use Studio notebooks, which are collaborative notebooks (the view is an extension of the JupyterLab interface). You can launch quickly because you don’t need to set up compute instances and file storage beforehand. SageMaker Studio provides persistent storage, which enables you to view and share notebooks even if the instances that the notebooks run on are shut down. For more details, see Use Amazon SageMaker Studio Notebooks.

Many data scientists and ML researchers prefer to use a local IDE such as PyCharm or Visual Studio Code for Python code development while still using SageMaker to train the model, tune hyperparameters with SageMaker hyperparameter tuning jobs, compare experiments, and deploy models to production-ready environments. In this post, we show how you can use SageMaker to manage your training jobs and experiments on AWS, using the Amazon SageMaker Python SDK with your local IDE. For this post, we use PyCharm for our IDE, but you can use your preferred IDE with no code changes.

The code used in this post is available on GitHub.

Prerequisites

To run training jobs on a SageMaker managed environment, you need the following:

  • An AWS account configured with the AWS Command Line Interface (AWS CLI) to have sufficient permissions to run SageMaker training jobs
  • Docker configured (SageMaker local mode) and the SageMaker Python SDK installed on your local computer
  • (Optional) Studio set up for experiment tracking and the Amazon SageMaker Experiments Python SDK

Setup

To get started, complete the following steps:

  1. Create a new user with programmatic access that enables an access key ID and secret access key for the AWS CLI.
  2. Attach the permissions AmazonSageMakerFullAccess and AmazonS3FullAccess.
  3. Limit the permissions to specific Amazon Simple Storage Service (Amazon S3) buckets if possible.
  4. You also need an execution role for the SageMaker AmazonSageMakerFullAccess and AmazonS3FullAccess permissions. SageMaker uses this role to perform operations on your behalf on the AWS hardware that is managed by SageMaker.
  5. Install the AWS CLI on your local computer and quick configuration with aws configure:
$ aws configure
AWS Access Key ID [None]: AKIAI*********EXAMPLE
AWS Secret Access Key [None]: wJal********EXAMPLEKEY
Default region name [None]: eu-west-1
Default output format [None]: json

For more information, see Configuring the AWS CLI

  1. Install Docker and your preferred local Python IDE. For this post, we use PyCharm.
  2. Make sure that you have all the required Python libraries to run your code locally.
  3. Add the SageMaker Python SDK to your local library. You can use pip install sagemaker or create a virtual environment with venv for your project then install SageMaker within the virtual environment. For more information, see Use Version 2.x of the SageMaker Python SDK.

Develop your ML algorithms on your local computer

Many data scientists use a local IDE for ML algorithm development, such as PyCharm. In this post, the algorithm Python script tf_code/tf_script.py is a simple file that uses TensorFlow Keras to create a feedforward neural network. You can run the Python script locally as you do usually.

Make your TensorFlow code SageMaker compatible

To make your code compatible for SageMaker, you must follow certain rules for reading input data and writing output model and other artifacts. The training script is very similar to a training script you might run outside of SageMaker, but you can access useful properties about the training environment through various environment variables. For more information, see SageMaker Toolkits Containers Structure.

The following code shows some important environment variables used by SageMaker for managing the infrastructure.

The following uses the input data location SM_CHANNEL_{channel_name}:

SM_CHANNEL_TRAINING=/opt/ml/input/data/training
SM_CHANNEL_VALIDATION=/opt/ml/input/data/validation
SM_CHANNEL_TESTING=/opt/ml/input/data/testing

The following code uses the model output location to save the model artifact:

SM_MODEL_DIR=/opt/ml/model

The following code uses the output artifact location to write non-model training artifacts (such as evaluation results):

SM_OUTPUT_DATA_DIR=/opt/ml/output

You can pass these SageMaker environment variables as arguments so you can still run the training script outside of SageMaker:

# SageMaker default SM_MODEL_DIR=/opt/ml/model
if os.getenv("SM_MODEL_DIR") is None:
    os.environ["SM_MODEL_DIR"] = os.getcwd() + '/model'

# SageMaker default SM_OUTPUT_DATA_DIR=/opt/ml/output
if os.getenv("SM_OUTPUT_DATA_DIR") is None:
    os.environ["SM_OUTPUT_DATA_DIR"] = os.getcwd() + '/output'

# SageMaker default SM_CHANNEL_TRAINING=/opt/ml/input/data/training
if os.getenv("SM_CHANNEL_TRAINING") is None:
    os.environ["SM_CHANNEL_TRAINING"] = os.getcwd() + '/data'

if __name__ == '__main__':
    parser = argparse.ArgumentParser()
    parser.add_argument('--train', type=str, default=os.environ.get('SM_CHANNEL_TRAINING'))
    parser.add_argument('--model_dir', type=str, default=os.environ.get('SM_MODEL_DIR'))
    parser.add_argument('--output_dir', type=str, default=os.environ.get('SM_OUTPUT_DATA_DIR'))

Test your ML algorithms on a local computer with the SageMaker SDK local mode

The SageMaker Python SDK supports local mode, which allows you to create estimators and deploy them to your local environment. This is a great way to test your deep learning scripts before running them in the SageMaker managed training or hosting environments. Local mode is supported for framework images (TensorFlow, MXNet, Chainer, PyTorch, and Scikit-Learn) and images you supply yourself. See the following code for ./sm_local.py:

sagemaker_role = 'arn:aws:iam::707*******22:role/RandomRoleNameHere'
sagemaker_session = LocalSession()
sagemaker_session.config = {'local': {'local_code': True}}

def sagemaker_estimator(sagemaker_role, code_entry, code_dir, hyperparameters):
    sm_estimator = TensorFlow(entry_point=code_entry,
                              source_dir=code_dir,
                              role=sagemaker_role,
                              instance_type='local',
                              instance_count=1,
                              model_dir='/opt/ml/model',
                              hyperparameters=hyperparameters,
                              output_path='file://{}/model/'.format(os.getcwd()),
                              framework_version='2.2',
                              py_version='py37',
                              script_mode=True)
    return sm_estimator

With SageMaker local mode, the managed TensorFlow image from the service account is downloaded to your local computer and shows up in Docker. This Docker image is the same as in the SageMaker managed training or hosting environments, so you can debug your code locally and faster.

The following diagram outlines how a Docker image runs in your local machine with SageMaker local mode.


The service account TensorFlow Docker image is now running in your local computer.

On the newer versions of macOS, when you debug your code with SageMaker local mode, you might need to add Docker Full Disk Access within System Preferences under Security & Privacy, otherwise PermissionError occurs.

Run your ML algorithms on an AWS managed environment with the SageMaker SDK

After you create the training job, SageMaker launches the ML compute instances and uses the training code and the training dataset to train the model. It saves the resulting model artifacts and other output in the S3 bucket you specified for that purpose.

The following diagram outlines how a Docker image runs in an AWS managed environment.

On the SageMaker console, you can see that your training job launched, together with all training job related metadata, including metrics for model accuracy, input data location, output data configuration, and hyperparameters. This helps you manage and track all your SageMaker training jobs.

Deploy your trained ML model on a SageMaker endpoint for real-time inference

For this step, we use the ./sm_deploy.py script.

When your trained model seems satisfactory, you might want to test the real-time inference against an HTTPS endpoint, or with batch prediction. With the SageMaker SDK, you can easily set up the inference environment to test your inference code and assess model performance regarding accuracy, latency, and throughput.

SageMaker provides model hosting services for model deployment, as shown in the following diagram. It provides an HTTPS endpoint where your ML model is available to perform inference.

The persistent endpoint deployed with SageMaker hosting services appears on the SageMaker console.

Organize, track, and compare your ML trainings with Amazon SageMaker Experiments

Finally, if you have lots of experiments with different preprocessing configurations, different hyperparameters, or even different ML algorithms to test, we suggest you use Amazon SageMaker Experiments to help you group and organize your ML iterations.

Experiments automatically tracks the inputs, parameters, configurations, and results of your iterations as trials. You can assign, group, and organize these trials into experiments. Experiments is integrated with Studio, providing a visual interface to browse your active and past experiments, compare trials on key performance metrics, and identify the best-performing models.

Conclusion

In this post, we showed how you can use SageMaker with your local IDE, such as PyCharm. With SageMaker, data scientists can take advantage of this fully managed service to build, train, and deploy ML models quickly, without having to worry about the underlying infrastructure needs.

To fully achieve operational excellence, your organization needs a well-architected ML workload solution, which includes versioning ML inputs and artifacts, tracking data and model lineage, automating ML deployment pipelines, continuously monitoring and measuring ML workloads, establishing a model retraining strategy, and more. For more information about SageMaker features, see the Amazon SageMaker Developer Guide.

SageMaker is generally available worldwide. For a list of the supported AWS Regions, see the AWS Region Table for all AWS global infrastructure.


About the Author

Yanwei Cui, PhD, is a Machine Learning Specialist Solutions Architect at AWS. He started machine learning research at IRISA (Research Institute of Computer Science and Random Systems), and has several years of experience building artificial intelligence powered industrial applications in computer vision, natural language processing and online user behavior prediction. At AWS, he shares the domain expertise and helps customers to unlock business potentials, and to drive actionable outcomes with machine learning at scale. Outside of work, he enjoys reading and traveling.

Read More

How Cortica used Amazon HealthLake to get deeper insights to improve patient care

This is a guest post by Ernesto DiMarino, who is Head of Enterprise Applications and Data at Cortica.

Cortica is on a mission to revolutionize healthcare for children with autism and other neurodevelopmental differences. Cortica was founded to fix the fragmented journey families typically navigate while seeking diagnoses and therapies for their children. To bring their vision to life, Cortica seamlessly blends neurology, research-based therapies, and technology into comprehensive care programs for the children they serve. This coordinated approach leads to best-in-class member satisfaction and empowers families to achieve long-lasting, transformative results.

In this post, we discuss how Cortica used Amazon HealthLake to create a data analytics hub to store a patient’s medical history, medication history, behavioral assessments, lab reports, and genetic variants in Fast Healthcare Interoperability Resource (FHIR) standard format. They create a composite view of the patient’s health journey and apply advance analytics to understand trends in patient progression with Cortica’s treatment approach.

Unifying our data

The challenges faced by Cortica’s team of three data engineers are no different than any other healthcare enterprise. Cortica has two EHRs (electronic health records), 6 specialties, 420 providers, and a few home-grown data capturing questionnaires, one of which has 842 questions. With multiple vendors providing systems and data solutions, Cortica finds itself in an all-too-common situation in the healthcare industry: volumes of data with multiple formats and complexity in matching patients from system to system. Cortica looked to solve some of this complexity by setting up a data lake on AWS.

Cortica’s team imported all data into an Amazon Simple Storage Service (Amazon S3) data lake using Python extract, transform, and load (ETL), orchestrating it with Apache Airflow. Additionally, they maintain a Kimball model star schema for financial and operational analytics. The data sizes are a respectable 16 terabytes of data. Most of the file formats delivered to the data lake are in CSV, PDF, and Parquet, all of which the data lake is well equipped to manage. However, the data lake solution is only part of the story. To truly derive value from the data, Cortica needed a standardized model to deal with the healthcare languages and vocabularies, as well as the many industry standardized code sets.

Deriving deeper value from data

Although the data lake and star schema data model work well for some financial and operational analytics, the Cortica team found that it was challenging to dive deeper into the data for meaningful insights to share with patients and their caregivers. Some of the questions they wanted to answer included:

  • How can Cortica present to caregivers a composite view of the patient’s healthcare journey with Cortica?
  • How can they show that patients are getting better over time using data from standardized assessments, medical notes, and goals tracking data?
  • How do patients with specific comorbidities progress to their goals compared to patients without comorbidities?
  • Can Cortica show how patients have better outcomes through the unique multispecialty approach?
  • Can Cortica partner with industry researchers sharing de-identified data to help further treatment for autism and other neurodevelopmental differences?

Before implementing the data lake, staff would read through PDFs, Excel, and vendor systems to create Excel files to capture the data points of interest. Interrogating the EHRs and manually transcribing documents and notes into a large spreadsheet for analysis would take months of work. This process wasn’t scalable and made it difficult to reproduce analytics and insights.

With the data lake, Cortica found that they still lacked the ability to quickly access the volumes of data, as well as join the various datasets together to make complex analysis. Because healthcare data is so driven by medical terminologies, they needed a solution that could help unify data from different healthcare fields to present a clear patient journey through the different specialties Cortica offers. To quickly derive this deeper value, they chose Amazon HealthLake to help provide this added layer of meaning to the data.

Cortica’s solution

Cortica adopted Amazon HealthLake to help standardize data and scale insights. Through implementing the FHIR standard, Amazon HealthLake provided a faster solution to standardizing data with a far less complex maintenance pathway. They were able to quickly load a basic set of resources into Amazon HealthLake. This allowed the team to create a proof of concept (POC) for starting to answer the bigger set of questions focused on their patient population. In a 3-day process, they were able to develop a POC for understanding their patient’s journey from the perspective of their behavior therapy goals and medical comorbidities. Most of the 3-day process was spent on two days fine-tuning the queries in Amazon QuickSight and making visualizations of the data. From a data to visual perspective, the data was ready in hours not months. The following diagram illustrates their pipeline.

Getting to insights faster

Cortica was able to quickly see across their patient population the length of time it took for patients to attain their goals. The team could then break it down by age-phenotype (a designated age grouping for comparing Cortica’s population). They saw the grouping of patients that were meeting their goals in 4, 6, 9, and 12-month intervals. They further sliced and diced the visuals by layering in a variety of categories such as goal status. Until now, staff and clinicians were only able to look at an individual’s data rather than population data. They couldn’t get these types of insights. The manual chart clinician abstraction process for this goal analysis would have taken months to complete.

The following charts show two visualizations of their goals.

As a fast follow with this POC, Cortica wanted to see how medical comorbidities impacted goal attainment. The specific medical comorbidities of interest were seizures, constipation, and sleep disturbances, because these are commonly found within this patient population. Data for the FHIR Condition Resource was loaded into the pipeline, and the team was able to identify cohorts by comorbidites and quickly visualize the information. In a few minutes, they had visualizations running, and could see the impact that these comorbidities had on goal attainment (see the following example diagram).

With Amazon HealthLake, the Cortica team can spend more time analyzing and understanding data patterns rather than figuring out where data comes from, formatting it, and joining it into a usable state. The value that Amazon brings to any healthcare organization is the ability to quickly move data, conform data, and start visualizing. With FHIR as the data model, a small non-technical team can request an organization’s integration team to provide a flat file feed of FHIR resources of interest to an S3 bucket. This data is easily loaded to Amazon HealthLake data stores via the AWS Command Line Interface (AWS CLI), AWS Management Console, or API. Next, they can run the data on Amazon Athena to expose the data to an SQL queryable tool and use QuickSight for visualization. Both clinical or non-technical teams can use this solution to start deriving value from data locked within medical records systems.

Conclusion

The tools available through AWS such as Amazon HealthLake, Amazon SageMaker, Athena, Amazon Comprehend Medical, and QuickSight are speeding up the ability to learn more about the patient population Cortica cares for in an actionable timeframe. Analysis that took months to complete can now be completed in days, and in some cases hours. AWS tools can enhance analysis by adding layers of richness to the data in minutes and provide different views of the same analysis. Furthermore, analysis that required chart abstraction can now be done through automated data pipelines, processing hundreds or thousands of documents to derive insights from notes, which were previously only available to a few clinicians.

Cortica is entering a new era of data analytics, one in which the data pipeline and process doesn’t require data engineers and technical staff. What is unknown can be learned from the data, ultimately bringing Cortica closer to its mission of revolutionizing the pediatric healthcare space and empowering families to achieve long-lasting, transformative results.

The content and opinions in this post are those of the third-party author and AWS is not responsible for the content or accuracy of this post.


About the Authors

Ernesto DiMarino is Head of Enterprise Applications and Data at Cortica.

Satadal Bhattacharjee is Sr Manager, Product Management, who leads products at AWS Health AI. He works backwards from healthcare customers to help them make sense of their data by developing services such as Amazon HealthLake and Amazon Comprehend Medical.

Read More

OpenAI Codex

OpenAI Codex

We’ve created an improved version of OpenAI Codex, our AI system that translates natural language to code, and we are releasing it through our API in private beta starting today. Codex is the model that powers GitHub Copilot, which we built and launched in partnership with GitHub a month ago. Proficient in more than a dozen programming languages, Codex can now interpret simple commands in natural language and execute them on the user’s behalf—making it possible to build a natural language interface to existing applications. We are now inviting businesses and developers to build on top of OpenAI Codex through our API.

Rewatch Live Demo


View the Codex Challenge


Read Paper

Watch Video

Creating a Space Game with OpenAI Codex

Watch Video

“Hello World” with OpenAI Codex

Watch Video

Data Science with OpenAI Codex

Watch Video

Talking to Your Computer with OpenAI Codex

Watch Video

Converting Python to Ruby with OpenAI Codex

Watch Video

Giving OpenAI Codex a First Grade Math Test

OpenAI Codex is a descendant of GPT-3; its training data contains both natural language and billions of lines of source code from publicly available sources, including code in public GitHub repositories. OpenAI Codex is most capable in Python, but it is also proficient in over a dozen languages including JavaScript, Go, Perl, PHP, Ruby, Swift and TypeScript, and even Shell. It has a memory of 14KB for Python code, compared to GPT-3 which has only 4KB—so it can take into account over 3x as much contextual information while performing any task.

GPT-3’s main skill is generating natural language in response to a natural language prompt, meaning the only way it affects the world is through the mind of the reader. OpenAI Codex has much of the natural language understanding of GPT-3, but it produces working code—meaning you can issue commands in English to any piece of software with an API. OpenAI Codex empowers computers to better understand people’s intent, which can empower everyone to do more with computers.

Once a programmer knows what to build, the act of writing code can be thought of as (1) breaking a problem down into simpler problems, and (2) mapping those simple problems to existing code (libraries, APIs, or functions) that already exist. The latter activity is probably the least fun part of programming (and the highest barrier to entry), and it’s where OpenAI Codex excels most.

OpenAI Codex is a general-purpose programming model, meaning that it can be applied to essentially any programming task (though results may vary). We’ve successfully used it for transpilation, explaining code, and refactoring code. But we know we’ve only scratched the surface of what can be done.

We’re now making OpenAI Codex available in private beta via our API, and we are aiming to scale up as quickly as we can safely. During the initial period, OpenAI Codex will be offered for free. OpenAI will continue building on the safety groundwork we laid with GPT-3—reviewing applications and incrementally scaling them up while working closely with developers to understand the effect of our technologies in the world.

OpenAI

The C4_200M Synthetic Dataset for Grammatical Error Correction

Posted by Felix Stahlberg and Shankar Kumar, Research Scientists, Google Research

Grammatical error correction (GEC) attempts to model grammar and other types of writing errors in order to provide grammar and spelling suggestions, improving the quality of written output in documents, emails, blog posts and even informal chats. Over the past 15 years, there has been a substantial improvement in GEC quality, which can in large part be credited to recasting the problem as a “translation” task. When introduced in Google Docs, for example, this approach resulted in a significant increase in the number of accepted grammar correction suggestions.

One of the biggest challenges for GEC models, however, is data sparsity. Unlike other natural language processing (NLP) tasks, such as speech recognition and machine translation, there is very limited training data available for GEC, even for high-resource languages like English. A common remedy for this is to generate synthetic data using a range of techniques, from heuristic-based random word- or character-level corruptions to model-based approaches. However, such methods tend to be simplistic and do not reflect the true distribution of error types from actual users.

In “Synthetic Data Generation for Grammatical Error Correction with Tagged Corruption Models”, presented at the EACL 16th Workshop on Innovative Use of NLP for Building Educational Applications, we introduce tagged corruption models. Inspired by the popular back-translation data synthesis technique for machine translation, this approach enables the precise control of synthetic data generation, ensuring diverse outputs that are more consistent with the distribution of errors seen in practice. We used tagged corruption models to generate a new 200M sentence dataset, which we have released in order to provide researchers with realistic pre-training data for GEC. By integrating this new dataset into our training pipeline, we were able to significantly improve on GEC baselines.

Tagged Corruption Models
The idea behind applying a conventional corruption model to GEC is to begin with a grammatically correct sentence and then to “corrupt” it by adding errors. A corruption model can be easily trained by switching the source and target sentences in existing GEC datasets, a method that previous studies have shown that can be very effective for generating improved GEC datasets.

A conventional corruption model generates an ungrammatical sentence (red) given a clean input sentence (green).

The tagged corruption model that we propose builds on this idea by taking a clean sentence as input along with an error type tag that describes the kind of error one wishes to reproduce. It then generates an ungrammatical version of the input sentence that contains the given error type. Choosing different error types for different sentences increases the diversity of corruptions compared to a conventional corruption model.

Tagged corruption models generate corruptions (red) for the clean input sentence (green) depending on the error type tag. A determiner error may lead to dropping the “a”, whereas a noun-inflection error may produce the incorrect plural “sheeps”.

To use this model for data generation we first randomly selected 200M clean sentences from the C4 corpus, and assigned an error type tag to each sentence such that their relative frequencies matched the error type tag distribution of the small development set BEA-dev. Since BEA-dev is a carefully curated set that covers a wide range of different English proficiency levels, we expect its tag distribution to be representative for writing errors found in the wild. We then used a tagged corruption model to synthesize the source sentence.

Synthetic data generation with tagged corruption models. The clean C4 sentences (green) are paired with the corrupted sentences (red) in the synthetic GEC training corpus. The corrupted sentences are generated using a tagged corruption model by following the error type frequencies in the development set (bar chart).

Results
In our experiments, tagged corruption models outperformed untagged corruption models on two standard development sets (CoNLL-13 and BEA-dev) by more than three F0.5-points (a standard metric in GEC research that combines precision and recall with more weight on precision), advancing the state-of-the-art on the two widely used academic test sets, CoNLL-14 and BEA-test.

In addition, the use of tagged corruption models not only yields gains on standard GEC test sets, it is also able to adapt GEC systems to the proficiency levels of users. This could be useful, for example, because the error tag distribution for native English writers often differs significantly from the distributions for non-native English speakers. For example, native speakers tend to make more punctuation and spelling mistakes, whereas determiner errors (e.g., missing or superfluous articles, like “a”, “an” or “the”) are more common in text from non-native writers.

Conclusion
Neural sequence models are notoriously data-hungry, but the availability of annotated training data for grammatical error correction is rare. Our new C4_200M corpus is a synthetic dataset containing diverse grammatical errors, which yields state-of-the-art performance when used to pre-train GEC systems. By releasing the dataset we hope to provide GEC researchers with a valuable resource to train strong baseline systems.

Read More