Reimagine search on GitHub repositories with the power of the Amazon Kendra GitHub connector

Amazon Kendra offers highly accurate semantic and natural language search powered by machine learning (ML).

Many organizations use GitHub as a code hosting platform for version control and to redefine collaboration of open-source software projects. A GitHub account repository might include many content types, such as files, issues, issue comments, issue comment attachments, pull requests, pull request comments, pull request comment attachments, and more. This corpus data is scattered across multiple locations and content repositories (public, private, and internal) within an organization. However, surfacing the relevant information in a traditional keyword search is ineffective. You can now use the new Amazon Kendra data source for GitHub to index specific content types and easily find information from this data. The GitHub data source syncs the data in your GitHub repositories to your Amazon Kendra index.

This post guides you through the step-by-step process to configure the Amazon Kendra connector for GitHub. We also show you how to configure for the connector both GitHub Enterprise Cloud (SaaS) and GitHub Enterprise Server (on premises) services.

Solution overview

The solution consists of the following high-level steps:

  1. Set up your GitHub enterprise account.
  2. Set up a GitHub repo.
  3. Create a GitHub data source connector.
  4. Search the indexed content.

Prerequisites

You need the following prerequisites to set up the Amazon Kendra connector for GitHub:

Set up your GitHub enterprise account

Create an enterprise account before proceeding to the next steps. For authentication, you can specify two types of tokens while configuring the GitHub connector:

  • Personal access token – Direct API requests that you authenticate with a personal access token are user-to-server requests. User-to-server requests are limited to 5,000 requests per hour and per authenticated user. Your personal access token is also an OAuth token.
  • OAuth token – With this token, the requests are subject to a higher limit of 15,000 requests per hour and per authenticated user.

Our recommendation is to use an OAuth token for better API throttle limits and connector performance.

For this post, we assume you have an enterprise account and generated OAuth token.

Set up your GitHub repo

To configure your GitHub repo, complete the following steps:

  1. Create a new repository, and specify its owner and name.
  2. Choose if the repository is public, internal, or private.
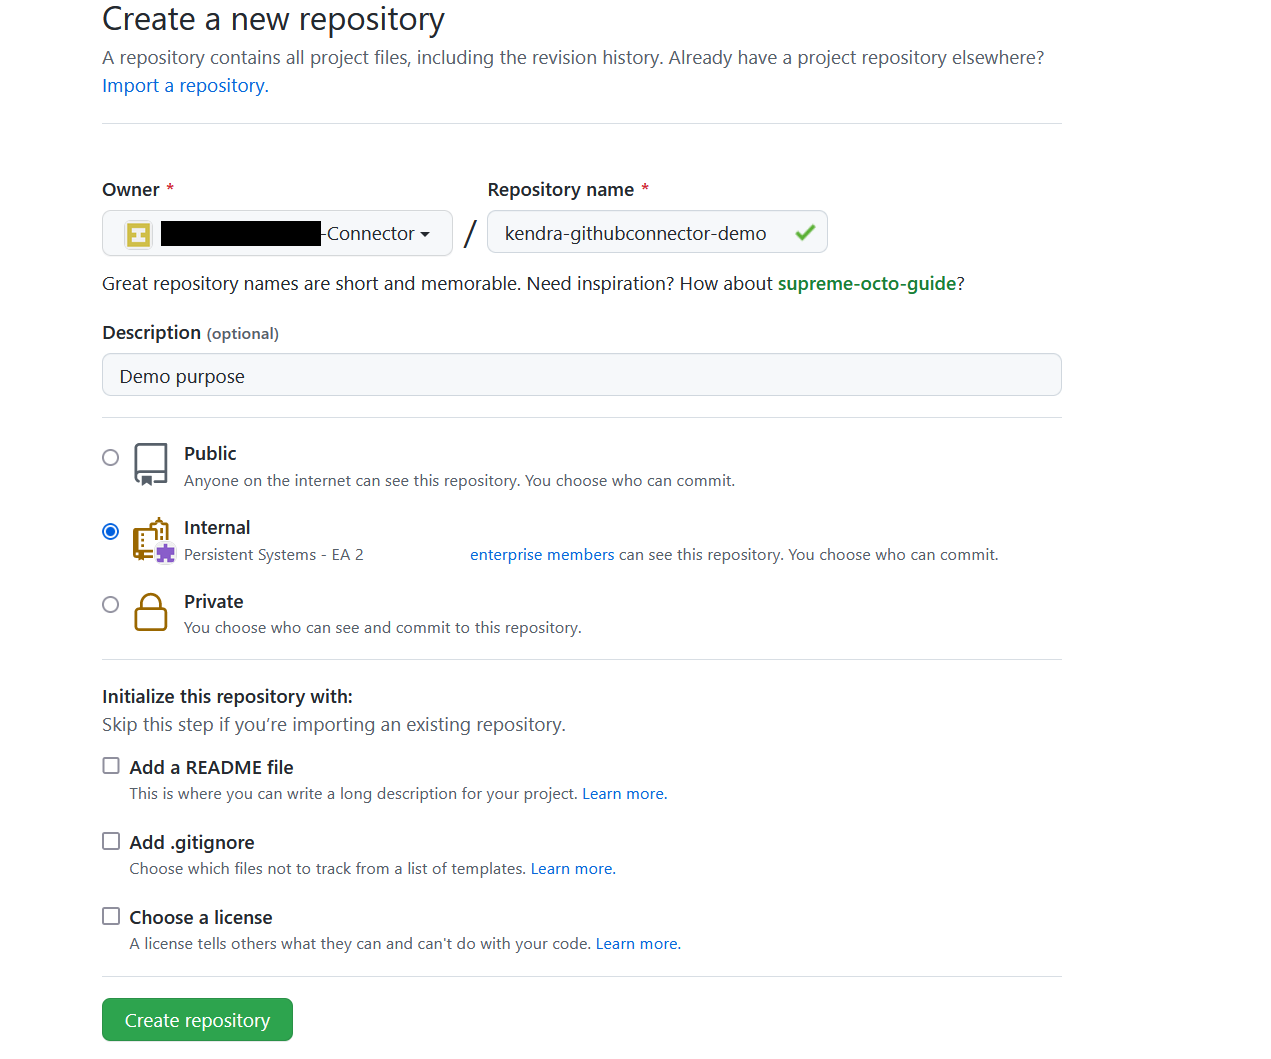
  3. For this post, update the README file with the following text:
    CreateIndex API creates a new Amazon Kendra index. Index creation is an asynchronous API. To determine if index creation has completed, check the Status field returned from a call to DescribeIndex. The Status field is set to ACTIVE when the index is ready to use.
    Once the index is active you can index your documents using the BatchPutDocument API or using one of the supported data sources.

  4. You can add a sample file to your repository with commit changes. The following is an example of using Amazon Kendra in Python:
    import boto3
    from botocore.exceptions import ClientError
    import pprint
    import time
    
    kendra = boto3.client("kendra")
    
    print("Create an index.")
    
    # Provide a name for the index
    index_name = "python-getting-started-index"
    # Provide an optional decription for the index
    description = "Getting started index"
    # Provide the IAM role ARN required for indexes
    index_role_arn = "arn:aws:iam::${accountId}:role/KendraRoleForGettingStartedIndex"
    
    try:
        index_response = kendra.create_index(
            Description = description,
            Name = index_name,
            RoleArn = index_role_arn
        )
    
        pprint.pprint(index_response)
    
        index_id = index_response["Id"]
    
        print("Wait for Amazon Kendra to create the index.")
    
        while True:
            # Get the details of the index, such as the status
            index_description = kendra.describe_index(
                Id = index_id
            )
            # When status is not CREATING quit.
            status = index_description["Status"]
            print(" Creating index. Status: "+status)
            time.sleep(60)
            if status != "CREATING":
                break
    
        print("Create an S3 data source.")
        
        # Provide a name for the data source
        data_source_name = "python-getting-started-data-source"
        # Provide an optional description for the data source
        data_source_description = "Getting started data source."
        # Provide the IAM role ARN required for data sources
        data_source_role_arn = "arn:aws:iam::${accountId}:role/KendraRoleForGettingStartedDataSource"
        # Provide the data source connection information 
        S3_bucket_name = "S3-bucket-name"
        data_source_type = "S3"
        # Configure the data source
        configuration = {"S3Configuration":
            {
                "BucketName": S3_bucket_name
            }
        }
    
        data_source_response = kendra.create_data_source(
            Name = data_source_name,
            Description = description,
            RoleArn = data_source_role_arn,
            Type = data_source_type,
            Configuration = configuration,
            IndexId = index_id
        )
    
        pprint.pprint(data_source_response)
    
        data_source_id = data_source_response["Id"]
    
        print("Wait for Amazon Kendra to create the data source.")
    
        while True:
            # Get the details of the data source, such as the status
            data_source_description = kendra.describe_data_source(
                Id = data_source_id,
                IndexId = index_id
            )
            # If status is not CREATING, then quit
            status = data_source_description["Status"]
            print(" Creating data source. Status: "+status)
            time.sleep(60)
            if status != "CREATING":
                break
    
        print("Synchronize the data source.")
    
        sync_response = kendra.start_data_source_sync_job(
            Id = data_source_id,
            IndexId = index_id
        )
    
        pprint.pprint(sync_response)
    
        print("Wait for the data source to sync with the index.")
    
        while True:
    
            jobs = kendra.list_data_source_sync_jobs(
                Id = data_source_id,
                IndexId = index_id
            )
    
            # For this example, there should be one job
            status = jobs["History"][0]["Status"]
    
            print(" Syncing data source. Status: "+status)
            if status != "SYNCING":
                break
            time.sleep(60)
    
    except  ClientError as e:
            print("%s" % e)
    
    print("Program ends.")

  5. Download AWS_Whitepapers.zip to your computer, and extract the files into a folder called AWS_Whitepapers.
  6. Upload AWS_Whitepapers/Best_Practices/AWS_Serverless_Multi-Tier_Architectures to your repository.

Your repository should look like the following screenshot.

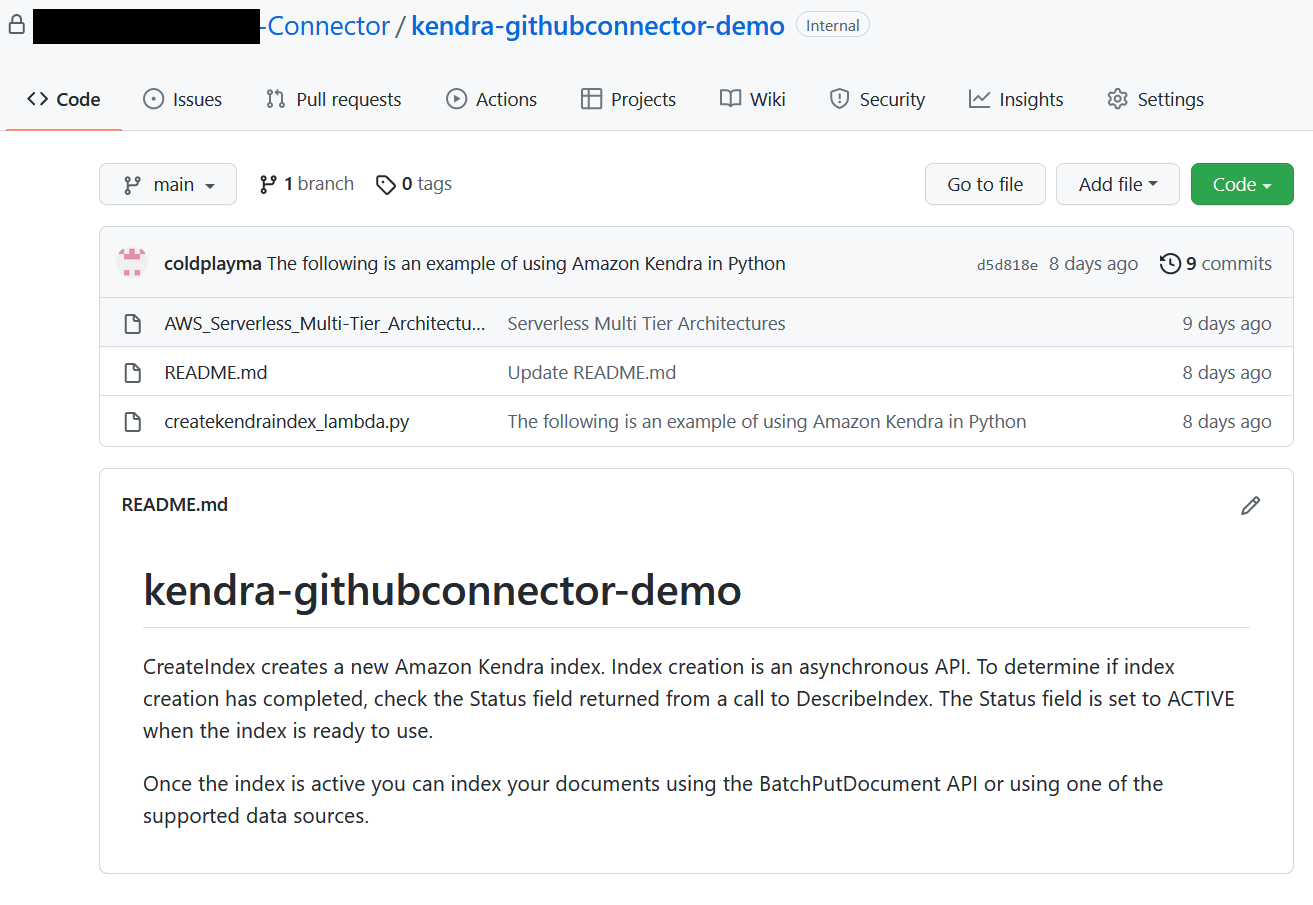
Your organization’s code repositories might hold hundreds of thousands of documents, README notes, code comments, webpages, and other items. In the next section, we showcase the document comprehension capability of Amazon Kendra to find the relevant information contained in these repositories.

Create a GitHub data source connector

For this post, we assume you have already created an Amazon Kendra index. If you don’t have an index, create a new index before proceeding with the following steps.

  1. On the Amazon Kendra console, choose the index that you want to add the data source to.
  2. Choose Add data sources.
  3. From the list of data source connectors, choose Add connector under GitHub.
  4. On the Specify data source details page, enter a data source name and an optional description.
  5. To assign metadata to your AWS resources in the form of tags, choose Add tags and enter a key and value.
  6. Choose Next.
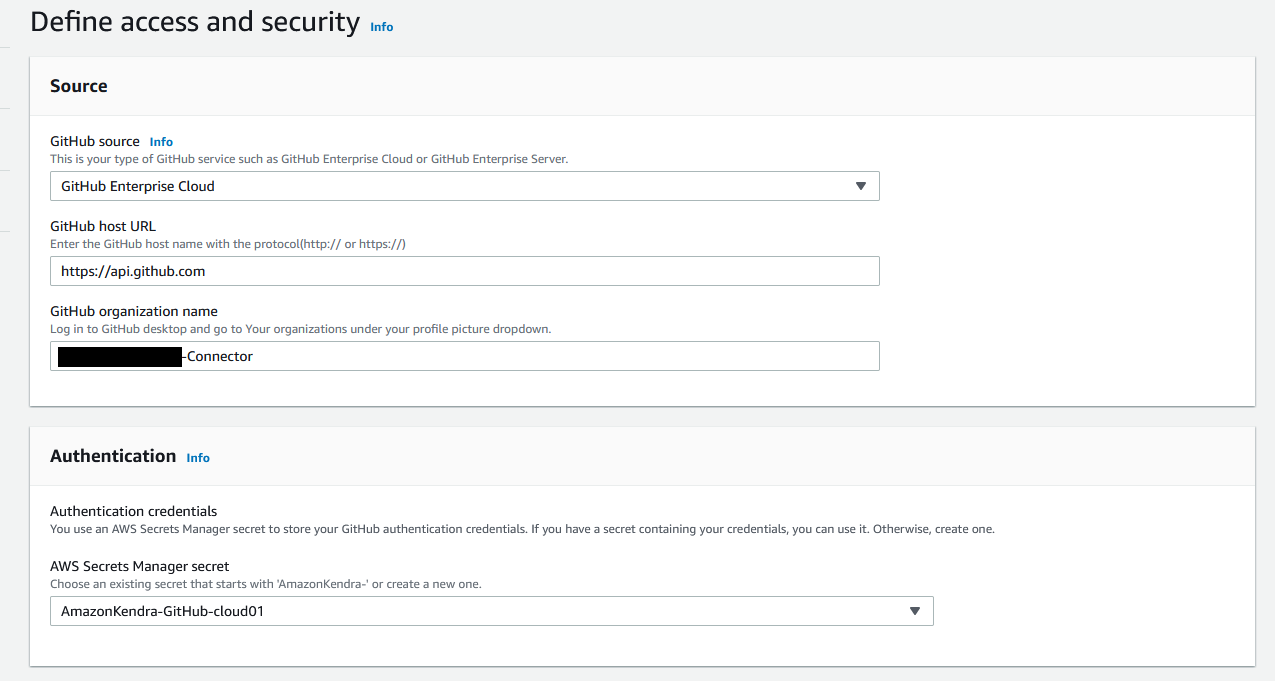
  7. On the Define access and security page, choose your GitHub source. Amazon Kendra supports two types of GitHub services:
    1. GitHub Enterprise Cloud – If you choose this option, specify the GitHub host URL and GitHub organization name. Configure your Secrets Manager secret with the authentication credentials in the form of an OAuth2 access token of the GitHub enterprise owner. The Oauth2 token scope should be authorized for repo:status, public_repo, repo:invite, read:org, user:email, and read:user.
    2. GitHub Enterprise Server – If you choose this option, specify the GitHub host URL and GitHub organization name you created in the previous section. Configure your Secrets Manager secret with the authentication credentials in the form of an OAuth2 access token of the GitHub enterprise owner. The Oauth2 token scope should be authorized for repo:status, public_repo, repo:invite, read:org, user:email, read:user, and site_admin. To configure the SSL certificate, you can create a self-signed certificate for this post using openssl x509 -in sample.pem -out new_github.cer and add this certificate to an S3 bucket.
  8. For Virtual Private Cloud (VPC), choose the default option (No VPC).
  9. For IAM role, choose Create a new role (recommended) and enter a role name.
    Whenever you modify the Secrets Manager secret, make sure you also modify the IAM role, because it requires permission to access your secret to authenticate your GitHub account. For more information on the required permissions to include in the IAM role, see IAM roles for data sources.
  10. Choose Next.

    On the Configure sync settings page, you provide details about the sync scope and run schedule.
  11. For Select repositories to crawl, select Select repositories to configure a specific list.
  12. Choose the repository kendra-githubconnector-demo that you created earlier.
  13. Optionally, you can adjust the crawl mode. The GitHub connector supports the two modes:
    1. Full crawl mode – It crawls the entire GitHub organization as configured whenever there is a data source sync. By default, the connector runs in this mode.
    2. Change log mode – It crawls the specified changed GitHub content (added, deleted, modified, permission changes) of the organization whenever there is a data source sync.
  14. Optionally, you can filter on the specific content types to index, and configure inclusion and exclusion filters on the file name, type, and path.
  15. Under Sync run schedule, for Frequency, choose Run on demand.
  16. Choose Next.
  17. In the Set fields mapping section, define the mappings between GitHub fields to Amazon Kendra field names.
    You can configure for each content type and enable these GitHub fields as facets to further refine your search results. For this post, we use the default options.
  18. Choose Next.
  19. On the Review and create page, review your options for the GitHub data source.
  20. Choose Add data source.
  21. After the data source is created, choose Sync now to index the data from GitHub.

Search indexed content

After about 10 minutes, the data source sync is complete and the GitHub content is ingested into the index. The GitHub connector crawls the following entities:

  • Repositories on GitHub Enterprise Cloud:
    • Repository with its description
    • Code and their branches with folders and subfolders
    • Issues and pull request files for public repositories
    • Issues and pull request comments and their replies for public and private repositories
    • Issues and pull request comment attachments and their replies’ attachments for public repositories
  • Repositories on GitHub Enterprise Server:
    • Repository with its description
    • Code and their branches with folders and subfolders
    • Issues and pull request comments and their replies for public, private, and internal repositories

Now you can test some queries on the Amazon Kendra Search console.

  1. Choose Search indexed content.
  2. Enter the sample text How to check the status of the index creation?
  3. Run another query and enter the sample text What are most popular usecases for AWS Lambda?

Amazon Kendra accurately surfaces relevant information based on the content indexed from the GitHub repositories. Access control to all the information is still enforced by the original repository.

Clean up

To avoid incurring unnecessary charges, clean up the resources you created for testing this connector.

  1. Delete the Amazon Kendra index if you created one specifically for testing this solution.
  2. Delete the GitHub connector data source if you added a new data source to an existing index.
  3. Delete the content you added for your GitHub account.

Conclusion

In this post, we covered the process of setting up the new Amazon Kendra connector for GitHub. Organizations can empower their software developers by providing secure and intelligent search of content spread across many different GitHub repositories.

This post illustrates the basic connector capabilities. You can also customize the search by enabling facets based on GitHub fields and map to Amazon Kendra index fields. With the GitHub connector, you can control access to the data because it can crawl orgname-reponame and set a group as the principle and collaborators of the repository as members of the group. Furthermore, Amazon Kendra provides features such as Custom Document Enrichment and Experience Builder to enhance the search experience.

For more details about Amazon Kendra, refer to the Amazon Kendra Developer Guide.


About the Authors

Manjula Nagineni is a Solutions Architect with AWS based in New York. She works with major Financial service institutions, architecting, and modernizing their large-scale applications while adopting AWS cloud services. She is passionate about designing big data workloads cloud-natively. She has over 20 years of IT experience in Software Development, Analytics and Architecture across multiple domains such as finance, manufacturing and telecom.

Arjun Agrawal is Software Development Engineer at AWS Kendra.

Read More

Merge cells and column headers in Amazon Textract tables

Financial documents such as bank, loan, or mortgage statements are often formatted to be visually appealing and easy to read for the human eye. These same features can also make automated processing challenging at times. For instance, in the following sample statement, merging rows or columns in a table helps reduce information redundancy, but it can become difficult to write the code that identifies the repeating value and assign it to the corresponding elements.

Sample Bank Statement

In April 2022, Amazon Textract introduced a new capability of the table feature that automatically detects merged rows and columns as well as headers. Prior to this enhancement, for a similar document, the table’s output would have contained empty values for the Date column. Customers had to write custom code to detect the beginning of a new row and carry over the appropriate value.

This post walks you through a simple example of how to use the merged cells and headers features.

The new Amazon Textract table response structure

The response schema for the Amazon Textract API is now enhanced with two new structure types, as illustrated in the following diagram:

  • A new block type called MERGED_CELL
  • New cell entity types called COLUMN_HEADER or ROW_HEADER

AnalyzeDocument Response Structure

MERGED_CELL blocks are appended to the JSON document as any other CELL block. The MERGED_CELL blocks have a parent/child relationship with the CELL blocks they combine. This allows you to propagate the same cell value across multiple columns or rows even when not explicitly represented in the document. The MERGED_CELL block itself is then referenced from the TABLE block via a parent/child relationship.

Headers are flagged through a new entity type populated within the corresponding CELL block.

Using the new feature

Let’s try out the new feature on the sample statement presented earlier. The following code snippet calls Amazon Textract to extract tables out of the document, turn the output data into a Pandas DataFrame, and display its content.

We use the following modules in this example:

Let’s initialize the Boto3 session and invoke Amazon Textract with the sample statement as the input document:

session = boto3.Session(profile_name='<your_profile_name>')
documentName = " s3://amazon-textract-public-content/blogs/Textract-MergeCell-Sample-Bank-Statement.pdf"
textract_json = call_textract(input_document=documentName, features = [Textract_Features.TABLES])

Let’s pretty-print the response payload. As you can see, by default the date is not populated across all rows.

print(get_string(textract_json=textract_json, output_type=[Textract_Pretty_Print.TABLES]))
|--------------------|---------|
| Beginning Balance: | $8000.0 |
| Deposits           | $3005.5 |
| Other Subtractions | -1539.5 |
| Checks             |         |
| 0.00               |         |
| Service Fees 0.00  |         |
|-----------|----------|------------------------------|
| Account   | name     | John Doe                     |
| Account   | number   | 00002134001                  |
| Statement | Date:    |                              |
| Date      | February | 1, 2022 to February 28, 2022 |
|----------|-------------------------|---------|---------|--------|----------|
|          |                         |         | Amount  |        |          |
| Date     | Description             | Details | Credits | Debits | Balance  |
| 2/4/2022 | Life Insurance Payments | Credit  |         | 445    | 9500.45  |
|          | Property Management     | Credit  |         | 300    | 9945.45  |
|          | Retail Store 4          | Credit  |         | 65.75  | 10245.45 |
| 2/3/2022 | Electricity Bill        | Credit  |         | 245.45 | 10311.2  |
|          | Water Bill              | Credit  |         | 312.85 | 10556.65 |
|          | Rental Deposit          | Credit  | 3000    |        | 10869.5  |
| 2/2/2022 | Retail Store 3          | Credit  |         | 125    | 7869.5   |
|          | Retail Store 2 Refund   | Debit   | 5.5     |        | 7994.5   |
|          | Retail Store 1          | Credit  |         | 45.5   | 8000     |
| 2/1/2022 | Shoe Store Refund       | Credit  | 33      |        | 8045.5   |
|          | Snack Vending Machine   | Debit   |         | 4      | 8012.5   |

Then, we load the response into a document by using the Amazon Textract response parser module, and reorder the blocks by location:

t_doc = TDocumentSchema().load(textract_json)
ordered_doc = order_blocks_by_geo(t_doc)
trp_doc = Document(TDocumentSchema().dump(ordered_doc))

Now let’s iterate through the tables’ content, and extract the data into a DataFrame:

table_index = 1
dataframes = []
 def combine_headers(top_h, bottom_h):
   bottom_h[3] = top_h[2] + " " + bottom_h[3]
   bottom_h[4] = top_h[2] + " " + bottom_h[4]
 for page in trp_doc.pages:
   for table in page.tables:
     table_data = []
     headers = table.get_header_field_names()         #New Table method to retrieve header column names
     if(len(headers)>0):                   #Let's retain the only table with headers
       print("Statememt headers: "+ repr(headers))
       top_header= headers[0]
       bottom_header = headers[1]
       combine_headers(top_header, bottom_header)     #The statement has two headers. let's combine them
       for r, row in enumerate(table.rows_without_header): #New Table attribute returning rows without headers
         table_data.append([])
         for c, cell in enumerate(row.cells):
           table_data[r].append(cell.mergedText)    #New Cell attribute returning merged cells common values
       if len(table_data)>0:
         df = pd.DataFrame(table_data, columns=bottom_header)

The trp module has been improved to include two new capabilities, as highlighted in the preceding code’s comments:

  • Fetch the header column names
  • Expose merged cells’ repeated value

Displaying the DataFrame produces the following output.

Statement Table Dataframe Display

We can now use multi-level indexing and reproduce the table’s initial structure:

multi = df.set_index(['Date', 'Details'])
display(multi)

Statement Table Dataframe Display 2

For a complete version of the notebook presented in this post, visit the amazon-textract-code-samples GitHub repository.

Conclusion

Amazon Textract already helps you speed up document processing and reduce the number of manual tasks. The table’s new headers and merged cells features help you even further by reducing the need for custom or hard-coded logic. It can also help reduce postprocessing manual corrections.

For more information, please visit the Amazon Textract Response Objects documentation page. And if you are interested in learning more about another recently announced Textract feature, we highly recommend checking out Specify and extract information from documents using the new Queries feature in Amazon Textract.


About the Authors

Narcisse Zekpa is a Solutions Architect based in Boston. He helps customers in the Northeast U.S. accelerate their adoption of the AWS Cloud, by providing architectural guidelines, design innovative, and scalable solutions. When Narcisse is not building, he enjoys spending time with his family, traveling, cooking, and playing basketball.

Martin Schade is a Senior ML Product SA with the Amazon Textract team. He has over 20 years of experience with internet-related technologies, engineering, and architecting solutions. He joined AWS in 2014, first guiding some of the largest AWS customers on the most efficient and scalable use of AWS services, and later focused on AI/ML with a focus on computer vision. Currently, he’s obsessed with extracting information from documents.

Read More

Detect financial transaction fraud using a Graph Neural Network with Amazon SageMaker

Fraud plagues many online businesses and costs them billions of dollars each year. Financial fraud, counterfeit reviews, bot attacks, account takeovers, and spam are all examples of online fraud and malicious behaviors.

Although many businesses take approaches to combat online fraud, these existing approaches can have severe limitations. First, many existing methods aren’t sophisticated or flexible enough to detect the whole spectrum of fraudulent or suspicious online behaviors. Second, fraudsters can evolve and adapt to deceive simple rule-based or feature-based methods. For instance, fraudsters can create multiple coordinated accounts to avoid triggering limits on individual accounts.

However, if we construct a full interaction graph encompassing not only single transaction data but also account information, historical activities, and more, it’s more difficult for fraudsters to conceal their behavior. For example, accounts that are often connected to other fraudulent-related nodes may indicate guilt by association. We can also combine weak signals from individual nodes to derive stronger signals about that node’s activity. Fraud detection with graphs is effective because we can detect patterns such as node aggregation, which may occur when a particular user starts to connect with many other users or entities, and activity aggregation, which may occur when a large number of suspicious accounts begin to act in tandem.

In this post, we show you how to quickly deploy a financial transaction fraud detection solution with Graph Neural Networks (GNNs) using Amazon SageMaker JumpStart.

Alternatively, if you are looking for a fully managed service to build customized fraud detection models without writing code, we recommend checking out Amazon Fraud Detector. Amazon Fraud Detector enables customers with no machine learning experience to automate building fraud detection models customized for their data, leveraging more than 20 years of fraud detection expertise from Amazon Web Services (AWS) and Amazon.com.

Benefits of Graph Neural Networks

To illustrate why a Graph Neural Network is a great fit for online transaction fraud detection, let’s look at the following example heterogeneous graph constructed from a sample dataset of typical financial transaction data.

An example heterogeneous graph

A heterogeneous graph contains different types of nodes and edges, which in turn tend to have different types of attributes that are designed to capture characteristics of each node and edge type.

The sample dataset contains not only features of each transaction, such as the purchased product type and transaction amount, but also multiple identity information that could be used to identify the relations between transactions. That information can be used to construct Relational Graph Convolutional Networks (R-GCNs). In the preceding example graph, the node types correspond to categorical columns in the sample dataset such as card number, card type, and email domain.

GNNs utilize all the constructed information to learn a hidden representation (embedding) for each transaction, so that the hidden representation is used as input for a linear classification layer to determine whether the transaction is fraudulent or not.

The solution shown in this post uses Amazon SageMaker and the Deep Graph Library (DGL) to construct a heterogeneous graph from tabular data and train an R-GCNs model to identify fraudulent transactions.

Solution overview

At a high level, the solution trains a graph neural network to accept an interaction graph, as well as some features about the users in order to classify those users as potentially fraudulent or not. This approach ensures that we detect signals that are present in the user attributes or features, as well as in the connectivity structure, and interaction behavior of the users.

This solution employs the following algorithms:

  • R-GCNs, which is a state-of-the-art GNN model for heterogenous graph input
  • SageMaker XGBoost, which we use as the baseline model to compare performances

By default, this solution uses synthetic datasets that are created to mimic typical examples of financial transactions datasets. We demonstrate how to use your own labeled dataset later in this post.

The outputs of the solution are as follows:

  • An R-GCNs model trained on the input datasets.
  • An XGBoost model trained on the input datasets.
  • Predictions of the probability for each transaction being fraudulent. If the estimated probability of a transaction is over a threshold, it’s classified as fraudulent.

In this solution, we focus on the SageMaker components, which include two main parts:

The following diagram illustrates the solution architecture.

Architecture diagram

Prerequisites

To try out the solution in your own account, make sure that you have the following in place:

When the Studio instance is ready, you can launch Studio and access JumpStart. JumpStart solutions are not available in SageMaker notebook instances, and you can’t access them through SageMaker APIs or the AWS Command Line Interface (AWS CLI).

Launch the solution

To launch the solution, complete the following steps:

  1. Open JumpStart by using the JumpStart launcher in the Get Started section or by choosing the JumpStart icon in the left sidebar.
  2. Under Solutions, choose Fraud Detection in Financial Transactions to open the solution in another Studio tab.
    Launch the solution in SageMaker JumpStart
  3. In the solution tab, choose Launch to launch the solution.
    Launch the solution
    The solution resources are provisioned and another tab opens showing the deployment progress. When the deployment is finished, an Open Notebook button appears.
  4. Choose Open Notebook to open the solution notebook in Studio.
    Open notebook

Explore the default dataset

The default dataset used in this solution is a synthetic dataset created to mimic typical examples of financial transactions dataset that many companies have. The dataset consists of two tables:

  • Transactions – Records transactions and metadata about transactions between two users. Examples of columns include the product code for the transaction and features on the card used for the transaction, and a column indicating whether the corresponded transaction is fraud or not.
  • Identity – Contains information about the identity users performing transactions. Examples of columns include the device type and device IDs used.

The two tables can be joined together using the unique identified-key column TransactionID. The following screenshot shows the first five observations of the Transactions dataset.

Sample dataset transactions table

The following screenshot shows the first five observations of the Identity dataset.

Sample dataset identity table

The following screenshot shows the joined dataset.

Sample dataset joined table

Besides the unique identifier column (TransactionID) to identify each transaction, there are two types of predicting columns and one target column:

  • Identity columns – These contain identity information related to a transaction, including card_no, card_type, email_domain, IpAddress, PhoneNo, and DeviceID
  • Categorical or numerical columns – These describe the features of each transaction, including ProductCD and TransactionAmt
  • Target column – The isFraud column indicates whether the corresponded transaction is fraudulent or not

The goal is to fully utilize the information in the predicting columns to classify each transaction (each row in the table) to be either fraud or not fraud.

Upload the raw data to Amazon S3

The solution notebook contains code that downloads the default synthetic datasets and uploads them to the input Amazon Simple Storage Service (Amazon S3) bucket provisioned by the solution.

To use your own labeled datasets, before running the code cell in the Upload raw data to S3 notebook section, edit the value of the variable raw_data_location so that it points to the location of your own input data.

Code lines that specify data location

In the Data Visualization notebook section, you can run the code cells to visualize and explore the input data as tables.

If you’re using your own datasets with different data file names or table columns, remember to also update the data exploration code accordingly.

Data preprocessing and feature engineering

The solution provides a data preprocessing and feature engineering Python script data-preprocessing/graph_data_preprocessor.py. This script serves as a general processing framework to convert a relational table to heterogeneous graph edge lists based on the column types of the relational table. Some of the data transformation and feature engineering techniques include:

  • Performing numerical encoding for categorical variables and logarithmic transformation for transaction amount
  • Constructing graph edge lists between transactions and other entities for the various relation types

All the columns in the relational table are classified into one of the following three types for data transformation:

  • Identity columns – Columns that contain identity information related to a user or a transaction, such as IP address, phone number, and device identifiers. These column types become node types in the heterogeneous graph, and the entries in these columns become the nodes.
  • Categorical columns – Columns that correspond to categorical features such as a user’s age group, or whether or not a provided address matches an address on file. The entries in these columns undergo numerical feature transformation and are used as node attributes in the heterogeneous graph.
  • Numerical columns – Columns that correspond to numerical features such as how many times a user has tried a transaction. The entries here are also used as node attributes in the heterogeneous graph. The script assumes that all columns in the tables that aren’t identity columns or categorical columns are numerical columns.

The names of the identity columns and categorical columns need to be provided as command line arguments when running the Python script (--id-cols for identity column names and --cat-cols for category column names).

Code lines that specify Python script command line arguments

If you’re using your own data and your data is in the same format as the default synthetic dataset but with different column names, you simply need to adapt the Python arguments in the notebook code cell according to your dataset’s column names. However, if your data is in a different format, you need to modify the following section in the data-preprocessing/graph_data_preprocessor.py Python script.

Code lines that handle data format

We divide the dataset into training (70% of the entire data), validation (20%), and test datasets (10%). The validation dataset is used for hyperparameter optimization (HPO) to select the optimal set of hyperparameters. The test dataset is used for the final evaluation to compare various models. If you need to adjust these ratios, you can use the command line arguments --train-data-ratio and --valid-data-ratio when running the preprocessing Python script.

When the preprocessing job is complete, we have a set of bipartite edge lists between transactions and different device ID types (suppose we’re using the default dataset), as well as the features, labels, and a set of transactions to validate our graph model performance. You can find the transformed data in the S3 bucket created by the solution, under the dgl-fraud-detection/preprocessed-data folder.

Preprocessed data in S3

Train an XGBoost baseline model with HPO

Before diving into training a graph neural network with the DGL, we first train an XGBoost model with HPO as the baseline on the transaction table data.

  1. Read the data from features_xgboost.csv and upload the data to Amazon S3 for training the baseline model. This CSV file was generated in the data preprocessing and feature engineering job in the last step. Only the categorical columns productCD, card_type, and the numerical column TransactionAmt are included.
  2. Create an XGBoost estimator with the SageMaker XGBoost algorithm container.
  3. Create and fit an XGBoost estimator with HPO:
    1. Specify dynamic hyperparameters we want to tune and their searching ranges.
    2. Define optimization objectives in terms of metrics and objective type.
    3. Create hyperparameter tuning jobs to train the model.
  4. Deploy the endpoint of the best tuning job and make predictions with the baseline model.

Train the Graph Neural Network using the DGL with HPO

Graph Neural Networks work by learning representation for nodes or edges of a graph that are well suited for some downstream tasks. We can model the fraud detection problem as a node classification task, and the goal of the GNN is to learn how to use information from the topology of the sub-graph for each transaction node to transform the node’s features to a representation space where the node can be easily classified as fraud or not.

Specifically, we use a relational graph convolutional neural networks model (R-GCNs) on a heterogeneous graph because we have nodes and edges of different types.

  1. Define hyperparameters to determine properties such as the class of GNN models, the network architecture, the optimizer, and optimization parameters.
  2. Create and train the R-GCNs model.

For this post, we use the DGL, with MXNet as the backend deep learning framework. We create a SageMaker MXNet estimator and pass in our model training script (sagemaker_graph_fraud_detection/dgl_fraud_detection/ train_dgl_mxnet_entry_point.py), the hyperparameters, as well as the number and type of training instances we want to use. When the training is complete, the trained model and prediction result on the test data are uploaded to Amazon S3.

  1. Optionally, you can inspect the prediction results and compare the model metrics with the baseline XGBoost model.
  2. Create and fit a SageMaker estimator using the DGL with HPO:
    1. Specify dynamic hyperparameters we want to tune and their searching ranges.
    2. Define optimization objectives in terms of metrics and objective type.
    3. Create hyperparameter tuning jobs to train the model.
  3. Read the prediction output for the test dataset from the best tuning job.

Clean up

When you’re finished with this solution, make sure that you delete all unwanted AWS resources to avoid incurring unintended charges. In the Delete solution section on your solution tab, choose Delete all resources to delete resources automatically created when launching this solution.

Clean up in SageMaker JumpStart

Alternatively, you can use AWS CloudFormation to delete all standard resources automatically created by the solution and notebook. To use this approach, on the AWS CloudFormation console, find the CloudFormation stack whose description contains sagemaker-graph-fraud-detection, and delete it. This is a parent stack; deleting this stack automatically deletes the nested stacks.

Clean up from AWS CloudFormation

With either approach, you still need to manually delete any extra resources that you may have created in this notebook. Some examples include extra S3 buckets (in addition to the solution’s default bucket), extra SageMaker endpoints (using a custom name), and extra Amazon Elastic Container Registry (Amazon ECR) repositories.

Conclusion

In this post, we discussed the business problem caused by online transaction fraud, the issues in traditional fraud detection approaches, and why a GNN is a good fit for solving this business problem. We showed you how to build an end-to-end solution for detecting fraud in financial transactions using a GNN with SageMaker and a JumpStart solution. We also explained other features of JumpStart, such as using your own dataset, using SageMaker algorithm containers, and using HPO to automate hyperparameter tuning and find the best tuning job to make predictions.

To learn more about this JumpStart solution, check out the solution’s GitHub repository.


About the Authors

Xiaoli Shen profile pictureXiaoli Shen is a Solutions Architect and Machine Learning Technical Field Community (TFC) member at Amazon Web Services. She’s focused on helping customers architecting on the cloud and leveraging AWS services to derive business value. Prior to joining AWS, she was a senior full-stack engineer building large-scale data-intensive distributed systems on the cloud. Outside of work she’s passionate about volunteering in technical communities, traveling the world, and making music.

Xin Huang profile picture Dr. Xin Huang is an applied scientist for Amazon SageMaker JumpStart and Amazon SageMaker built-in algorithms. He focuses on developing scalable machine learning algorithms. His research interests are in the area of natural language processing, explainable deep learning on tabular data, and robust analysis of non-parametric space-time clustering.

Vedant Jain profile picture Vedant Jain is a Sr. AI/ML Specialist Solutions Architect, helping customers derive value out of the Machine Learning ecosystem at AWS. Prior to joining AWS, Vedant has held ML/Data Science Specialty positions at various companies such as Databricks, Hortonworks (now Cloudera) & JP Morgan Chase. Outside of his work, Vedant is passionate about making music, using Science to lead a meaningful life & exploring delicious vegetarian cuisine from around the world.

Read More

Best Practices for Deploying Language Models

Best Practices for Deploying Language Models

Cohere, OpenAI, and AI21 Labs have developed a preliminary set of best practices applicable to any organization developing or deploying large language models. Computers that can read and write are here, and they have the potential to fundamentally impact daily life. The future of human–machine interaction is full of possibility and promise, but any powerful technology needs careful deployment.

The joint statement below represents a step towards building a community to address the global challenges presented by AI progress, and we encourage other organizations who would like to participate to get in touch.

Joint Recommendation for Language Model Deployment

We’re recommending several key principles to help providers of large language models (LLMs) mitigate the risks of this technology in order to achieve its full promise to augment human capabilities.

While these principles were developed specifically based on our experience with providing LLMs through an API, we hope they will be useful regardless of release strategy (such as open-sourcing or use within a company). We expect these recommendations to change significantly over time because the commercial uses of LLMs and accompanying safety considerations are new and evolving. We are actively learning about and addressing LLM limitations and avenues for misuse, and will update these principles and practices in collaboration with the broader community over time.

We’re sharing these principles in hopes that other LLM providers may learn from and adopt them, and to advance public discussion on LLM development and deployment.

Prohibit misuse


Publish usage guidelines and terms of use of LLMs in a way that prohibits material harm to individuals, communities, and society such as through spam, fraud, or astroturfing. Usage guidelines should also specify domains where LLM use requires extra scrutiny and prohibit high-risk use-cases that aren’t appropriate, such as classifying people based on protected characteristics.


Build systems and infrastructure to enforce usage guidelines. This may include rate limits, content filtering, application approval prior to production access, monitoring for anomalous activity, and other mitigations.

Mitigate unintentional harm


Proactively mitigate harmful model behavior. Best practices include comprehensive model evaluation to properly assess limitations, minimizing potential sources of bias in training corpora, and techniques to minimize unsafe behavior such as through learning from human feedback.


Document known weaknesses and vulnerabilities, such as bias or ability to produce insecure code, as in some cases no degree of preventative action can completely eliminate the potential for unintended harm. Documentation should also include model and use-case-specific safety best practices.

Thoughtfully collaborate with stakeholders


Build teams with diverse backgrounds and solicit broad input. Diverse perspectives are needed to characterize and address how language models will operate in the diversity of the real world, where if unchecked they may reinforce biases or fail to work for some groups.


Publicly disclose lessons learned regarding LLM safety and misuse in order to enable widespread adoption and help with cross-industry iteration on best practices.


Treat all labor in the language model supply chain with respect. For example, providers should have high standards for the working conditions of those reviewing model outputs in-house and hold vendors to well-specified standards (e.g., ensuring labelers are able to opt out of a given task).

As LLM providers, publishing these principles represents a first step in collaboratively guiding safer large language model development and deployment. We are excited to continue working with each other and with other parties to identify other opportunities to reduce unintentional harms from and prevent malicious use of language models.

Download as PDF

Support from other organizations

“While LLMs hold a lot of promise, they have significant inherent safety issues which need to be worked on. These best practices serve as an important step in minimizing the harms of these models and maximizing their potential benefits.”

—Anthropic

“As large language models (LLMs) have become increasingly powerful and expressive, risk mitigation becomes increasingly important. We welcome these and other efforts to proactively seek to mitigate harms and highlight to users areas requiring extra diligence. The principles outlined here are an important contribution to the global conversation.”

—John Bansemer, Director of the CyberAI Project and Senior Fellow, Center for Security and Emerging Technology (CSET)

“Google affirms the importance of comprehensive strategies in analyzing model and training data to mitigate the risks of harm, bias, and misrepresentation. It is a thoughtful step taken by these AI providers to promote the principles and documentation towards AI safety.”

—Google Cloud Platform (GCP)

“The safety of foundation models, such as large language models, is a growing social concern. We commend Cohere, OpenAI, and AI21 Labs for taking a first step to outline high-level principles for responsible development and deployment from the perspective of model developers. There is still much work to be done, and we believe it is essential to engage more voices from academia, industry, and civil society to develop more detailed principles and community norms. As we state in our recent blog post, it is not just the end result but the legitimacy of the process that matters.”

—Percy Liang, Director of the Stanford Center for Research on Foundation Models (CRFM)

Get involved

If you’re developing language models or are working to mitigate their risks, we’d love to talk with you. Please reach out at bestpractices@openai.com.


OpenAI

GFN Thursday Jumps Into June With 25 New Games Coming This Month

Celebrate the onset of summer this GFN Thursday with 25 more games joining the GeForce NOW library, including seven additions this week. Because why would you ever go outside?

Looking to spend the summer months in Space Marine armor? Games Workshop is kicking off its Warhammer Skulls event for its sixth year, with great discounts on the Warhammer franchise on GeForce NOW.

Snag Sales With the Warhammer Skulls Festival

Warhammer Skulls Fest on GeForce NOW
Get many of your favorite Warhammer titles streaming on GeForce NOW on sale this week.

Games Workshop’s Warhammer Festival brings week-long discounts on several Warhammer games that are available to stream on GeForce NOW.

Gamers can grab the following titles on sale:

Check out the Warhammer Community to get all the details, including links to sales.

Jump Into June

LEAP on GeForce NOW
Arm yourself to the teeth in LEAP, a fast-paced, multiplayer first-person shooter featuring epic battles with up to 60 players.

Twenty-five more games are joining the cloud this June. Get started with this week’s seven additions:

  • LEAP (New release on Steam)
  • Souldiers (New release on Steam)
  • Twilight Wars: Declassified (New release on Steam)
  • ABRISS – build to destroy (Steam)
  • ANNO: Mutationem (Steam)
  • Kathy Rain: Director’s Cut (Steam)
  • Star Conflict (Steam)

Also coming this month:

  • MythBusters: The Game – Crazy Experiments Simulator (New release on Steam, June 8)
  • POSTAL: Brain Damaged (New release on Steam, June 9)
  • Pro Cycling Manager 2022 (New release on Steam, June 9)
  • Tour de France 2022 (New release on Steam, June 9)
  • Builder Simulator (New release on Steam, June 9)
  • Chivalry 2 (New release on Steam, June 12)
  • Starship Troopers – Terran Command (New release on Steam and Epic Games Store, June 16)
  • Airborne Kingdom (Steam)
  • Core Keeper (Steam)
  • Fishing: North Atlantic (Steam)
  • Immortal Life (Steam)
  • The Legend of Heroes: Trails of Cold Steel II (Steam)
  • KeyWe (Steam)
  • King Arthur: Knight’s Tale (Steam)
  • Mechwarrior 5: Mercenaries (Steam)
  • No Straight Roads: Encore Edition (Steam)
  • Silt (Steam and Epic Games Store)
  • SimAirport (Steam)

More From May

On top of the 27 games announced in May, another nine joined over the month:

On July 1, God of War (Steam, Epic Games Store) will be removed from the GeForce NOW library. However, it will remain available for those who have played the game at least once on GeForce NOW.

As part of the GeForce NOW opt-in process, some games may continue to be available to members on a legacy basis. This will allow members who have started playing a game at least once on GeForce NOW to continue playing it, even after the game has been removed for users who have not played it.

Finally, in the spirit of summer, we’ve got to know your vacation plans. Let us know your answer on Twitter or in the comments below.

The post GFN Thursday Jumps Into June With 25 New Games Coming This Month appeared first on NVIDIA Blog.

Read More

New documentation on tensorflow.org

Posted by the TensorFlow team

As Google I/O took place, we published a lot of exciting new docs on tensorflow.org, including updates to model parallelism and model remediation, TensorFlow Lite, and the TensorFlow Model Garden. Let’s take a look at what new things you can learn about!

Counterfactual Logit Pairing

The Responsible AI team added a new model remediation technique as part of their Model Remediation library. The TensorFlow Model Remediation library provides training-time techniques to intervene on the model such as changing the model itself by introducing or altering model objectives. Originally, model remediation launched with its first technique, MinDiff, which minimizes the difference in performance between two slices of data.

New at I/O is Counterfactual Logit Pairing (CLP). This is a technique that seeks to ensure that a model’s prediction doesn’t change when a sensitive attribute referenced in an example is either removed or replaced. For example, in a toxicity classifier, examples such as “I am a man” and “I am a lesbian” should be equal and not classified as toxic.

Check out the basic tutorial, the Keras tutorial, and the API reference.

Model parallelism: DTensor

DTensor provides a global programming model that allows developers to operate on tensors globally while managing distribution across devices. DTensor distributes the program and tensors according to the sharding directives through a procedure called Single program, multiple data (SPMD) expansion.

By decoupling the overall application from sharding directives, DTensor enables running the same application on a single device, multiple devices, or even multiple clients, while preserving its global semantics. If you remember Mesh TensorFlow from TF1, DTensor can address the same issue that Mesh addressed: training models that may be larger than a single core.

With TensorFlow 2.9, we made DTensor, that had been in nightly builds, visible on tensorflow.org. Although DTensor is experimental, you’re welcome to try it out. Check out the DTensor Guide, the DTensor Keras Tutorial, and the API reference.

New in TensorFlow Lite

We made some big changes to the TensorFlow Lite site, including to the getting started docs.

Developer Journeys

First off, we now organize the developer journeys by platform (Android, iOS, and other edge devices) to make it easier to get started with your platform. Android gained a new learning roadmap and quickstart. We also earlier added a guide to the new beta for TensorFlow Lite in Google Play services. These quickstarts include examples in both Kotlin and Java, and upgrade our example code to CameraX, as recommended by our colleagues in Android developer relations!

If you want to immediately run an Android sample, one can now be imported directly from Android studio. When starting a new project, choose: New Project > Import Sample… and look for Artificial Intelligence > TensorFlow Lite in Play Services image classification example application. This is the sample that can help you find your mug…or other objects:

Model Maker

The TensorFlow Lite Model Maker library simplifies the process of training a TensorFlow Lite model using custom datasets. It uses transfer learning to reduce the amount of training data required and reduce training time, and comes pre-built with seven common tasks including image classification, object detection, and text search.

We added a new tutorial for text search. This type of model lets you take a text query and search for the most related entries in a text dataset, such as a database of web pages. On mobile, you might use this for auto reply or semantic document search.

We also published the full Python library reference.

TF Lite model page

Finding the right model for your use case can sometimes be confusing. We’ve written more guidance on how to choose the right model for your task, and what to consider to make that decision.You can also find links to models for common use cases.

Model Garden: State of the art models ready to go

The TensorFlow Model Garden provides implementations of many state-of-the-art machine learning (ML) models for vision and natural language processing (NLP), as well as workflow tools to let you quickly configure and run those models on standard datasets. The Model Garden covers both vision and text tasks, and a flexible training loop library called Orbit. Models come with pre-built configs to train to state-of-the-art, as well as many useful specialized ops.

We’re just getting started documenting all the great things you can do with the Model Garden. Your first stops should be the overview, lists of available models, and the image classification tutorial.

Other exciting things!

Don’t miss the crown-of-thorns starfish detector! Find your own COTS on real images from the Great Barrier reef. See the video, read the blog post, and try out the model in Colab yourself.

Also, there is a new tutorial on TensorFlow compression, which does lossy compression using neural networks. This example uses something like an autoencoder to compress and decompress MNIST.

And, of course, don’t miss all the great I/O talks you can watch on YouTube. Thank you!

Read More

Inaugural Day of AI brings new digital literacy to classrooms worldwide

The first annual Day of AI on Friday, May 13 introduced artificial intelligence literacy to classrooms all over the world. An initiative of MIT Responsible AI for Social Empowerment and Education (RAISE), Day of AI is an opportunity for teachers to introduce K-12 students of all backgrounds to artificial intelligence (AI) and its role in their lives.

With over 3,000 registrations from educators across 88 countries — far exceeding the first-year goal of 1,000 registrations in the United States — the initiative has clearly struck a chord with students and teachers who want to better understand the technology that’s increasingly part of everyday life.

In today’s technology-driven world, kids are exposed to and interact with AI in ways they might not realize — from search algorithms to smart devices, video recommendations to facial recognition. Day of AI aims to help educators and students develop AI literacy with an easy entry point, with free curricula and hands-on activities developed by MIT RAISE for grades 3-12.

Professor Cynthia Breazeal, director of MIT RAISE, dean for digital learning, and head of the MIT Media Lab’s Personal Robots research group, says “We’re so inspired by the enthusiasm that students have expressed about learning about AI. We created this program because we want students and their teachers to be able to learn about these technologies in a way that’s engaging, that’s meaningful, that gives them the experience so they know that they can do AI too.”

AI is for everyone

The MIT RAISE team designed all Day of AI activities to be accessible to educators and students of all backgrounds and abilities, including those with little or no technology experience. In collaboration with education provider i2 Learning, MIT RAISE also offered teachers free professional development sessions prior to teaching the material. “That really helped me understand GANs and how that works,” says Gar-Hay Kit, a sixth-grade teacher from Mary Lyon School in Boston. “The slides that we were given were easy to work with and my class was engaged with all of the activities that we did that day.”

Students engaged with AI topics such as deepfakes, generative adversarial networks (GANs), algorithmic bias in datasets, and responsible design in social media platforms. Through hands-on activities and accessible, age-appropriate lessons, they learned what these technologies do, how they’re built, the potential dangers, along with responsible design and use — to bring benefit while mitigating unintended negative consequences.

To celebrate the inaugural Day of AI, the RAISE team hosted an event at WBUR CitySpace. Students from the fifth and sixth grade at Mary Lyon School shared projects they had created using the Day of AI curriculum during the previous few days. They demonstrated how Google QuickDraw was more likely to recognize spotted cows when the majority of users submit input with drawings of cows with spots; the AI didn’t have a wide enough dataset to draw from to be able to account for other breeds of cows that have different patterns or solid colors.

In a project about responsible social media and game design, students showed how the Roblox game platform only recommends gendered clothing for characters based on the user-entered gender. The solution the students proposed was to change the design of the recommendation system by inputting more options that were less overtly gendered, and allowing all users access to all of the clothing.

When asked what stuck out the most about the Day of AI activities, sixth-grade student Julia said, “It was cool how they were teaching young students AI and how we got to watch videos, and draw on the website.”

“One of the great benefits of this program is that no experience is necessary. You can be from anywhere and still have access to this career,” said Lieutenant Governor Karyn Polito at the event. The accessibility of Day of AI curricula relates to the tenet of Massachusetts STEM Week, “See yourself in STEM,” and Massachusetts’ STEM education goals at large. When Polito asked the audience of fifth- and sixth-graders from Mary Lyon School if they saw themselves in STEM, dozens of hands shot up in the air.

Breazeal echoed that sentiment, saying, “No matter your background, we want you to feel empowered and see a place where you can be inventing and driving these technologies in responsible ways to make a better world.” Working professionals and graduate students who use AI aren’t the only ones affected by this technology. RAISE pursues research, innovation, and outreach programs like Day of AI so K-12 students of all ages can recognize AI, evaluate its influence, and learn how to use it responsibly. Addressing the students, Breazeal said, “As you grow up, you’ll have a voice in our democracy to say how you want to see AI used.” 

More than just robots … but sometimes robots

Breazeal also moderated a panel of professionals who work with AI every day: Daniella DiPaola, PhD student at the MIT Media Lab; Steve Idowu, senior manager of strategic innovation at Liberty Mutual; Alex Aronov, executive director of data strategy and solutions at Vertex; and Sara Saperstein, head of data science, cybersecurity, and fraud at MassMutual. The panelists discussed how they’re able to leverage AI in a variety of different ways at their jobs.

Aronov explained that in a broad sense, AI can help automate “mundane” tasks so employees can focus on projects that require creative, innately “human” thinking. Idowu uses AI to improve customer and employee experiences, from claims to risk assessments. DiPaola addressed the common misconception that AI refers to sentient robots: when the Media Lab developed the social robot Jibo, the AI in action is not the robot itself but natural language understanding, technology that helps Jibo understand what people say and mean. Throughout her academic career, DiPaola has been interested in how people interact with technology. “AI is helping us uncover things about ourselves,” she said.

The panelists also spoke to the broader goals of Day of AI — not only to introduce a younger generation to the STEM concepts at the core of AI technology, but to help them envision a future for themselves that uses those skills in new ways. “It’s not just the math and computer science, it’s about thinking deeply about what we’re doing — and how,” said Saperstein.

Jeffrey Leiden, executive chair of Vertex Pharmaceuticals (a founding sponsor of Day of AI as well as the CitySpace event), said, “Twenty years ago, I don’t think any of us could have predicted how much AI and machine learning would be in our lives. We have Siri on our phones, AI can tell us what’s in our fridges, it can change the temperature automatically on our thermostats,” he said. As someone working in the medical industry, he’s particularly excited for how AI can detect medical events before they happen so patients can be treated proactively.

By introducing STEM subjects as early as elementary and middle school, educators can build pathways for students to pursue STEM in high school and beyond. Exposure to future careers as scientists and researchers working in fields ranging from life sciences to robotics can empower students to bring their ideas forward and come up with even better solutions for science’s great questions.

The first Day of AI was hugely successful, with teachers posting photos and stories of their students’ enthusiasm from all over the world on social media using #DayofAI. Further Day of AI events are planned in Australia and Hong Kong later this summer, and the MIT RAISE team is already planning new curriculum modules, resources, and community-building efforts in advance of next year’s event. Plans include engaging the growing global community for language translation, more cultural localization for curriculum modules, and more.

Read More

Automate vending Amazon SageMaker notebooks with Amazon EventBridge and AWS Lambda

Having an environment capable of delivering Amazon SageMaker notebook instances quickly allows data scientists and business analysts to efficiently respond to organizational needs. Data is the lifeblood of an organization, and analyzing that data efficiently provides useful insights for businesses. A common issue that organizations encounter is creating an automated pattern that enables development teams to launch AWS services. Organizations want to enable their developers to launch resources as they need them, but in a centralized and secure fashion.

This post demonstrates how to centralize the management of SageMaker instance notebooks using AWS services including AWS CloudFormation, AWS Serverless Application Model (AWS SAM), AWS Service Catalog, Amazon EventBridge, AWS Systems Manager Parameter Store, Amazon API Gateway, and AWS Lambda. We walk through how to use these AWS services to automate the process of vending SageMaker notebooks to end-users.

Solution overview

In our solution, a notebook user requests a notebook instance using AWS Service Catalog. The request is processed by AWS CloudFormation, which delivers the notebook instance. EventBridge monitors the AWS Service Catalog API for completion of the notebook instance resource provisioning. An event-based rule in EventBridge calls the Lambda event processor, which runs a Lambda function returning the presigned URL.

The following architectural diagram illustrates the infrastructure state as defined in the CloudFormation templates.

The process consists of the following steps:

  1. A user requests a new notebook via the AWS Service Catalog console.
  2. AWS Service Catalog launches a CloudFormation stack.
  3. AWS CloudFormation launches the SageMaker notebook.
  4. A SageMaker notebook is now running.
  5. An EventBridge function is triggered when a new AWS Service Catalog product is launched.
  6. The Amazon CloudWatch event invokes a Lambda function that generates the presigned URL and a user-specific SSM parameter.
  7. A user requests a new presigned URL.
  8. A Lambda function generates a new presigned URL and updates the user’s SSM parameter with the new URL.

Prerequisites

To implement this solution, you must have the following prerequisites:

Deploy resources with AWS CloudFormation

To create your resources with AWS CloudFormation, complete the following steps:

  1. Deploy the s3-iam-config CloudFormation template:
    aws cloudformation create-stack 
    --stack-name s3-iam-config 
    --template-body file://templates/s3-iam-config.yml 
    --parameters file://parameters/s3-iam-params.json 
    --capabilities CAPABILITY_NAMED_IAM

The output should look like the following code:

{
"StackId": "arn:aws:cloudformation:us-east-1:123456789012:stack/s3-iam-config/9be9f990-0909-11eb-811c-0a78092beb51"
}

The template creates an Amazon Simple Storage Service (Amazon S3) bucket.

  1. Run the following command to get the S3 bucket name generated in the previous step:
    aws cloudformation describe-stacks 
    --stack-name s3-iam-config 
    --query "Stacks[0].Outputs[?OutputKey=='S3BucketName'].OutputValue" 
    --output text

The output should look like the following:

s3-iam-config-s3bucket-1p85zr5051d86
  1. Run the following command using the output from the previous step (update the bucket name):
    aws s3 cp templates/sm-notebook.yml s3://<bucket_name>/sm-notebook.yml

The output should look like the following:

upload: templates/sm-notebook.yml to s3://s3-iam-config-s3bucket-1p85zr5051d86/sm-notebook.yml
  1. Open the parameters/service-catalog-params.json file and update the S3BucketName parameter to the bucket name from the previous step. Update the UserIAMPrincipal with the ARN of the IAM role you’re using for this demo.
    [
      {
        "ParameterKey" : "NotebookInstanceType",
        "ParameterValue" : "ml.t2.medium"
      },
      {
        "ParameterKey" : "S3IAMConfigStackName",
        "ParameterValue" : "s3-iam-config"
      },
      {
        "ParameterKey" : "ServiceCatalogTemplateName",
        "ParameterValue" : "sm-notebook.yml"
      },
      {
        "ParameterKey" : "S3BucketName",
        "ParameterValue" : "<input_your_bucket_name>"
      },
      {
        "ParameterKey" : "UserIAMPrincipal",
        "ParameterValue" : "<input_your_iam_principal_arn>"
      }
    ]

  2. Deploy the service-catalog CloudFormation template:
    aws cloudformation create-stack 
    --stack-name service-catalog-config 
    --template-body file://templates/service-catalog.yml 
    --parameters file://parameters/service-catalog-params.json 
    --capabilities CAPABILITY_NAMED_IAM

The output should look like the following:

{
    "StackId": "arn:aws:cloudformation:us-east-1:123456789012:stack/service-catalog-config/fb29c5e0-28a0-11ec-8337-123f746ae8a3"
}

Deploy resources with AWS SAM

To deploy resources with AWS SAM, complete the following steps:

  1. Change your directory to the lambda directory:
    cd lambda/

  2. Build the application:
    sam build

The output should look like the following:

Built Artifacts  : .aws-sam/build
Built Template   : .aws-sam/build/template.yaml

Commands you can use next
=========================
[*] Invoke Function: sam local invoke
[*] Test Function in the Cloud: sam sync --stack-name {stack-name} --watch
[*] Deploy: sam deploy --guided
  1. Deploy the application:
    sam deploy --guided

  2. Respond to the questions in the CLI as shown in the following code:
      Configuring SAM deploy
    ======================
    
            Looking for config file [samconfig.toml] :  Found
            Reading default arguments  :  Success
    
            Setting default arguments for 'sam deploy'
            =========================================
            Stack Name [sam-app]: sam-app
            AWS Region [us-east-1]: us-east-1
            Parameter EventBridgeFunctionName [EventBridgeFunction]: EventBridgeFunction
            Parameter EventRuleName [SvcCatalogEventRule]: SvcCatalogEventRule
            Parameter RefreshFunctionName [RefreshURLFunction]: RefreshURLFunction
            #Shows you resources changes to be deployed and require a 'Y' to initiate deploy
            Confirm changes before deploy [y/N]: N
            #SAM needs permission to be able to create roles to connect to the resources in your template
            Allow SAM CLI IAM role creation [Y/n]: Y
            #Preserves the state of previously provisioned resources when an operation fails
            Disable rollback [y/N]: N
            EventBridgeFunction may not have authorization defined, Is this okay? [y/N]: Y
            RefreshURLFunction may not have authorization defined, Is this okay? [y/N]: Y
            Save arguments to configuration file [Y/n]: Y
            SAM configuration file [samconfig.toml]: samconfig.toml
            SAM configuration environment [default]: dev

The output should look like the following:

        Looking for resources needed for deployment:
        Creating the required resources...
        Successfully created!
         Managed S3 bucket: aws-sam-cli-managed-default-samclisourcebucket-1f4i68wsmouhw
         A different default S3 bucket can be set in samconfig.toml

        Saved arguments to config file
        Running 'sam deploy' for future deployments will use the parameters saved above.
        The above parameters can be changed by modifying samconfig.toml
        Learn more about samconfig.toml syntax at 
        https://docs.aws.amazon.com/serverless-application-model/latest/developerguide/serverless-sam-cli-config.html

Uploading to sam-app/6f3e2f13cfdca08133238f77fc2c667b  9425988 / 9425988  (100.00%)
Uploading to sam-app/b153fd4be66b581361f7d46efae25f18  9425968 / 9425968  (100.00%)

        Deploying with following values
        ===============================
        Stack name                   : sam-app
        Region                       : us-east-1
        Confirm changeset            : False
        Disable rollback             : False
        Deployment s3 bucket         : aws-sam-cli-managed-default-samclisourcebucket-1f4i68wsmouhw
        Capabilities                 : ["CAPABILITY_IAM"]
        Parameter overrides          : {"EventBridgeFunctionName": "EventBridgeFunction", "EventRuleName": "SvcCatalogEventRule", "RefreshFunctionName": "RefreshURLFunction"}
        Signing Profiles             : {}

Initiating deployment
=====================
Uploading to sam-app/c82cdea2bfbc2abc6520a97fce4c8a8b.template  6754 / 6754  (100.00%)

Waiting for changeset to be created..

CloudFormation stack changeset
-----------------------------------------------------------------------------------------------------------------------------------------------------------------
Operation                                LogicalResourceId                        ResourceType                             Replacement                            
-----------------------------------------------------------------------------------------------------------------------------------------------------------------
+ Add                                    EventBridgeFunctionHelloWorldPermissio   AWS::Lambda::Permission                  N/A                                    
                                         nProd                                                                                                                    
+ Add                                    EventBridgeFunctionRole                  AWS::IAM::Role                           N/A                                    
+ Add                                    EventBridgeFunction                      AWS::Lambda::Function                    N/A                                    
+ Add                                    PermissionForEventsToInvokeLambda        AWS::Lambda::Permission                  N/A                                    
+ Add                                    RefreshURLFunctionHelloWorldPermission   AWS::Lambda::Permission                  N/A                                    
                                         Prod                                                                                                                     
+ Add                                    RefreshURLFunctionRole                   AWS::IAM::Role                           N/A                                    
+ Add                                    RefreshURLFunction                       AWS::Lambda::Function                    N/A                                    
+ Add                                    ServerlessRestApiDeploymentb762875163    AWS::ApiGateway::Deployment              N/A                                    
+ Add                                    ServerlessRestApiProdStage               AWS::ApiGateway::Stage                   N/A                                    
+ Add                                    ServerlessRestApi                        AWS::ApiGateway::RestApi                 N/A                                    
+ Add                                    SvcCatalogEventRule                      AWS::Events::Rule                        N/A                                    
-----------------------------------------------------------------------------------------------------------------------------------------------------------------

Changeset created successfully. arn:aws:cloudformation:us-east-1:123456789012:changeSet/samcli-deploy1641934511/763fe89c-9c6a-4cef-a1a6-90986d7decfd


2022-01-11 15:55:22 - Waiting for stack create/update to complete

CloudFormation events from stack operations
-----------------------------------------------------------------------------------------------------------------------------------------------------------------
ResourceStatus                           ResourceType                             LogicalResourceId                        ResourceStatusReason                   
-----------------------------------------------------------------------------------------------------------------------------------------------------------------
CREATE_IN_PROGRESS                       AWS::IAM::Role                           RefreshURLFunctionRole                   -                                      
CREATE_IN_PROGRESS                       AWS::IAM::Role                           EventBridgeFunctionRole                  -                                      
CREATE_IN_PROGRESS                       AWS::IAM::Role                           EventBridgeFunctionRole                  Resource creation Initiated            
CREATE_IN_PROGRESS                       AWS::IAM::Role                           RefreshURLFunctionRole                   Resource creation Initiated            
CREATE_COMPLETE                          AWS::IAM::Role                           EventBridgeFunctionRole                  -                                      
CREATE_IN_PROGRESS                       AWS::Lambda::Function                    EventBridgeFunction                      -                                      
CREATE_IN_PROGRESS                       AWS::Lambda::Function                    EventBridgeFunction                      Resource creation Initiated            
CREATE_COMPLETE                          AWS::IAM::Role                           RefreshURLFunctionRole                   -                                      
CREATE_COMPLETE                          AWS::Lambda::Function                    EventBridgeFunction                      -                                      
CREATE_IN_PROGRESS                       AWS::Lambda::Function                    RefreshURLFunction                       -                                      
CREATE_IN_PROGRESS                       AWS::Lambda::Function                    RefreshURLFunction                       Resource creation Initiated            
CREATE_IN_PROGRESS                       AWS::Events::Rule                        SvcCatalogEventRule                      -                                      
CREATE_IN_PROGRESS                       AWS::Events::Rule                        SvcCatalogEventRule                      Resource creation Initiated            
CREATE_COMPLETE                          AWS::Lambda::Function                    RefreshURLFunction                       -                                      
CREATE_IN_PROGRESS                       AWS::ApiGateway::RestApi                 ServerlessRestApi                        -                                      
CREATE_COMPLETE                          AWS::ApiGateway::RestApi                 ServerlessRestApi                        -                                      
CREATE_IN_PROGRESS                       AWS::ApiGateway::RestApi                 ServerlessRestApi                        Resource creation Initiated            
CREATE_IN_PROGRESS                       AWS::ApiGateway::Deployment              ServerlessRestApiDeploymentb762875163    -                                      
CREATE_IN_PROGRESS                       AWS::Lambda::Permission                  EventBridgeFunctionHelloWorldPermissio   -                                      
                                                                                  nProd                                                                           
CREATE_IN_PROGRESS                       AWS::Lambda::Permission                  RefreshURLFunctionHelloWorldPermission   Resource creation Initiated            
                                                                                  Prod                                                                            
CREATE_IN_PROGRESS                       AWS::Lambda::Permission                  EventBridgeFunctionHelloWorldPermissio   Resource creation Initiated            
                                                                                  nProd                                                                           
CREATE_IN_PROGRESS                       AWS::Lambda::Permission                  RefreshURLFunctionHelloWorldPermission   -                                      
                                                                                  Prod                                                                            
CREATE_IN_PROGRESS                       AWS::ApiGateway::Deployment              ServerlessRestApiDeploymentb762875163    Resource creation Initiated            
CREATE_COMPLETE                          AWS::ApiGateway::Deployment              ServerlessRestApiDeploymentb762875163    -                                      
CREATE_IN_PROGRESS                       AWS::ApiGateway::Stage                   ServerlessRestApiProdStage               -                                      
CREATE_IN_PROGRESS                       AWS::ApiGateway::Stage                   ServerlessRestApiProdStage               Resource creation Initiated            
CREATE_COMPLETE                          AWS::Lambda::Permission                  RefreshURLFunctionHelloWorldPermission   -                                      
                                                                                  Prod                                                                            
CREATE_COMPLETE                          AWS::Lambda::Permission                  EventBridgeFunctionHelloWorldPermissio   -                                      
                                                                                  nProd                                                                           
CREATE_COMPLETE                          AWS::ApiGateway::Stage                   ServerlessRestApiProdStage               -                                      
CREATE_COMPLETE                          AWS::Events::Rule                        SvcCatalogEventRule                      -                                      
CREATE_IN_PROGRESS                       AWS::Lambda::Permission                  PermissionForEventsToInvokeLambda        -                                      
CREATE_IN_PROGRESS                       AWS::Lambda::Permission                  PermissionForEventsToInvokeLambda        Resource creation Initiated            
CREATE_COMPLETE                          AWS::Lambda::Permission                  PermissionForEventsToInvokeLambda        -                                      
CREATE_COMPLETE                          AWS::CloudFormation::Stack               sam-app                                  -                                      
-----------------------------------------------------------------------------------------------------------------------------------------------------------------

CloudFormation outputs from deployed stack
------------------------------------------------------------------------------------------------------------------------------------------------------------------
Outputs                                                                                                                                                          
------------------------------------------------------------------------------------------------------------------------------------------------------------------
Key                 RefreshURLFunctionIamRole                                                                                                                    
Description         Implicit IAM Role created for Hello World function                                                                                           
Value               arn:aws:lambda:us-east-1:123456789012:function:RefreshURLFunction                                                                            

Key                 RefreshURLFunctionAPI                                                                                                                        
Description         API Gateway endpoint URL for Prod stage for Hello World function                                                                             
Value               https://m94bjaurjb.execute-api.us-east-1.amazonaws.com/Prod/refreshurl/                                                                      

Key                 RefreshURLFunction                                                                                                                           
Description         Hello World Lambda Function ARN                                                                                                              
Value               arn:aws:lambda:us-east-1:123456789012:function:RefreshURLFunction                                                                            
------------------------------------------------------------------------------------------------------------------------------------------------------------------

Successfully created/updated stack - sam-app in us-east-1

Test the solution

Now that you have deployed the solution, let’s test the workflow.

  1. On the AWS Service Catalog console, under Administration in the navigation pane, choose Portfolios.
  2. Choose your SageMaker notebook.
  3. Choose Launch product.
  4. At the bottom of the page, choose Launch product.

You should see a page similar to the following screenshot.

  1. Wait a few moments for the status to show as Available.
  2. Open your terminal and run the following command to get the presigned URL from Parameter Store:
    aws ssm get-parameter 
    --name "/SageMaker/Notebooks/Demo-User-Notebook" 
    --query Parameter.Value

The output should look like the following:

"https://demo-user-notebook.notebook.us-east-1.sagemaker.aws?authToken=eyJhbGciOiJIUzI1NiJ9.eyJmYXNDcmVkZW50aWFscyI6IkFZQURlSlVvLzJjeEcwQ0xtNHBjTTZFOGM1SUFYd0FCQUJWaGQzTXRZM0o1Y0hSdkxYQjFZbXhwWXkxclpYa0FSRUV3U0ZSdU1rNXJZMUpyWnpWWVlsZFBRbUowTmtadVpGcHZlRlJXUW05SVlWaHdiazFJY25WRWVrTmtlVWRUVUZsak56UnhObWQzVTJGS1dYUm5hVk40VVQwOUFBRUFCMkYzY3kxcmJYTUFTMkZ5YmpwaGQzTTZhMjF6T25WekxXVmhjM1F0TVRvM05qUTNNRGM1TWpRME1UVTZhMlY1TDJJM01ETTNNRE5oTFdVMU5HTXROR1JtWWkxaE1HRTFMVGMyTnpNek1XWXlORGsxT1FDNEFRSUJBSGhlY3J4TGdEdDJaWmRKYk5nd3R4RHJpWmtZQnZUR1cwZWZCWVhaVW1VTTFBRXNiUlBXblloT3hjUWhPUE9jR0FaZUFBQUFmakI4QmdrcWhraUc5dzBCQndhZ2J6QnRBZ0VBTUdnR0NTcUdTSWIzRFFFSEFUQWVCZ2xnaGtnQlpRTUVBUzR3RVFRTUFnMjM1NzZRT1l6azgyc29BZ0VRZ0RzejlwVHd4Q2ZZUHd6SGJvZERIaElRa1BRWjdUUXRxZ2dEaVpkTDBtMnIxaW1jVHp5czJHc0t6T3d2Z2g1cGNSSytVS2ZxTXlnTmVhaHVVd0lBQUFBQURBQUFFQUFBQUFBQUFBQUFBQUFBQUFET3ZoZFMvb01sTE4xZ3hQSFkybklQLy8vLy93QUFBQUVBQUFBQUFBQUFBQUFBQUFFQUFBTmZFc2JYV1RDWXorV0o0S3BwSXhEMkpkMVFzUnZFbW9lS21hZDhvSmNSN0tRMi9CQWd3TTA3YUFOOEN1WE8yc2lLUnpZdjI1YmlLOFYzUDM2d1Fjc3RoS085Ui91TFFzNWk4RytHc3BZSnlNamRsbWdWYTFEd2FZQmd0TUMwcmJMRjZSWXJhcFJtMFArbDVIQWg3bWNyeU9lejZWRVlYTmdJY2FXR0tjZDFwRjQ5bXBLTzNyQW5BSGlCdEVaNCtlSVFYVkJwMmQyV2c4TEFqR0RRYVNyclVBOUhJa3pvaloybm5iVHluY3pLWXlNVjA3Ui8wZmVTZU9jTTBubC9IRHdjWUdyc1RCcDgzM1RVWCtkOGRNRXI4amtpQVAwUTFQRkNrU2h5WS9CU05IalZtWThxd094N05jV3g1ZVpSenl3cm0vWXNZOW5paEt5cWRMaGNIQUhDbXZhWW8yb2lMZ3BGak51WG5udlh1U1UxcmFlRVZMNUlKR1loMVAzRWZnR3huNmlsUTJmVGllQytQdWNmT3dsZWwrSnR5SWNmbVRTeFB0bnE1YW1mVjEycml0Skx5a09WMklEc0YzSEl6RW11SmhYZTBqKzM1dWlITW5BVkFZVm5RbithdWh1K3lVcUNKeWVWU1o2ZWVsYmIwd2tYUGNpOXBkazFMbTFLNUpZcFJuMFoyS1hvSnBxNm52b3pPWkdvNG9jbmVRQWhKODRiYjR6RkdGZ1NOaTdQWEFuMnpDTkZ1S2w0eU9KVldiRDRXMGZGSFc1OE5iUTE5amc5Zlp0czlkVmxKclowSmVrYTJhZi9TaUpoeWdvcDBwQ0pBS0pZZkErVEhTQmdCUTFNUWpyUXV5U25jbnQ4NU5XUW1uVG9PUGJ4bVlyN0JRMllpQlJsekdxSDNuQ0pXN2x4YmNzYUV1c1dFMXB3K0RJc2lLMEV1YVV6anBFWFV0NEt4Zm82T3B3b28vdVcyV0dlSmNQVHk4TkNRYWZlUU1VbXgwaDQ3aDF0UHNIY0hBUjltKzU2c3BzMnJETjl4ZTFUMVdHVDg4a3FFMW5YYzRQeUZNdTVuYXB0UEdUU1B0akpZWDRKKzRsSzlJZzZCNG9qRTNmVEEzUVllSTd0dU9UZG9Vd2R6SkJ4L1NvSjNxU0ZUMWRDZXFDeUcyWUN5cjN0TmFzZlpYNFBBWmU4b1M1QVZTeExkVlVqUkpYcW1DM1ZkNUJPRlFySHpReTZjTkFLNFVOY2tBanh3bUgwbFlNdlFtc3lTODRzcCtLUGdpbXl3eWNDdk5tYWQ1bVltRHRZYVpMU3JCVUZIVzlDS2tTS2pqWWtBWnZ3MXRnS3h5OE9wNjZDRHY3aEZObzNDUWQ3MGpnV0wyamdnU1RIckJ6blJwK2wxQ1VscnNsblNzaGluTDcwbnp4eU02b1NBbm1FdFVscG9yeG1iWGRUbUxld244R1lQS1ZvT0syd1pobXk0TVQzc2xxRlU1enVTU2tBQnp5eURZb3djR3JxemlBTXNDcEZONVhRVk9HNHkzNnlZS3pTU0FVTEppRCtOZFRLeWxJbUFHY3daUUl3TXpoZ25hWitia1h5VmErTWUrYmwxUHBrUXcwMWxMUDZNcExnTGRPbkVKb0RRM0xLc2pLZHlidWx4cmlNK011SEFqRUF3V00zdXpjemZyY1ZWOGNwUzdlUDlBRXluNks5NkNQNFBiVCtYK1VVZERqYXZkR1hrenY3TklkWG4xem9pU0dpIiwiY2lwaGVyVGV4dCI6IkFRSUJBSGhlY3J4TGdEdDJaWmRKYk5nd3R4RHJpWmtZQnZUR1cwZWZCWVhaVW1VTTFBRVRlWjBib1lRWDZSazJ1dzdNREJZY0FBQUFvakNCbndZSktvWklodmNOQVFjR29JR1JNSUdPQWdFQU1JR0lCZ2txaGtpRzl3MEJCd0V3SGdZSllJWklBV1VEQkFFdU1CRUVERjVkR1VSbkt5ZlA4S2dKTVFJQkVJQmJyTkJkSkZEOWhySytrajEvTDRieXMxMlFmR2dxM1pSTVlGa2lwNjJXZGZ2aUhvdkswQ3pKY0VtSUE4akY5cktPRm5ZblFoeHpHdmhxZy84VjU4RjUxbWFKUkJIY0RlUzdjSGRpSkdhOW1MbmZuVzFwQVhoaUp1WlRCdz09Iiwid29ya3NwYWNlTmFtZSI6ImRlbW8tdXNlci1ub3RlYm9vayIsIndvcmtzcGFjZURvbWFpbk5hbWUiOiJkZW1vLXVzZXItbm90ZWJvb2siLCJzdWIiOiIxOTU4ODk2NzE2OTAiLCJleHAiOjE2MzgxNDAyMTQsImlhdCI6MTYzODEzODQxNH0.duv90DKJDan6ZOI_uwgP3sQEtManyMCD61tnhZtI-mY"

EventBridge rule

EventBridge is configured with an event rule to process an API response for the AWS Service Catalog API. This rule is configured to pass the notebook instance state so that you can use Lambda to return a presigned URL response as a triggered action. The event rule is configured as follows:

{
  "detail-type": ["AWS API Call via CloudTrail"],
  "detail": {
    "eventSource": ["servicecatalog.amazonaws.com"],
    "eventName": ["ProvisionProduct"]
  }
}

The following screenshot of the EventBridge console shows your event rule.

The AWS CloudTrail API is being monitored using the event source for servicecatalog.amazonaws.com. The monitored event name is ProvisionProduct. Monitoring this event allows you to take effective action in response to AWS Service Catalog reporting back the successful delivery state of the notebook instance. When a ProvisionProduct event occurs, a Lambda function called DemoEventBridgeFunction is invoked, which returns a presigned URL to the end-user.

Lambda function for returning presigned notebook instance URLs

To ensure secure access to user-requested notebooks via AWS Service Catalog, a presigned URL is created and returned to the user. This provides a secure method of accessing the notebook instance and performing business critical functions. For this purpose, we use the EventBridgeServiceCatalogFunction function, which uses a waiter for the notebook instance state to become available. Waiters provide a means of polling a service and suspending the execution of a task until a specific condition is met. When it’s ready, the function generates a presigned URL. Finally, the function creates an SSM parameter with the generated presigned URL. The SSM parameter uses the following pattern: /SageMaker/Notebooks/%s-Notebook"%user_name/. This allows us to create a common namespace for all our SageMaker notebook SSM parameters while keeping them unique based off of user_name.

Presigned URLs have a defined expiration. The Lambda function deploys notebooks with a session expiration of 12 hours. Because of this, developers need to generate a new presigned URL when their existing presigned URL expires. The RefreshURLFunction accomplishes this by allowing users to invoke the function from calling the API Gateway. Developers can invoke this function and pass their notebook name, and it returns a presigned URL. When the RefreshURLFunction is complete, a user can make a call to Parameter Store, get the new presigned URL, and then access their notebook.

  1. Get the RefreshURLFunction API Gateway URL with the following code:
    aws cloudformation describe-stacks 
    --stack-name sam-app 
    --query "Stacks[0].Outputs[?OutputKey=='RefreshURLFunctionAPI'].OutputValue" 
    --output text 
    --region us-east-1

The output should look like the following:

https://8mnr3ksi0d.execute-api.us-east-1.amazonaws.com/Prod/refreshurl/
  1. Invoke the function RefreshURLFunction by calling the API Gateway. Update input_url with the URL from the previous step:
    curl -X POST <input_url>  -d '{"notebook_user_name": "Demo-User"}'

The output should look like the following:

{"PreSignedURL": "https://demo-user-notebook-dctz.notebook.us-east-1.sagemaker.aws?authToken=eyJhbGciOiJIUzI1NiJ9.eyJmYXNDcmVkZW50aWFscyI6IkFZQURlRGw3R2E2OWZ3SmhjSlZKcDB1VjR2b0FYd0FCQUJWaGQzTXRZM0o1Y0hSdkxYQjFZbXhwWXkxclpYa0FSRUZzYVcxNVNsZGtXRXhCZGpVNGRIRkVTalo0V25SSk5WWTVUVEZHZFZaTVZtVldWRzQ0Tms1UGRWaEpSVFI2UTBwdGVFZDFWbFUxUzNoc1pYSXJia05YWnowOUFBRUFCMkYzY3kxcmJYTUFTMkZ5YmpwaGQzTTZhMjF6T25WekxXVmhjM1F0TVRvM05qUTNNRGM1TWpRME1UVTZhMlY1TDJJM01ETTNNRE5oTFdVMU5HTXROR1JtWWkxaE1HRTFMVGMyTnpNek1XWXlORGsxT1FDNEFRSUJBSGhlY3J4TGdEdDJaWmRKYk5nd3R4RHJpWmtZQnZUR1cwZWZCWVhaVW1VTTFBRjY1ZFVPdW5vQlY2MVdrTnM2OUVsdUFBQUFmakI4QmdrcWhraUc5dzBCQndhZ2J6QnRBZ0VBTUdnR0NTcUdTSWIzRFFFSEFUQWVCZ2xnaGtnQlpRTUVBUzR3RVFRTVhsY1gyeW5WMVQxNkdBRHlBZ0VRZ0RzUEVSVllMRVMzN1FVZklvVTZjd3RZdGI4NkIrT212aVF3cm5BOFVDSnZtMjRxYXJORllaOGgzRGlnSy8wVVBSR3hTeFpoaFhWSTA0Q1RlUUlBQUFBQURBQUFFQUFBQUFBQUFBQUFBQUFBQUFBcUEvUnVZOTk2alBLV09zaFNqZS9GLy8vLy93QUFBQUVBQUFBQUFBQUFBQUFBQUFFQUFBTlhGZFYwR1FHMXZpN2drQkhtOGtmWlBUL0dxcnhOamFSWkU0Tis3ZTJocEI0YXUxS0ozQ2ZnRUMrcHR3dk9JdjQwVGYrdnNWNUt5MjYyNGYvOVhrYmVZQklqdnlLV1JJR0ZyS2dxditVTXdJcE8ydDFIbWcvSmFhdEpGdFhudlJodVcwMG9ldVBLS3ZFeGRKQ3ppYkRkT3J3SG5IMFJqWEhTc2tydGxsTDM2Mll0a3k0Z1cwV2xGOUt3Zm1xb2FjVzZZRTZhV0RUZU9oQWprZXFkQ1FoVi9KRWYwaTA1Q1VxU0k1REZzSC8yS2grZHJxS0tBSVMyTjFRYnNSZ3VGNzFFcnBCM3BoV25PSTFnd3BGL3VNMCs5MHRsTGVCeG5ncElqT1NEY1pkbHlwQmpNZkVadUNYWGU4ZTJGRGQ0bGVENFdOZDdzc0F4OHFQWmV5eWI3WWo2L0FxaUtESmdLOStScS9BVGF6NkRFNFNyL3BaWmpRRFFab1oyV1ZCa2VVWHR2U1piVUd4aXJXRG0rVUUxVk5sbG85TmhwSEhhR1dIZEJPU0w5SUFUWWZDVjV6enVURHNDS2l1dVBQTmFVZGhvSUVuL2c1UXhtOFJvZUlVVUJRcUVvbms3T3d1QzJZOEM2QUowclVxL055T3R5NmF4TWY2VEdYcTFsTHB4WG9wMjlXT3lzR3daQSs4Mmo3em5SZEo2RTZTU005TnJYRi95OWxRS3dBTFBaK3FBNmszSEFvdDg5UlZYSGVMTFQ3TklwazVYVnZlRXY5S3N2MUp1Uk1FVVJEZjI1bnZtOXRmVnp0MUN0R0Y1RVBQNEpid2d5RnZ4RDlnRkVPTUM5dk1rdWloT3JnM3JaaDNwRjd1RDRsVVptVUtTRXV6ZVVmRFd0eEhjVHZoeUxFVmZuczhpcjl6SnFacGxpNVdYdjF3bTQ5WWxJNGlSM1FiamtZM0JybUFsOFBzZkRjYmZJUmVBNmkvQjVNeHFOb3RvU0Y0MHA1OFpJTGZPNmNNWURlVHpzT2dMbENmYXIwT3JMK1lRVk55MU5ETUF3cGRWaXlNeWI1RHl2SzlOV3ZOOUt2c2lMTklrV1IvU2s5ekx1RjBPd3F0aE5GWjhkbWkvMzRzc2pRMUFVR1BMR2ZXbUl1ZmlqRnhrRytnL1lKMjNSa1pIVmRvb1J4TUt3Zmk5OXQvUS96QmI2OUgyQlljbFZwUVl0RGV4Z3ZGWTg2TGpUMm5sSjkya09ad1duWW9OMWpMenIrVTVWQkJKakpDT09ENVA0MXBWckdHN1R4Nlh4UlFscGRqQ3E5ZFhXQlJiRDh6d0JDZ2VMY254SFlZTjUzR2hON2U3S3QyUmZyak5aREtSanUvTWNZSXRSTTVLU2ZaNWFNZ2NJUXY0a0tLNUppVll6OEdaY2VUSE5TT21Zb1FNeG1xMnNOSGJDZzZpUFM4KytvUkErdFhGY1JWMFkxSG9qZlVWS2NzREJjZmFQRVo0TENSZENvZnYrWFVWaHFSNzlCZGpyYW92Wmo1TitqZjFxdHdWZU9mVWJBQm5NR1VDTUN6UU4xMThWMTFZcXcwSWFhbmY0NUtIcjhnUC9MaVZHLzVRTy9yemREbzdZbkZEMmtzM3ZKbFQxVWE5N3kxY25nSXhBS2FxNEJsQ3R4UUc3b2Yxc1BaWld3K2NCalgzcGdIMWhXMHpYOU1zVzJOYXFCSklpUkp1VTJVaUU0cVdDVnh4eVE9PSIsImNpcGhlclRleHQiOiJBUUlCQUhoZWNyeExnRHQyWlpkSmJOZ3d0eERyaVprWUJ2VEdXMGVmQllYWlVtVU0xQUhyWlZxanJHYWVlMUY5c016d2pmM1pBQUFBb2pDQm53WUpLb1pJaHZjTkFRY0dvSUdSTUlHT0FnRUFNSUdJQmdrcWhraUc5dzBCQndFd0hnWUpZSVpJQVdVREJBRXVNQkVFRFBGVFJFbXQ2SmQ2VWoxMExnSUJFSUJibHBFOWtORGxpd21Yb2ltaEFiTC8xNmpYTVRhcDYvNnpSRlFLbjNHWE9mRlVRcUx6VEVBSUQvY095bDlMYU1NdzBRaHBjSWhERmpEL1U1R29sQmUrSHJ4QnJuRk1SMjNrWVR1K2tXUFZVYUcwRExPanl1YVhYR3VDOHc9PSIsIndvcmtzcGFjZU5hbWUiOiJkZW1vLXVzZXItam9lLW5vdGVib29rIiwid29ya3NwYWNlRG9tYWluTmFtZSI6ImRlbW8tdXNlci1qb2Utbm90ZWJvb2steXVvYyIsInN1YiI6IjE5NTg4OTY3MTY5MCIsImV4cCI6MTY0MDc0NDM1OCwiaWF0IjoxNjQwNzQwNzU4fQ.WGFEzQhC3lvA9IguA2tbCS6Us9mhRIV_6LiuRTAytSo"}%  
  1. Open a browser and navigate to the PreSignedURL from the previous step.

The webpage should look like the following screenshot.

Conclusion

In this post, we demonstrated how to deploy the infrastructure components for a SageMaker notebook instance environment using AWS CloudFormation. We then illustrated how to use EventBridge to return the notebook instance state from the AWS Service Catalog API. Lastly, we showed how to use a Lambda function to return the presigned notebook instance URL for accessing the delivered resource. For more information, see the Amazon SageMaker Developer Guide. Thank you for reading!


About the Authors

Joe Keating is a Senior Customer Delivery Architect in Professional Services at Amazon Web Services. He works with AWS customers to design and implement a variety of solutions in the AWS Cloud. Joe enjoys cooking with a glass or two of wine and achieving mediocrity on the golf course.

Matt Hedges is a Cloud Application Architect at Amazon Web Services. He works closely with customers to align technology needs with business drivers to deliver their applications on AWS. With a focus on migrations and modernization, Matt works with enterprise customers around the world to pioneer changes that unlock the full potential of the cloud. Matt enjoys spending time with family, playing musical instruments, cooking, playing video games, fixing old cars, and learning new things.

Virginia Chu is a Senior DevSecOps Architect in Professional Services at Amazon Web Services. She works with enterprise-scale customers around the globe to design and implement a variety of solutions in the AWS Cloud.

Read More