Generative AI continues to transform numerous industries and activities, with one such application being the enhancement of chess, a traditional human game, with sophisticated AI and large language models (LLMs). Using the Custom Model Import feature in Amazon Bedrock, you can now create engaging matches between foundation models (FMs) fine-tuned for chess gameplay, combining classical strategy with generative AI capabilities.

Amazon Bedrock provides managed access to leading FMs from Anthropic, Meta, Mistral AI, AI21 Labs, Cohere, Stability AI, and Amazon, enabling developers to build sophisticated AI-powered applications. These models demonstrate remarkable capabilities in understanding complex game patterns, strategic decision-making, and adaptive learning. With the Custom Model Import feature, you can now seamlessly deploy your customized chess models fine-tuned on specific gameplay styles or historical matches, eliminating the need to manage infrastructure while enabling serverless, on-demand inference. This capability allows you to experiment on fascinating matchups between:
- Base FMs vs. custom fine-tuned models
- Custom fine-tuned models trained on distinct grandmaster playing styles
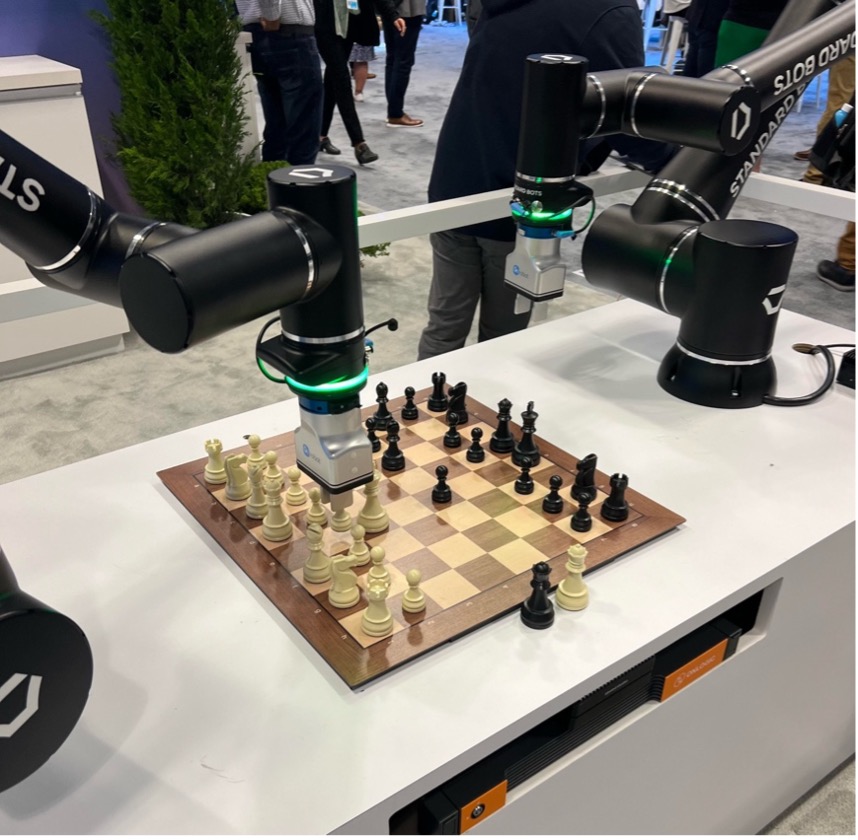
In this post, we demonstrate Embodied AI Chess with Amazon Bedrock, bringing a new dimension to traditional chess through generative AI capabilities. Our setup features a smart chess board that can detect moves in real time, paired with two robotic arms executing those moves. Each arm is controlled by different FMs—base or custom. This physical implementation allows you to observe and experiment with how different generative AI models approach complex gaming strategies in real-world chess matches.
Solution overview
The chess demo uses a broad spectrum of AWS services to create an interactive and engaging gaming experience. The following architecture diagram illustrates the service integration and data flow in the demo.
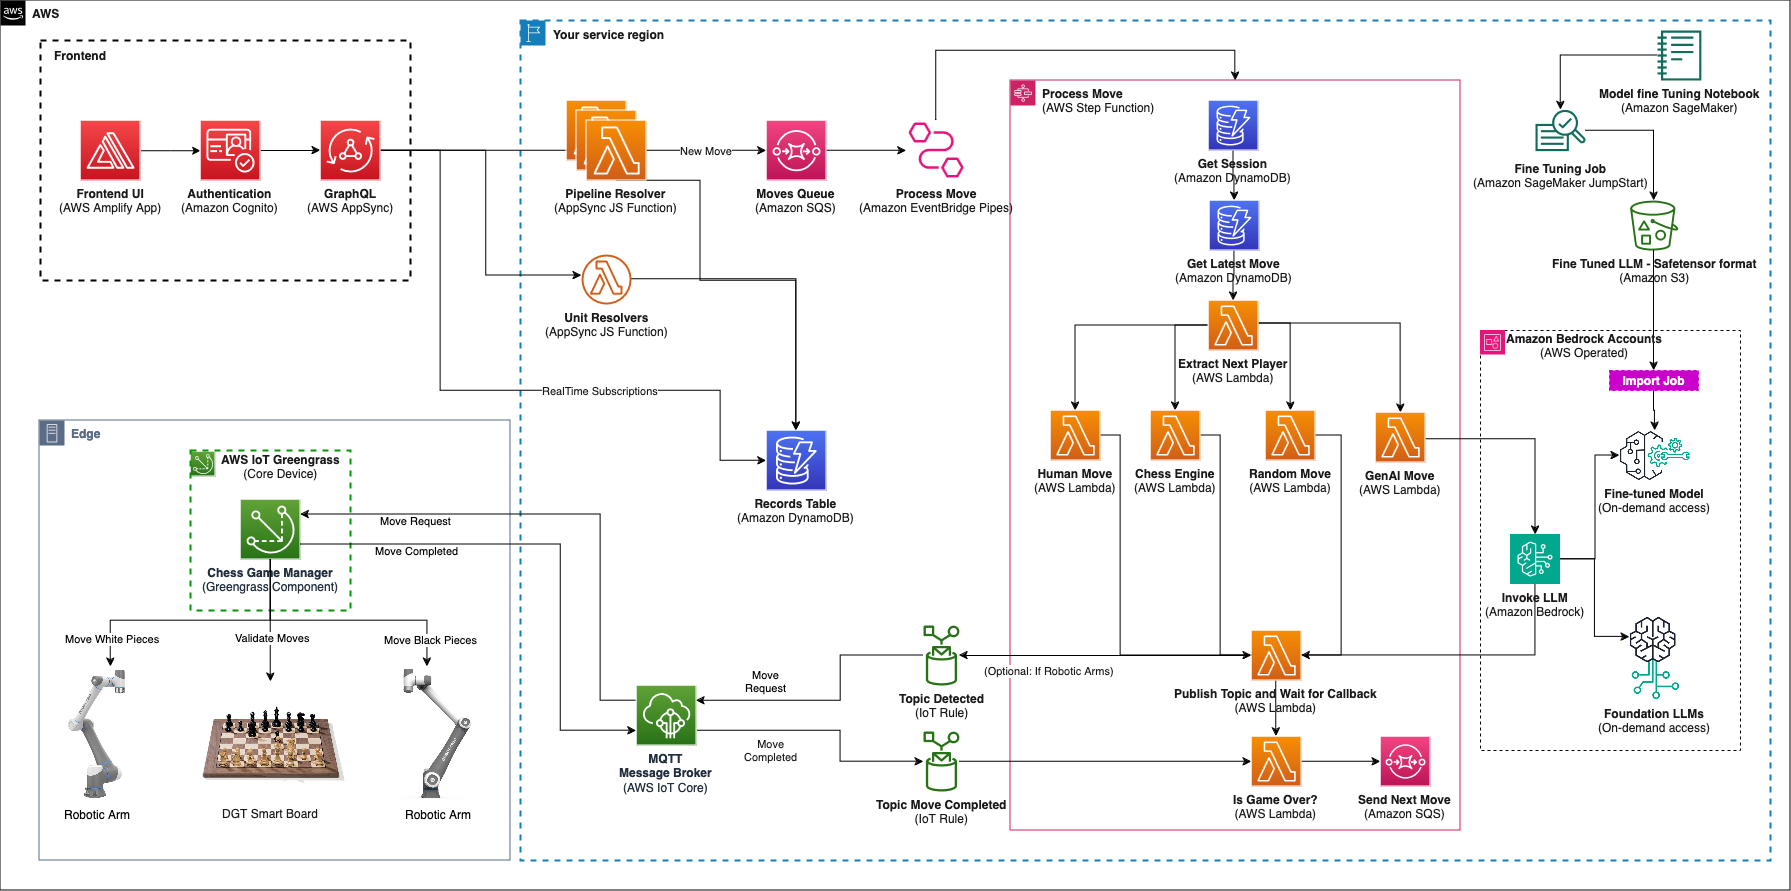
On the frontend, AWS Amplify hosts a responsive React TypeScript application while providing secure user authentication through Amazon Cognito using the Amplify SDK. This authentication layer connects users to backend services through GraphQL APIs, managed by AWS AppSync, allowing for real-time data synchronization and game state management.
The application’s core backend functionality is handled by a combination of Unit and Pipeline Resolvers. Whereas Unit Resolvers manage lightweight operations such as game state management, creation, and deletion, the critical move-making processes are orchestrated through Pipeline Resolvers. These resolvers queue moves for processing by AWS Step Functions, providing reliable and scalable game flow management.
For generative AI-powered gameplay, Amazon Bedrock integration enables access to both FMs and custom fine-tuned models. The FMs fine-tuned using Amazon SageMaker are then imported into Amazon Bedrock through the Custom Model Import feature, making them available alongside FMs for on-demand access during gameplay. More details on fine-tuning and importing a fine-tuned FM into Amazon Bedrock can be found in the blog post Import a question answering fine-tuned model into Amazon Bedrock as a custom model.
The execution of chess moves on the board is coordinated by a custom component called Chess Game Manager, running on AWS IoT Greengrass. This component bridges the gap between the cloud infrastructure and the physical hardware.
When processing a move, the Step Functions workflow publishes a move request to an AWS IoT Core topic and pauses, awaiting confirmation. The Chess Game Manager component consumes the message, and implements a three-phase validation system to make sure moves are executed accurately. First, it validates the intended move with the smart chessboard, which can detect piece positions. Second, it sends requests to the two robotic arms to physically move the chess pieces. Finally, it confirms with the smart chessboard that the pieces are in their correct positions after the move. This third-phase validation by the smart chessboard is the concept of “trust but verify” in Embodied AI, where the physical state of something may be different from what is shown in a dashboard. Therefore, after the state of the move is registered, the Step Functions workflow continues. After a move has been confirmed, the component publishes a response message back to AWS IoT Core, on a separate topic, which signals the Step Functions workflow to continue.
The demo offers a few gameplay options. Players can choose from the following list of opponents:
- Generative AI models available on Amazon Bedrock
- Custom fine-tuned models deployed to Amazon Bedrock
- Chess engines
- Human opponents
- Random moves
An infrastructure as code (IaC) approach was taken when constructing this project. You will use the AWS Cloud Deployment Kit (AWS CDK) when building the components for deployment into any AWS account. After you download the code base, you can deploy the project following the instructions outlined in the GitHub repo.
Prerequisites
This post assumes you have the following:
Chess with fine-tuned models
Traditional approaches to chess AI have focused on handcrafted rules and search algorithms. These methods, though effective, often struggle to capture the nuanced decision-making and long-term strategic thinking characteristic of human grandmasters. More recently, reinforcement learning (RL) has shown promise in mastering chess by allowing AI agents to learn through self-play and trial and error. RL models can discover strategies and evaluate board positions, but they often require extensive computational resources and training time—typically several weeks to months of continuous learning to reach grandmaster-level play.
Fine-tuning generative AI FMs offers a compelling alternative by learning the underlying patterns and principles of chess in just a few days using standard GPU instances, making it a more resource-efficient approach for developing specialized chess AI. The fine-tuning process significantly reduces the time and computational resources needed because the model already understands basic patterns and structures, allowing it to focus on learning chess-specific strategies and tactics.
Prepare the dataset
This section dives into the process of preparing a high-quality dataset for fine-tuning a chess-playing model, focusing on extracting valuable insights from games played by grandmasters and world championship games.
At the heart of our dataset lies the Portable Game Notation (PGN), a standard chess format that records every aspect of a chess game. PGN includes Forsyth–Edwards Notation (FEN), which captures the exact position of pieces on the board at any given moment. Together, these formats store both the moves played and important game details like player names and dates, giving our model comprehensive data to learn from.
Dataset preparation consists of the following key steps:
- Data acquisition – We begin by downloading a collection of games in PGN format from publicly available PGN files on the PGN mentor program website. We used the games played by Magnus Carlsen, a renowned chess grandmaster. You can download a similar dataset using the following commands:
# Download games zip file to the target directory - You may choose a different set of games – replace filename with the name of the file you want to download
curl -o /data/filename.zip https://www.pgnmentor.com/players/filename.zip

# Unzip the file in the target directory
unzip filename.zip
- Filtering for success – To train a model focused on winning strategies, we filter the games to include only games where the player emerged victorious. This allows the model to learn from successful games.
- PGN to FEN conversion – Each move in a PGN file represents a transition in the chessboard state. To capture these states effectively, we convert PGN notation to FEN format. This conversion process involves iterating through the moves in the PGN, updating the board state accordingly, and generating the corresponding FEN for each move.
The following is a sample game in a PGN file:
[Event “Titled Tue DDth MMM Late”]
[Site “chess.com INT”]
[Date “YYYY.MM.DD”]
[Round “10”]
[White “Player 1 last name,Player 1 first name”]
[Black “Player 2 last name, Player 2 first name “]
[Result “0-1”]
[WhiteElo “2xxx”]
[BlackElo “2xxx”]
[ECO “A00”]1.e4 c5 2.d4 cxd4 3.c3 Nc6 4.cxd4 d5 5.exd5 Qxd5 6.Nf3 e5 7.Nc3 Bb4 8.Bd2 Bxc3 9.Bxc3 e4 10.Nd2 Nf6 11.Bc4 Qg5 12.Qb3 O-O 13.O-O-O Bg4 14.h4 Bxd1 15.Rxd1 Qf5 16.g4 Nxg4 17.Rg1 Nxf2 18.d5 Ne5 19.Rg5 Qd7 20.Bxe5 f5 21.d6+ 1-0
The following are sample JSON records with FEN, capturing next move and next color to move. We followed two approaches for the JSON record creation. For models that have good understanding of FEN format, we used a more concise record:
{
    "move": "d4",
    "fen": "rnbqkbnr/pp1ppppp/8/2p5/4P3/8/PPPP1PPP/RNBQKBNR w KQkq - 0 2",
    "nxt_color": "WHITE"
}
For models with limited understanding of FEN format, we used a more detailed record:
{
    "move": "d4",
    "fen": "rnbqkbnr/pp1ppppp/8/2p5/4P3/8/PPPP1PPP/RNBQKBNR w KQkq - 0 2",
    "nxt_color": "WHITE",
    "move_history": "e4, c5"
}
The records include the following parameters:
- move – A valid next move for the given FEN state.
- fen – The current board position in FEN.
- nxt_color – Which color has the next turn to move.
- move_history – The history of game moves performed until the current board state.
For each game in the PGN file, multiple records similar to the preceding examples are created to capture the FEN, next move, and next move color.
- Move validation – We validate the legality of each move captured in the records in the preceding format. This step maintains data integrity and prevents the model from learning incorrect or impossible chess moves.
- Dataset splitting – We split the processed dataset into two parts: a training set and an evaluation set. The training set is used to train the model, and the evaluation set is used to assess the model’s performance on unseen data. This splitting helps us understand how well the model generalizes to new chess positions.
By following these steps, we create a comprehensive and refined dataset that enables our chess AI to learn from successful games, understand legal moves, and grasp the nuances of strategic chess play. This approach to data preparation creates the foundation for fine-tuning a model that can play chess at a high level.
Fine-tune a model
With our refined dataset prepared from successful games and legal moves, we now proceed to fine-tune a model using Amazon SageMaker JumpStart. The fine-tuning process requires clear instructions through a structured prompt template. Here again, based on the FM, we followed two approaches.
For fine-tuning an FM that understands FEN format, we used a more concise prompt template:
template = {
    "prompt": (
        "<s>[INST] You are a chess engine. Given a chess position in FEN notation and the color to move, provide the next best valid move in SAN (Standard Algebraic Notation) format to progress towards winning the game of chess. Your response must be a single move wrapped in <move></move> tags.nn"
        "Chess Position (FEN): {fen}n"
        "Color to Move: {nxt_color} [/INST]"
    ),
    "completion": " <move>{move}</move> </s>"
}
Alternatively, for models with limited FEN knowledge, we provide a prompt template similar to the following:
template = {
    "prompt": (
        "<s>[INST]nYou are a chess engine that provides the next best valid move in SAN format based on:n- FEN position where:n  Black pieces: p=pawn, r=rook, n=knight, b=bishop, q=queen, k=king (lowercase)n  White pieces: P=pawn, R=rook, N=knight, B=bishop, Q=queen, K=king (uppercase)n  Numbers 1-8 indicate consecutive empty squaresn- Color to moven- Move historynnAnalyze these inputs to recommend a legal move that progresses toward winning. Respond with a single move in <move></move> tags.nn"
        "Chess Position (FEN): {fen}n"
        "Color to Move: {nxt_color}n"
        "Move History: {move_history}n"
    ),
    "completion": " <move>{move}</move> </s>"
}
Training and evaluation datasets along with the template.json file created using one of the preceding templates are then uploaded to an Amazon Simple Storage Service (Amazon S3) bucket so they are ready for the fine-tuning job that will be submitted using SageMaker JumpStart.
Now that the dataset is prepared and our model is selected, we submit a SageMaker training job with the following code:
estimator = JumpStartEstimator(
    model_id=model_id,
    model_version=model_version,
    environment={"accept_eula": "true"},
    disable_output_compression=True,
    instance_type="ml.g5.24xlarge"
)
# By default, instruction tuning is set to false.
estimator.set_hyperparameters(instruction_tuned=True, epoch="3", max_input_length="1024")
estimator.fit({"training": train_test_data_location})
Let’s break down the preceding code, and look at some important sections:
- estimator – this is the SageMaker object used to accept all training parameters, while launching and orchestrating the training job.
- model_id – This is the SageMaker JumpStart model ID for the LLM that you need to fine-tune.
- accept_eula – This EULA varies from provider to provider and must be accepted when deploying or fine-tuning models from SageMaker JumpStart.
- instance_type – This is the compute instance the fine-tuning job will take place on. In this case, it’s a g5.24xlarge. This specific instance contains 4 NVIDIA A10G GPUs with 96 GiB of GPU memory. When deciding on an instance type, select the one that best balances your computational needs with your budget to maximize value.
- fit – The .fit method is the actual line of code that launches the SageMaker training job. All of the algorithm metrics and instance usage metrics can be viewed in Amazon CloudWatch logs, which are directly integrated with SageMaker.
When the SageMaker training job is complete, the model artifacts will be stored in an S3 bucket specified either by the user or the system default.
The notebook we use for fine-tuning one of the models can be accessed in the following GitHub repo.
Challenges and best practices for fine-tuning
In this section, we discuss common challenges and best practices for fine-tuning.
Automated Optimizations with SageMaker JumpStart
Fine-tuning an LLM for chess move prediction using SageMaker presents unique opportunities and challenges. We used SageMaker JumpStart to do the fine-tuning because it provides automated optimizations for different model sizes when fine-tuning for chess applications. SageMaker JumpStart automatically applies appropriate quantization techniques and resource allocations based on model size. For example:
- 3B–7B models – Enables FSDP with full precision training
- 13B models – Configures FSDP with optional 8-bit quantization
- 70B models – Automatically implements 8-bit quantization and disables FSDP for stability
This means if you create a SageMaker JumpStart Estimator without explicitly specifying the int8_quantization parameter, it will automatically use these default values based on the model size you’re working with. This design choice is made because larger models (like 70B) require significant computational resources, so quantization is enabled by default to reduce the memory footprint during training.
Data preparation and format
Dataset identification and preparation can be a challenge. We used readily available PGN datasets from world championships and grandmaster matches to streamline the data preparation process for chess LLM fine-tuning, significantly reducing the complexity of dataset curation.
Choosing the right chess format that produces optimal results with an LLM is critical for successful results post-fine-tuning. We discovered that Standard Algebraic Notation (SAN) significantly outperforms Universal Chess Interface (UCI) format in terms of training convergence and model performance.
Prompt consistency
Using consistent prompt templates during fine-tuning helps the model learn the expected input-output patterns more effectively, and Amazon Bedrock Prompt Management provide robust tools to create and manage these templates systematically. We recommend using the prompt template suggestions provided by the model providers for improved performance.
Model size and resource allocation
Successful LLM training requires a good balance of cost management through multiple approaches, with instance selection being a primary aspect. You can start with the following recommended instance and work your way up, depending on the quality and time available for training.
| Model Size |
Memory Requirements |
Recommended Instance and Quantization |
| 3B – 7B |
24 GB |
Fits on g5.2xlarge with QLoRA 4-bit quantization |
| 8B -13B |
48 GB |
Requires g5.4xlarge with efficient memory management |
| 70B |
400 GB |
Needs g5.48xlarge or p4d.24xlarge with multi-GPU setup |
Import the fine-tuned model into Amazon Bedrock
After the model is fine-tuned and the model artifacts are in the designated S3 bucket, it’s time to import it to Amazon Bedrock using Custom Model Import.
The following section outlines two ways to import the model: using the SDK or the Amazon Bedrock console.
The following is a code snippet showing how the model can be imported using the SDK:
create_model_import_job_resp = br_client.create_model_import_job(
        jobName=rivchess_imp_jb_nm,
        importedModelName=rivchess_model_nm,
        roleArn=role_arn,
        modelDataSource=rivchess_model_src)
In the code snippet, a create model import job is submitted to import the fine-tuned model into Amazon Bedrock. The parameters in the job are as follows:
- JobName – The name of the import job so it may be identified using the SDK or Amazon Bedrock console
- ImportedModelName – The name of the imported model, which will be used to invoke inference using the SDK and identify said model on the Amazon Bedrock console
- roleArn – The role with the correct permissions to import a model onto Amazon Bedrock
- modelDataSource – The S3 bucket in which the model artifacts were stored in, upon the completed training job
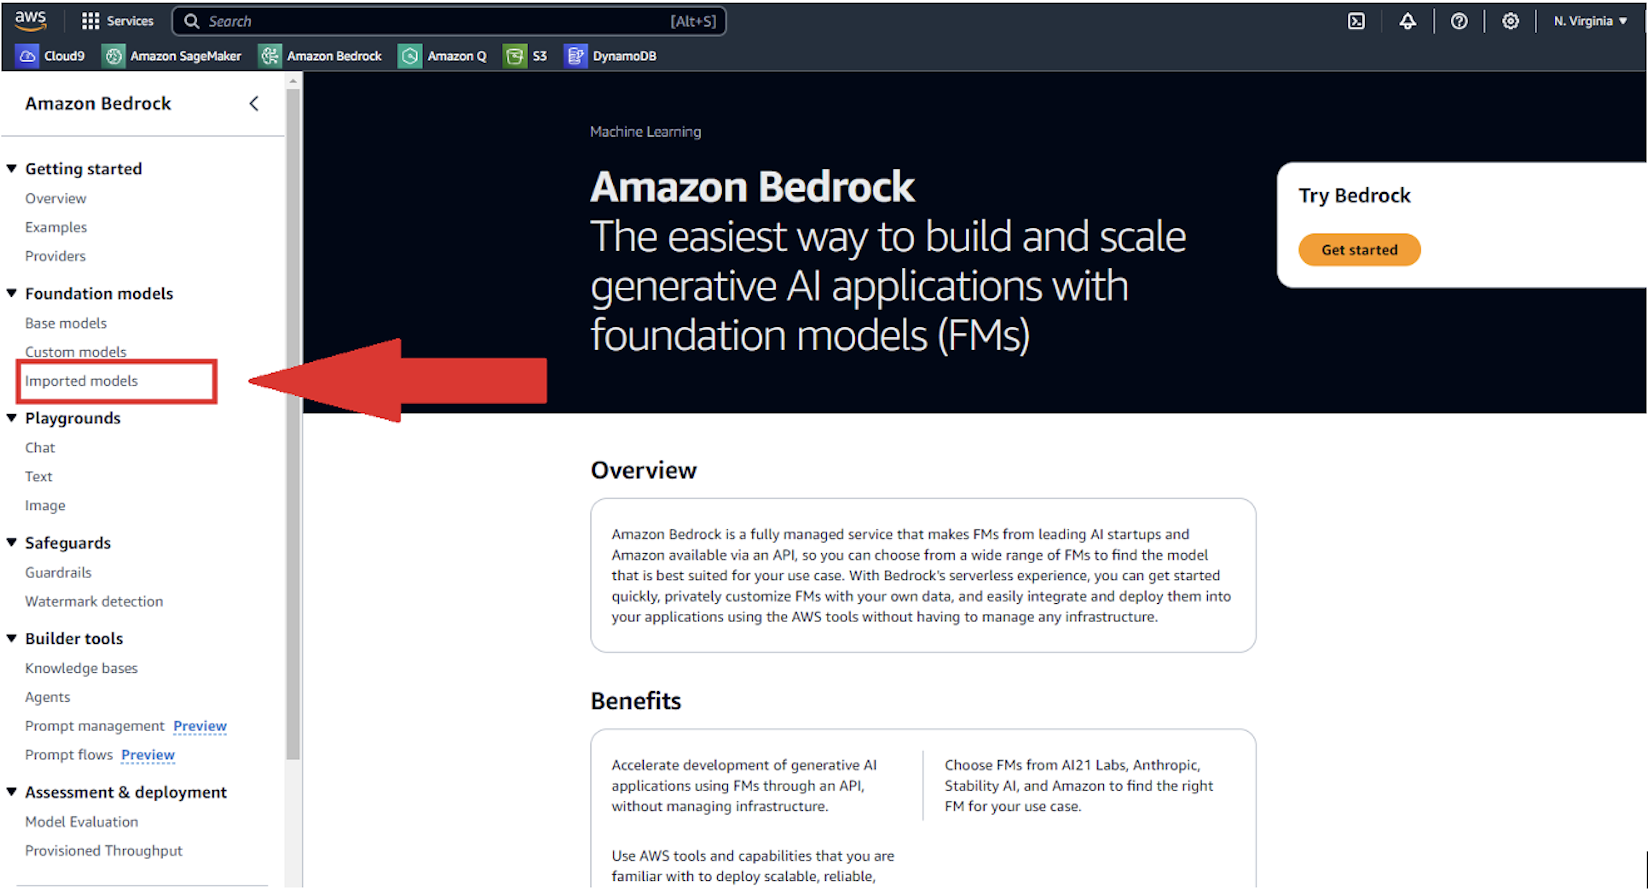
To use the Amazon Bedrock console, complete the following steps:
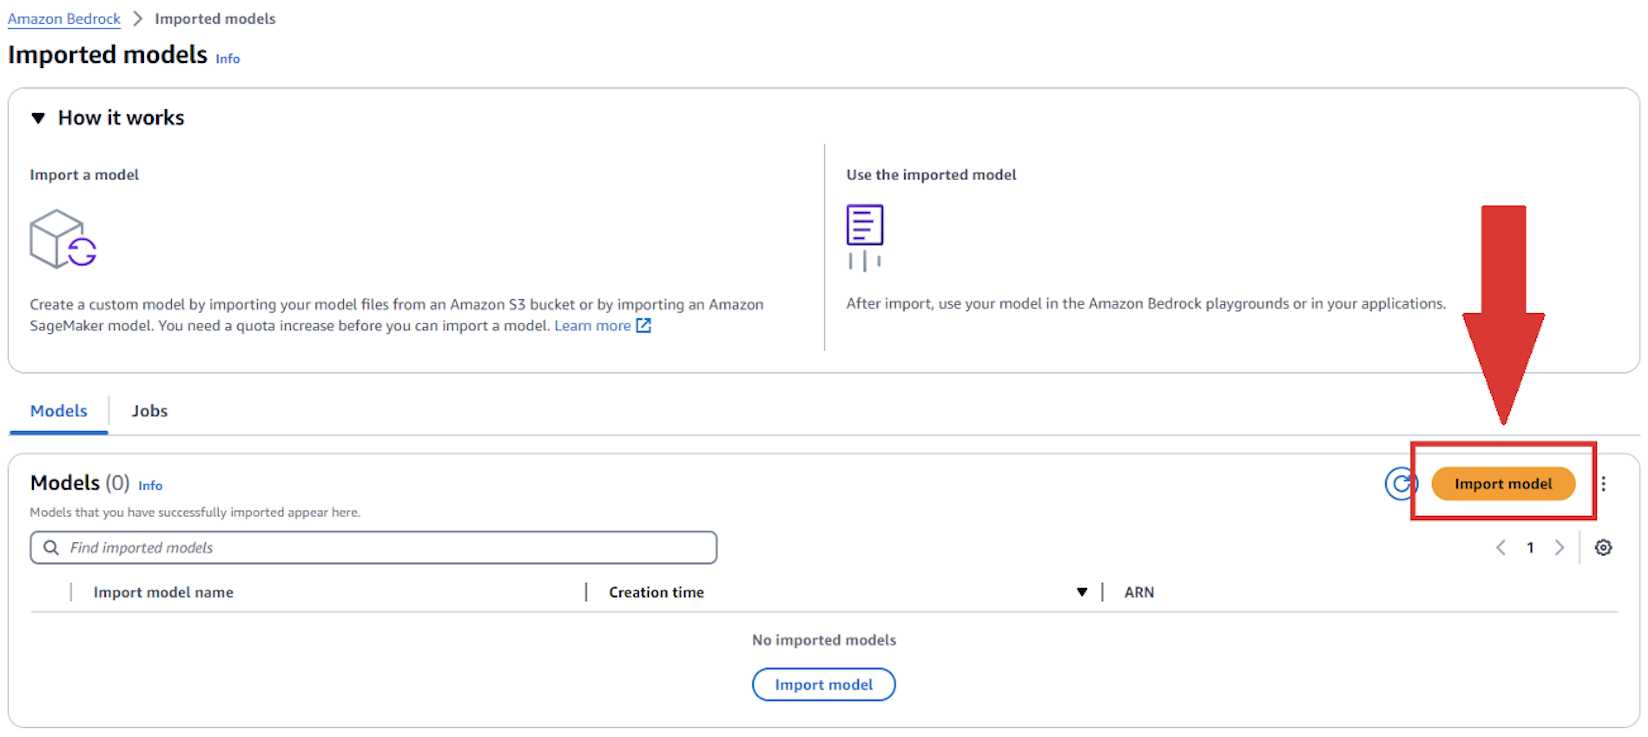
- On the Amazon Bedrock console, under Foundation models in the navigation pane, choose Imported models.
- Choose Import model.
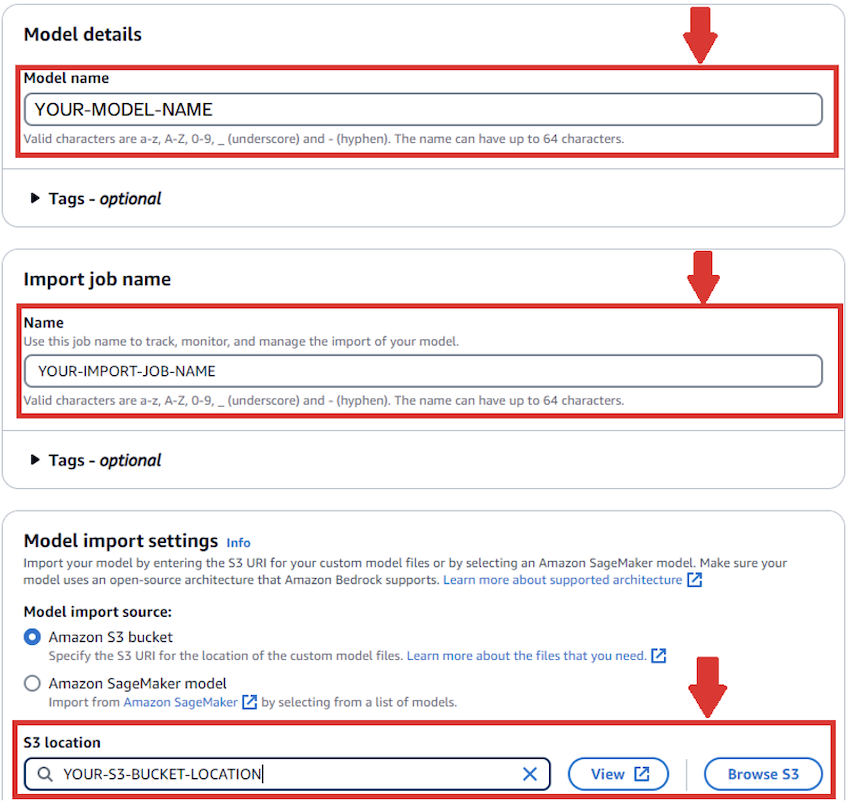
- Provide the following information:
- For Model name, enter a name for your model.
- For Import job name¸ enter a name for your import job.
- For Model import settings, select Amazon S3 bucket and enter your bucket location.
- Create an IAM role or use an existing one.
- Choose Import.
After the job is submitted, the job will populate the queue on the Imported models page.

When the model import job is complete, the model may now be called for inference using the Amazon Bedrock console or SDK.
Test the fine-tuned model to play chess
To test the fine-tuned model that is imported into Amazon Bedrock, we use the AWS SDK for Python (Boto3) library to invoke the imported model. We simulated the fine-tuned model against the Stockfish library for a game of up to 50 moves or when the game is won either by the fine-tuned model or by Stockfish.
The Stockfish Python library requires the appropriate version of the executable to be downloaded from the Stockfish website. We also use the chess Python library to visualize the status of the board. This is basically simulating a chess player at a particular Elo rating. An Elo rating represents a player’s strength as a numerical value.
Stockfish and chess Python libraries are GPL-3.0 licensed chess engines, and any usage, modification, or distribution of these libraries must comply with the GPL 3.0 license terms. Review the license agreements before using the Stockfish and chess Python libraries.
The first step is to install the chess and Stockfish libraries:
!pip install chess stockfish —upgrade —quiet
We then initialize the Stockfish library. The path to the command line executable needs to be provided:
stockfish = Stockfish(path='/home/sagemaker-user/riv2024-chess/stockfish/stockfish-ubuntu-x86-64-sse41-popcnt')
stockfish.update_engine_parameters({"Hash": 2048, "UCI_Chess960": "true"})
stockfish.set_elo_rating(1350)
fen_state = stockfish.get_fen_position()
We set the Elo rating, using Stockfish API methods (set_elo_rating). Additional configuration can be provided by following the Stockfish Python Library documentation.
We initialize the chess Python library similarly with equivalent code to the Stockfish Python library initialization. Further configuration can be provided to the chess library following the chess Python library documentation.
board = chess.Board()
board.reset_board()
board.chess960 = True
stockfish.set_fen_position(board.fen())
Upon initialization, we initiate the fine-tuned model imported into Amazon Bedrock against the Stockfish library. In the following code, the first move is performed by Stockfish. Then the fine-tuned model is invoked using the Amazon Bedrock invoke_model API wrapped in a helper function by providing the FEN position of the chess board currently. We continue playing each side until one side wins or when a total of 50 moves are played. We check if each move proposed by the fine-tuned model is legal or not. We continue to invoke the fine-tuned model up to five times if the proposed move is an illegal move.
while True:

    sfish_move = stockfish.get_best_move()
    try:
        move_color = 'WHITE' if board.turn else 'BLACK'
        uci_move = board.push_san(sfish_move).uci()
        stockfish.set_fen_position(board.fen())
        move_count += 1
        move_list.append(f"{sfish_move}")
        print(f'SF Move  - {sfish_move} | {move_color} | Is Move Legal: {stockfish.is_fen_valid(board.fen())} | FEN: {board.fen()} | Move Count: {move_count}')
    except (chess.InvalidMoveError, chess.IllegalMoveError) as e:
        print(f"Stockfish Error for {move_color}: {e}")
        print(f"### Move Count: {move_count} ###")
        print(f'Moves list - {s.join(move_list)}')
        break

    if board.is_checkmate():
        print("Stockfish won!")
        print(f"### Move Count: {move_count} ###")
        print(f'Moves list - {s.join(move_list)}')
        break

    if board.is_stalemate():
        print("Draw!")
        print(f"### Move Count: {move_count} ###")
        print(f'Moves list - {s.join(move_list)}')
        break

    next_turn = 'WHITE' if board.turn else 'BLACK'
    llm_next_move = get_llm_next_move(board.fen(), next_turn, None)
    if llm_next_move is None:
        print("Failed to get a move from LLM. Ending the game.")
        break

    ill_mov_cnt = 0
    while True:
        try:
            is_llm_move_legal = True
            prev_fen = board.fen()
            uci_move = board.push_san(llm_next_move).uci()
            is_llm_move_legal = stockfish.is_fen_valid(board.fen())
            if is_llm_move_legal:
                print(f'LLM Move - {llm_next_move} | {next_turn} | Is Move Legal: {stockfish.is_fen_valid(board.fen())} | FEN: {board.fen()} | Move Count: {move_count}')
                stockfish.set_fen_position(board.fen())
                move_count += 1
                move_list.append(f"{llm_next_move}")
                break
            else:
                board.pop()
                print('Popping board and retrying LLM Next Move!!!')
                llm_next_move = get_llm_next_move(board.fen(), next_turn, llm_next_move, s.join(move_list))
        except (chess.AmbiguousMoveError, chess.IllegalMoveError, chess.InvalidMoveError) as e:
            print(f"LLM Error #{ill_mov_cnt}: {llm_next_move} for {next_turn} is illegal move!!! for {prev_fen}  | FEN: {board.fen()}")
            if ill_mov_cnt == 5:
                print(f"{ill_mov_cnt} illegal moves so far, exiting....")
                break
            ill_mov_cnt += 1
            llm_next_move = get_llm_next_move(board.fen(), next_turn, llm_next_move)

        if board.is_checkmate():
            print("LLM won!")
            print(f"### Move Count: {move_count} ###")
            print(f'Moves list - {s.join(move_list)}')
            break

        if board.is_stalemate():
            print("Draw!")
            print(f"### Move Count: {move_count} ###")
            print(f'Moves list - {s.join(move_list)}')
            break
    if move_count == 50:
        print("Played 50 moves hence quitting!!!!")
        break
board
We observe and measure the effectiveness of the model by counting the number of successful legal moves its able to successfully propose.
The notebook we use for testing the fine-tuned model can be accessed from the following GitHub repo.
Deploy the project
You can initiate the deployment of the project using instructions outlined in the GitHub repo, starting with the following command:
pnpm cdk deploy
This will initiate an AWS CloudFormation stack to run. After the stack is successfully deployed to your AWS account, you can begin setting up user access. Navigate to the newly created Amazon Cognito user pool, where you can create your own user account for logging in to the application. After creating your account, you can add yourself to the admin group to gain administrative privileges within the application.
After you complete the user setup, navigate to Amplify, where your chess application should now be visible. You’ll find a published URL for your hosted demo—simply choose this link to access the application. Use the login credentials you created in the Amazon Cognito user pool to access and explore the application.
After you’re logged in with admin privileges, you’ll be automatically directed to the /admin page. You can perform the following actions on this page:
- Create a session (game instance) by selecting from various gameplay options.
- Start the game from the admin panel.
- Choose the session to load the necessary cookie data.
- Navigate to the participants screen to view and test the game. The interface is intuitive, but following these steps in order will provide proper game setup and functionality.
Set up the AWS IoT Core resources
Configuring the solution for IoT gameplay follows a similar process to the previous section—you’ll still need to deploy the UI stack. However, this deployment includes an additional IoT flag that signals the stack to deploy the AWS IoT rules in charge of handling game requests and responses. The specific deployment steps are outlined in this section.
Follow the steps from before, but add the following flag when deploying:
pnpm cdk deploy -c iotDevice=true
This will deploy the solution, adding a critical step to the Step Functions workflow, which publishes a move request message to the topic of an AWS IoT rule and then waits for a response.
Users will need to configure an IoT edge device to consume game requests from this topic. This involves setting up a device capable of publishing and subscribing to topics using the MQTT protocol, processing move requests, and sending success messages back to the topic of the AWS IoT rule that is waiting for responses, which then feeds back into the Step Functions workflow. Although the configuration is flexible and can be customized to your needs, we recommend using AWS IoT Greengrass on your edge device. AWS IoT Greengrass is an open source edge runtime and cloud service for building, deploying, and managing device software. This enables secure topic communication between your IoT devices and the AWS Cloud, allowing you to perform edge verifications such as controlling the robotic arms and synchronizing with the physical board before publishing either a success or failure message back to the cloud.
Setting up a Greengrass Core Device and Client Devices
To setup an AWS IoT Greengrass V2 core device, you can deploy the Chess Game Manager component to it, by following the instructions in the GitHub repo for Greengrass Component. The component contains a recipe, where you’ll need to define the configuration that is required for your IoT devices. The default configuration contains a list of topics used to process game requests and responses, to perform board validations and notifications of new moves, and to coordinate move requests and responses from the robotic arms. You also need to update the names of the client devices that will connect to the component, these client devices must be registered as AWS IoT Things on AWS IoT Core.
Users will also need to have a client application that controls the robotic arms, and a client application that fetches information from the smart chess board. Both client applications need to connect and communicate with the Greengrass core device running the Chess Game Manager component. In our demo, we tested with two separate robotic arms client applications, for the first one we used a pair of CR10A arms from Dobot Robotics, and communicated with the robotic arms using its TCP-IP-CR-Python-V4 SDK; For the second one we used a pair of RO1 arms from Standard Bots, using its Standard bots API. For the smart chess board client application, we used a DGT Smart Board, the board comes with a USB cable that allows us to fetch piece move updates using serial communication.
Preventing illegal moves
When using FMs in Amazon Bedrock to generate the next move, the system employs a retry mechanism that makes three distinct attempts with the generative AI model, each providing more context than the last:
- First attempt – The model is prompted to predict the next best move based on the current board state.
- Second attempt – If the first move was illegal, the model is informed of its failure and prompted to try again, including the context of why the previous attempt failed.
- Third attempt – If still unsuccessful, the model is provided with information on previous illegal moves, with an explanation of past failures. However, this attempt includes a list of all legal moves available. The model is then prompted to select from this list the next logical move.
If all three generative AI attempts fail, the system automatically falls back to a chess engine for a guaranteed valid move.
For the custom imported fine-tuned models in Amazon Bedrock, the system employs a retry mechanism that makes five distinct attempts with the model. It all five attempts fail, the system automatically falls back to a chess engine for a guaranteed move.
During chess evaluation tests, models that underwent fine-tuning with over 100,000 training records demonstrated notable effectiveness. These enhanced models prevailed in 80% of their matches against base versions, and the remaining 20% ended in draws.
Clean up
To clean up and remove all deployed resources, run the following command from the AWS CLI:
To clean up the imported models in Amazon Bedrock, use the following code:
aws bedrock delete-imported-model
   --model-identifier <your-model-name>
   --region <your aws region>
You can also delete the imported models by going to the Amazon Bedrock console and selecting the imported model on the Imported models page.
To clean up the imported models in the S3 bucket, use the following commands after replacing the values corresponding to your environment:
# Delete a single model file
aws s3 rm s3://bucket-name/path/to/model/file
# Delete multiple model files in a directory
aws s3 rm s3://bucket-name/models/ --recursive
# Delete specific model files using include/exclude patterns
aws s3 rm s3://bucket-name/ --recursive --exclude "*" --include "model*.tar.gz"
This code uses the following parameters:
- –recursive – Required when deleting multiple files or directories
- –dryrun – Tests the deletion command without actually removing files
Conclusion
This post demonstrated how you can fine-tune FMs to create Embodied AI Chess, showcasing the seamless integration of cloud services, IoT capabilities, and physical robotics. With the AWS comprehensive suite of services, including Amazon Bedrock Custom Model Import, Amazon S3, AWS Amplify, AWS AppSync, AWS Step Functions, AWS IoT Core, and AWS IoT Greengrass, developers can create immersive chess experiences that bridge the digital and physical realms.
Give this solution a try and let us know your feedback in the comments.
References
More information is available at the following resources:
About the Authors
 Channa Samynathan is a Senior Worldwide Specialist Solutions Architect for AWS Edge AI & Connected Products, bringing over 28 years of diverse technology industry experience. Having worked in over 26 countries, his extensive career spans design engineering, system testing, operations, business consulting, and product management across multinational telecommunication firms. At AWS, Channa uses his global expertise to design IoT applications from edge to cloud, educate customers on the value proposition of AWS, and contribute to customer-facing publications.
 Dwaragha Sivalingam is a Senior Solutions Architect specializing in generative AI at AWS, serving as a trusted advisor to customers on cloud transformation and AI strategy. With seven AWS certifications including ML Specialty, he has helped customers in many industries, including insurance, telecom, utilities, engineering, construction, and real estate. A machine learning enthusiast, he balances his professional life with family time, enjoying road trips, movies, and drone photography.
 Daniel Sánchez is a senior generative AI strategist based in Mexico City with over 10 years of experience in cloud computing, specializing in machine learning and data analytics. He has worked with various developer groups across Latin America and is passionate about helping companies accelerate their businesses using the power of data.
 Jay Pillai is a Principal Solutions Architect at AWS. In this role, he functions as the Lead Architect, helping partners ideate, build, and launch Partner Solutions. As an Information Technology Leader, Jay specializes in artificial intelligence, generative AI, data integration, business intelligence, and user interface domains. He holds 23 years of extensive experience working with several clients across supply chain, legal technologies, real estate, financial services, insurance, payments, and market research business domains.
 Mohammad Tahsin is an AI/ML Specialist Solutions Architect at Amazon Web Services. He lives for staying up to date with the latest technologies in AI/ML and helping guide customers to deploy bespoke solutions on AWS. Outside of work, he loves all things gaming, digital art, and cooking.
 Nicolai van der Smagt is a Senior Solutions Architect at AWS. Since joining in 2017, he’s worked with startups and global customers to build innovative solutions using AI on AWS. With a strong focus on real-world impact, he helps customers bring generative AI projects from concept to implementation. Outside of work, Nicolai enjoys boating, running, and exploring hiking trails with his family.
 Patrick O’Connor is a WorldWide Prototyping Engineer at AWS, where he assists customers in solving complex business challenges by developing end-to-end prototypes in the cloud. He is a creative problem-solver, adept at adapting to a wide range of technologies, including IoT, serverless tech, HPC, distributed systems, AI/ML, and generative AI.
 Paul Vincent is a Principal Prototyping Architect on the AWS Prototyping and Cloud Engineering (PACE) team. He works with AWS customers to bring their innovative ideas to life. Outside of work, he loves playing drums and piano, talking with others through Ham radio, all things home automation, and movie nights with the family.
 Rupinder Grewal is a Senior AI/ML Specialist Solutions Architect with AWS. He currently focuses on serving of models and MLOps on Amazon SageMaker. Prior to this role, he worked as a Machine Learning Engineer building and hosting models. Outside of work, he enjoys playing tennis and biking on mountain trails.
 Sam Castro is a Sr. Prototyping Architect on the AWS Prototyping and Cloud Engineering (PACE) team. With a strong background in software delivery, IoT, serverless technologies, and generative AI, he helps AWS customers solve complex challenges and explore innovative solutions. Sam focuses on demystifying technology and demonstrating the art of the possible. In his spare time, he enjoys mountain biking, playing soccer, and spending time with friends and family.
 Tamil Jayakumar is a Specialist Solutions Architect & Prototyping Engineer with AWS specializing in IoT, robotics, and generative AI. He has over 14 years of proven experience in software development, creating minimum viable products (MVPs) and end-to-end prototypes. He is a hands-on technologist, passionate about solving technology challenges using innovative solutions both on software and hardware, aligning business needs to IT capabilities.
Read More


 Karan Singh is a Generative AI Specialist for third-party models at AWS, where he works with top-tier third-party foundation model (FM) providers to develop and execute joint Go-To-Market strategies, enabling customers to effectively train, deploy, and scale FMs to solve industry specific challenges. Karan holds a Bachelor of Science in Electrical and Instrumentation Engineering from Manipal University, a master’s in science in Electrical Engineering from Northwestern University and is currently an MBA Candidate at the Haas School of Business at University of California, Berkeley.
 James Yi is a Senior AI/ML Partner Solutions Architect at Amazon Web Services. He spearheads AWS’s strategic partnerships in Emerging Technologies, guiding engineering teams to design and develop cutting-edge joint solutions in generative AI. He enables field and technical teams to seamlessly deploy, operate, secure, and integrate partner solutions on AWS. James collaborates closely with business leaders to define and execute joint Go-To-Market strategies, driving cloud-based business growth. Outside of work, he enjoys playing soccer, traveling, and spending time with his family.


 Lars Lorentz Ludvigsen is a technology enthusiast who was introduced to AWS DeepRacer in late 2019 and was instantly hooked. Lars works as a Managing Director at Accenture where he helps clients to build the next generation of smart connected products. In addition to his role at Accenture, he’s an AWS Community Builder who focuses on developing and maintaining the AWS DeepRacer community’s software solutions.


 Dmitry Soldatkin is a Senior Machine Learning Solutions Architect at AWS, helping customers design and build AI/ML solutions. Dmitry’s work covers a wide range of ML use cases, with a primary interest in generative AI, deep learning, and scaling ML across the enterprise. He has helped companies in many industries, including insurance, financial services, utilities, and telecommunications. He has a passion for continuous innovation and using data to drive business outcomes. Prior to joining AWS, Dmitry was an architect, developer, and technology leader in data analytics and machine learning fields in the financial services industry.
 Giuseppe Zappia is a Principal AI/ML Specialist Solutions Architect at AWS, focused on helping large enterprises design and deploy ML solutions on AWS. He has over 20 years of experience as a full stack software engineer, and has spent the past 5 years at AWS focused on the field of machine learning.
 Ram Vegiraju is an ML Architect with the Amazon SageMaker Service team. He focuses on helping customers build and optimize their AI/ML solutions on Amazon SageMaker. In his spare time, he loves traveling and writing.
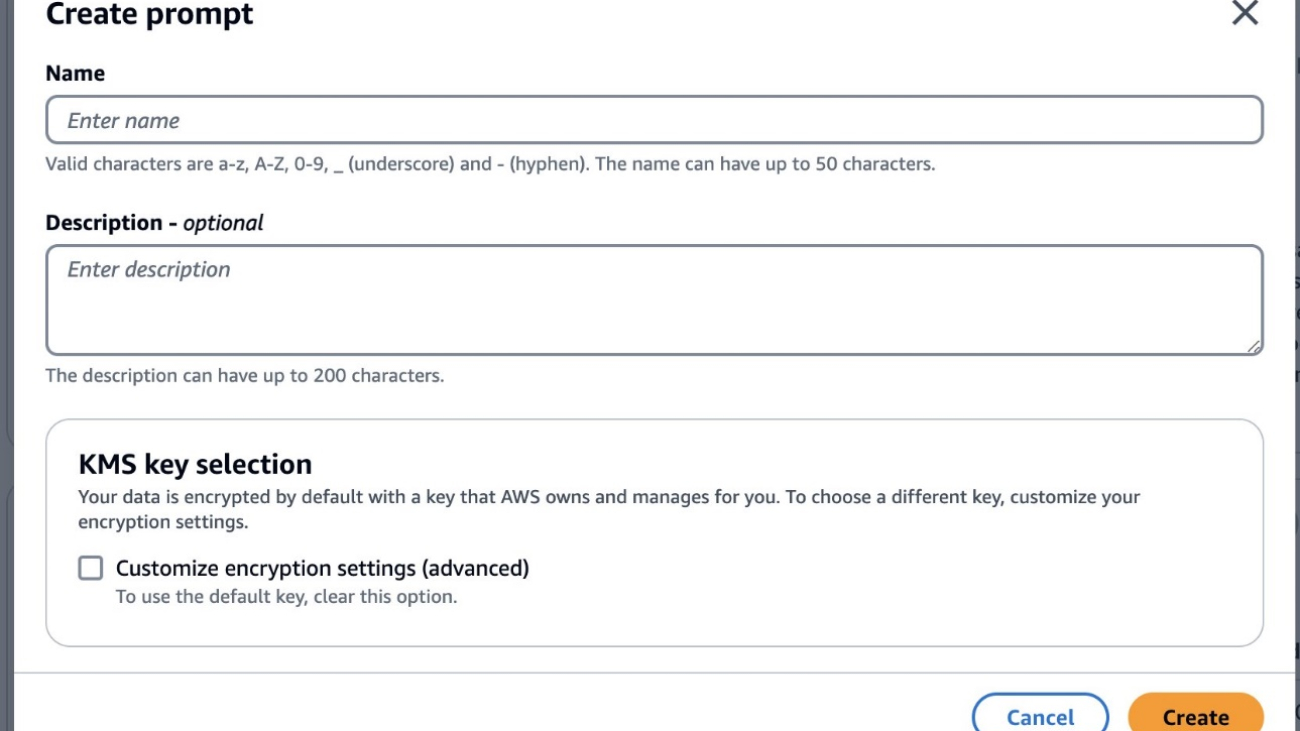


 Shreyas Subramanian is a Principal Data Scientist and helps customers by using generative AI and deep learning to solve their business challenges using AWS services. Shreyas has a background in large-scale optimization and ML and in the use of ML and reinforcement learning for accelerating optimization tasks.
 Chris Pecora is a Generative AI Data Scientist at Amazon Web Services. He is passionate about building innovative products and solutions while also focusing on customer-obsessed science. When not running experiments and keeping up with the latest developments in generative AI, he loves spending time with his kids.
 Zhengyuan Shen is an Applied Scientist at Amazon Bedrock, specializing in foundational models and ML modeling for complex tasks including natural language and structured data understanding. He is passionate about leveraging innovative ML solutions to enhance products or services, thereby simplifying the lives of customers through a seamless blend of science and engineering. Outside work, he enjoys sports and cooking.
 Shipra Kanoria is a Principal Product Manager at AWS. She is passionate about helping customers solve their most complex problems with the power of machine learning and artificial intelligence. Before joining AWS, Shipra spent over 4 years at Amazon Alexa, where she launched many productivity-related features on the Alexa voice assistant.


 Sudipta Mitra is a Generative AI Specialist Solutions Architect at AWS, who helps customers across North America use the power of data and AI to transform their businesses and solve their most challenging problems. His mission is to enable customers achieve their business goals and create value with data and AI. He helps architect solutions across AI/ML applications, enterprise data platforms, data governance, and unified search in enterprises.
 Gi Kim is a Data & ML Engineer with the AWS Professional Services team, helping customers build data analytics solutions and AI/ML applications. With over 20 years of experience in solution design and development, he has a background in multiple technologies, and he works with specialists from different industries to develop new innovative solutions using his skills. When he is not working on solution architecture and development, he enjoys playing with his dogs at a beach under the San Francisco Golden Gate Bridge.
 Surendiran Rangaraj is a Data & ML Engineer at AWS who helps customers unlock the power of big data, machine learning, and generative AI applications for their business solutions. He works closely with a diverse range of customers to design and implement tailored strategies that boost efficiency, drive growth, and enhance customer experiences.


 Kanwaljit Khurmi is a Principal Worldwide Generative AI Solutions Architect at AWS. He collaborates with AWS product teams, engineering departments, and customers to provide guidance and technical assistance, helping them enhance the value of their hybrid machine learning solutions on AWS. Kanwaljit specializes in assisting customers with containerized applications and high-performance computing solutions.
 Surya Kari is a Senior Generative AI Data Scientist at AWS. With a background in computer vision and AI devices, his current specializations include LLM training, multi-modal RAG, vision-language models, and edge computing.
 Arun Kumar Lokanatha is a Senior ML Solutions Architect with the Amazon SageMaker team. He specializes in LLM training workloads, helping customers build LLM workloads using SageMaker HyperPod, SageMaker training jobs, and SageMaker distributed training. Outside of work, he enjoys running, hiking, and cooking.
 Suhit Kodgule is a Software Development Engineer with the AWS Artificial Intelligence group working on deep learning frameworks. In his spare time, he enjoys hiking, traveling, and cooking.
 Anirudh Viswanathan is a Sr Product Manager, Technical – External Services with the SageMaker Training team. He holds a Masters in Robotics from Carnegie Mellon University, an MBA from the Wharton School of Business, and is named inventor on over 40 patents. He enjoys long-distance running, visiting art galleries, and Broadway shows.


 Kyle T. Blocksom is a Sr. Solutions Architect with AWS based in Southern California. Kyle’s passion is to bring people together and leverage technology to deliver solutions that customers love. Outside of work, he enjoys surfing, eating, wrestling with his dog, and spoiling his niece and nephew.
 Maira Ladeira Tanke is a Tech Lead Amazon Bedrock for Generative AI Agents at AWS. With a background in machine learning, she has over 10 years of experience architecting and building AI applications with customers across industries. As a technical lead, she helps customers accelerate their achievement of business value through generative AI solutions on Amazon Bedrock. In her free time, Maira enjoys traveling, playing with her cat, and spending time with her family someplace warm.
 Mark Roy is a Principal Machine Learning Architect for AWS, helping customers design and build generative AI solutions. His focus since early 2023 has been leading solution architecture efforts for the launch of Amazon Bedrock, the flagship generative AI offering from AWS for builders. Mark’s work covers a wide range of use cases, with a primary interest in generative AI, agents, and scaling ML across the enterprise. He has helped companies in insurance, financial services, media and entertainment, healthcare, utilities, and manufacturing. Prior to joining AWS, Mark was an architect, developer, and technology leader for over 25 years, including 19 years in financial services. Mark holds six AWS certifications, including the ML Specialty Certification.
 John Baker is a Principal SDE at AWS where he works on Amazon Bedrock and specifically Amazon Bedrock Agents. He has been with Amazon for more than 10 years and has worked across AWS, Alexa, and Amazon.com. In his spare time, John enjoys skiing and other outdoor activities throughout the Pacific Northwest.
 Sudip Dutta is a senior Software Developer engineer leading the development of Amazon Bedrock Agents custom orchestrator. With more than 17 year of experience developing distributed systems and architectures he has worked at AWS for the past 6 years focusing on ML and AI services such as Bedrock and Lex. On his free time Sudip enjoys hiking in the forest of pacific northwest or reading mystery novels!
 Figure 1. Architecture Diagram

 Rama Krishna Yalla is an Associate DevOps Consultant at AWS, adept at designing scalable, reliable, and secure cloud environments. He leverages automation and CI/CD best practices to streamline software delivery, reduce downtime, and enhance operational efficiency. Rama is experienced in managing infrastructure as code (IaC) ensuring consistent and repeatable deployments. He also focuses on implementing robust monitoring and logging solutions, enabling proactive issue resolution and optimized performance. Outside of work, Rama enjoys playing badminton and often participates in local tournaments.
 Akhil Raj Yallamelli is a Cloud Infrastructure Architect at AWS, specializing in architecting cloud infrastructure solutions for enhanced data security and cost efficiency. He is experienced in integrating technical solutions with business strategies to create scalable, reliable, and secure cloud environments. Akhil enjoys developing solutions focusing on customer business outcomes, incorporating generative AI (Gen AI) technologies to drive innovation and cloud enablement. He holds an MS degree in Computer Science. Outside of his professional work, Akhil enjoys watching and playing sports.
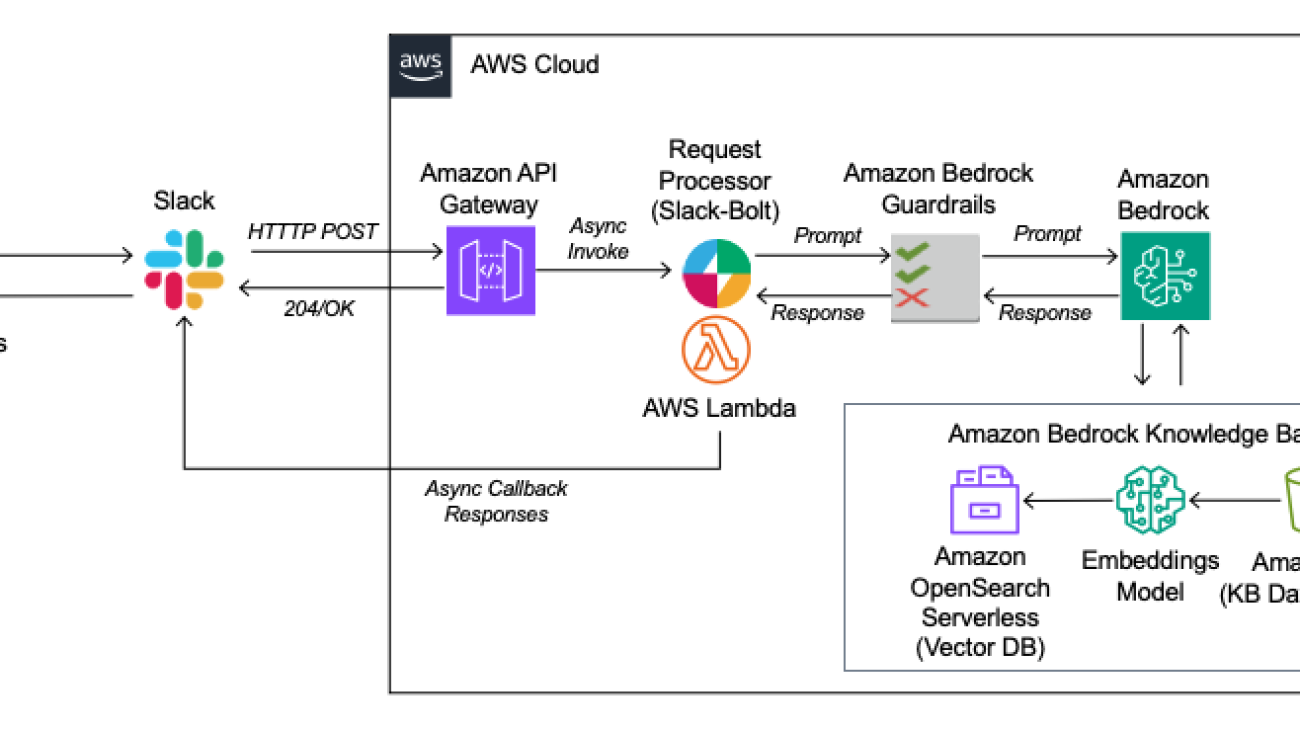


 Dean Colcott is an AWS Senior GenAI/ML Specialist Solution Architect and SME for Amazon Bedrock. He has areas of depth in integrating generative AI outcomes into enterprise applications, full stack development, video analytics, and computer vision and enterprise data platforms.