A guest post by Matthias Hertel and Annie Tallund of Arm
Microcontrollers power the world around us. They come with low memory resources and high requirements for energy efficiency. At the same time, they are expected to perform advanced machine learning interference in real time. In the embedded space, countless engineers are working to solve this challenge. The powerful Arm Cortex-M-based microcontrollers are a dedicated platform, optimized to run energy-efficient ML. Arm and the TensorFlow Lite Micro (TFLM) team have a long-running collaboration to enable optimized inference of ML models on a variety of Arm microcontrollers.
Additionally, with well-established technologies like CMSIS-Pack, the TFLM library is ready to run on to 10000+ different Cortex-M microcontroller devices with almost no integration effort. Combining these two offers a great variety of platforms and configurations. In this article, we will describe how we have collaborated with the TFLM team to use Arm Virtual Hardware (AVH) as part of the TFLM projects open-source continuous integration (CI) framework to verify many Arm-based processors with TFLM. This enables developers to test their projects on Arm intellectual property IP without the additional complexity of maintaining hardware.
Arm Virtual Hardware – Models for all Cortex-M microcontrollers
Arm Virtual Hardware (AVH) is a new way to host Arm IP models that can be accessed remotely. In an ML context, it offers a platform to test models without requiring the actual hardware. The following Arm M-profile processors are currently available through AVH:
Arm Corstone is another virtualization technology, in the form of a silicon IP subsystem, helping developers verify and integrate their devices. The Corstone framework builds the foundation for many modern Cortex-M microcontrollers. AVH supports multiple platforms including Corstone-300, Corstone-310 and Corstone-1000. The full list of supported platforms can be found here.
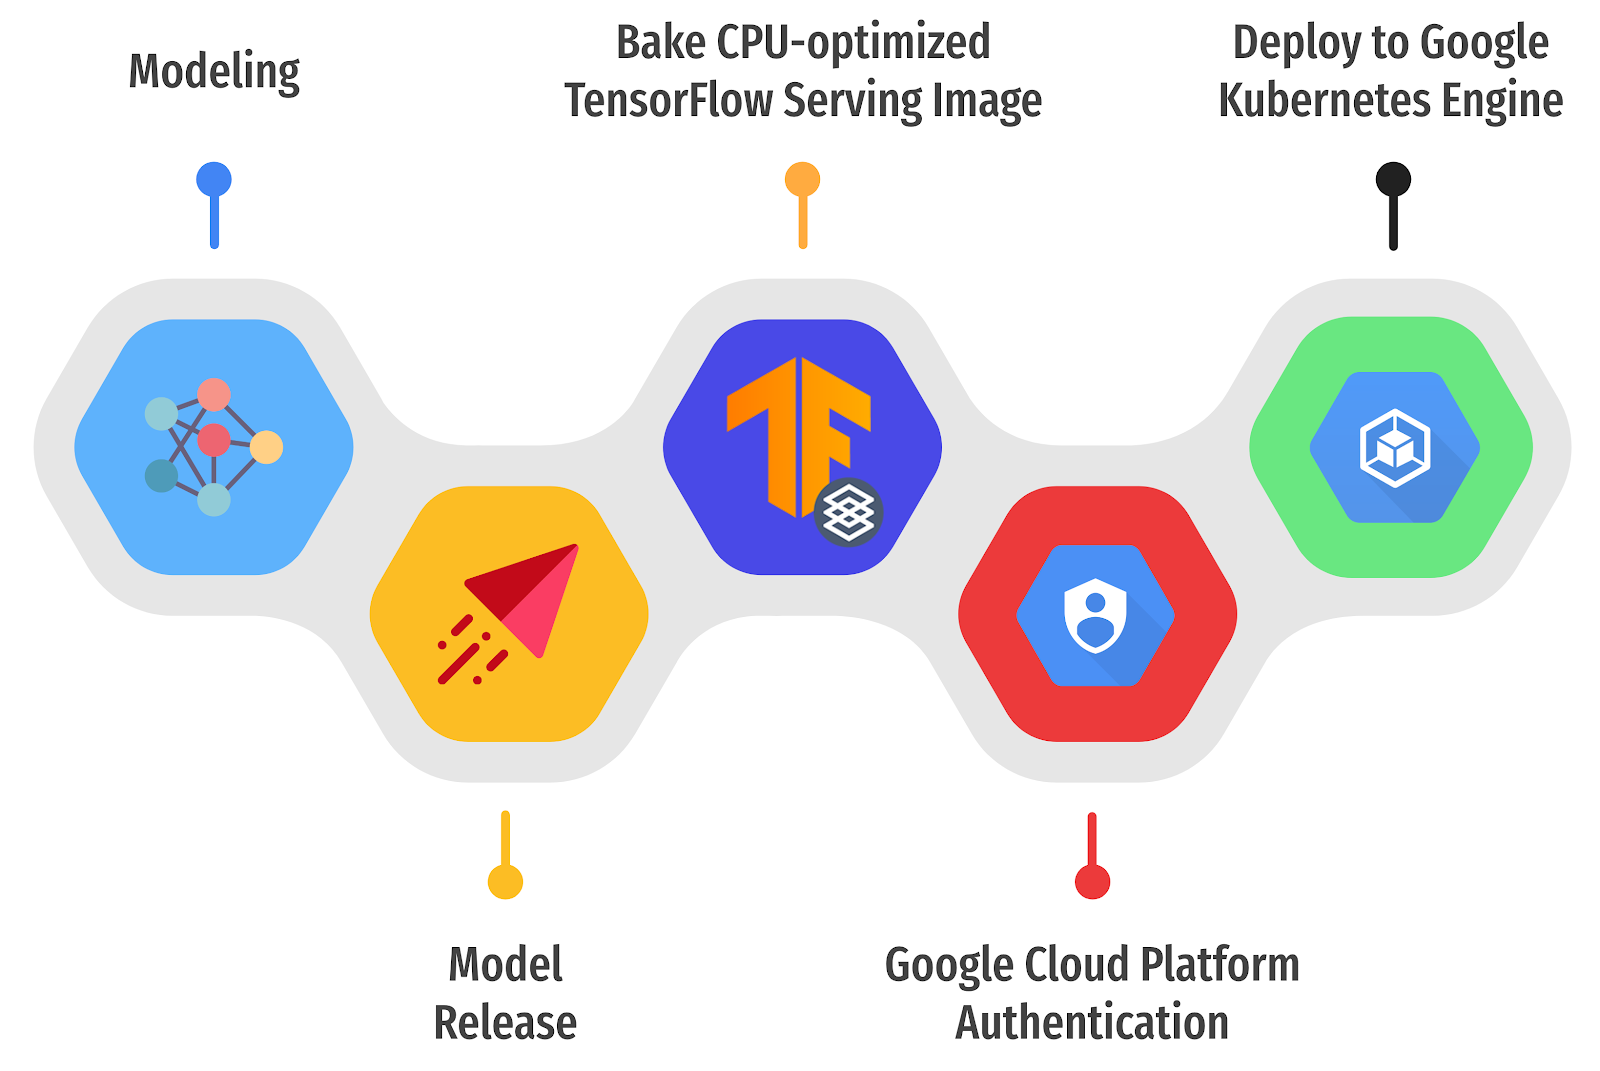
Through Arm Virtual Hardware, these building blocks are available as Amazon Machine Image (AMI) on Amazon Web Services (AWS) Marketplace and locally through Keil MDK-Professional.
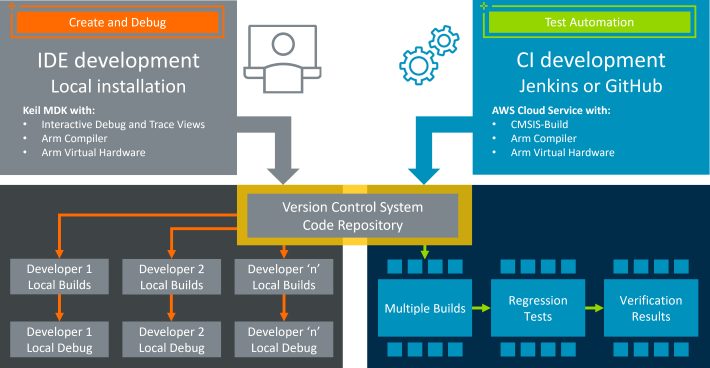 |
| The Arm Virtual Hardware end-to-end workflow, from developer to the cloud. |
GitHub Actions and Arm Virtual Hardware
GitHub Actions provides a popular CI solution for open-source projects, including TensorFlow Lite Micro. The AVH technology can be integrated with the GitHub Actions runner and that can be used to run tests on the different Arm platforms as natively compiled code without the need to have the hardware available.
Let’s get into how it’s done!
Defining a AVH use-case through a GitHub Actions workflow
Overview
Over the past year, we have made it possible to set up Arm IP verification in GitHub Actions. We will walk you through the steps needed to perform this integration with TFLM. The same process can be repeated for other open-source projects that use GitHub Actions as well.
A GitHub workflow file (such as Corstone-300 workflow in the TFLM repository) can be used to run code on an AWS EC2 instance, which has Arm IP installed. This workflow builds the TFLM project with Corstone-300 as a target, and runs the unit tests using both GCC and armclang, displaying the results directly in the GitHub UI via a hierarchical process as visualized below.
 |
The workflow contains one or more jobs, which points to a file containing steps. The steps are defined in a separate file (cortex_m_corstone_300_avh.yml). In our example, the steps will then point to a test script (test_cortex_m_corstone_300.sh), which is sent using an Arm-provided API (AVH Client) to the AWS instance where it is then executed accordingly. The script will send back output, which is obtained by the AVH client and can be displayed in the GitHub Actions UI.
Depending on the nature of the use case, this can happen one or several times, which all depends on the number of jobs and steps defined. In the Corstone-300 case, we use a single job with steps that will only run one test script only. This is not a limitation however, as visualized in the flowchart above.
Connecting the GitHub Actions runner to the AWS EC2 instance running AVH
|
– name: Install AVH Client for Python
run: | |
The AWS credentials are configured to allow the AVH client to connect to the AWS EC2 instance, though there are various other ways to authenticate with AWS services. These include adding the AWS keypair onto GitHub secrets, or using an allow-listed GitHub repository to ordinate a predefined role, as shown here.
|
– name: Configure AWS Credentials |
Defining and executing a workload
|
– name: Execute test suite on Arm Virtual Hardware at AWS |
This is where we define a list of steps to be executed. The steps will point to an inventory of files to be transferred, like the TFLM repository itself. Additionally, we define the code that we want to execute using these files, which can be done through the script that we provided earlier.
|
steps: |
Next, we set up a list of files to copy back to the GitHub Actions runner. For the TFLM unit test, a complete command line log will be written to a file, corstone300.log – that is returned to the GitHub Actions runner to analyze the test run outcome:
|
– name: Fetch results from Arm Virtual Hardware |
You can find a detailed explanation of avhclient and its usage on the Arm Virtual Hardware Client GitHub repository and the getting started guide.
Expanding the toolbox by adding more hardware targets
Using AVH it is easy to extend tests to all available Arm platforms. You can also avoid a negative impact on the overall CI workflow execution time by hosting through cloud services like AWS and spawning an arbitrary number of AVH instances in parallel.
Virtual Hardware targets like the Corstone-310 demonstrate how software validation is feasible even before silicon is available. This will make well-tested software stacks available for new Cortex-M devices from day one and we plan to expand the support. The introduction of Corstone-1000 will extend the range of tested architectures into the world of Cortex-A application processors, including Cortex-A32, Cortex-A35, Cortex-A53.
Wrapping up
To summarize: by providing a workflow file, a use-case file, and a workload (in our case, a test script), we have enabled running all the TFLM unit tests on the Corstone-300 and will work to extend it to all AVH targets available.
Thanks to the AVH integration, CI flows with virtual hardware targets open up new possibilities. Choosing the right architecture, integrating, and verifying has never been easier. We believe it is an important step in making embedded ML more accessible and that it will pave the way for future applications.
Thank you for reading!
Acknowledgements
We would like to acknowledge a number of our colleagues at Arm who have contributed to this project, including Samuel Peligrinello Caipers, Fredrik Knutsson, and Måns Nilsson.
We would also like to thank Advait Jain from Google and John Withers of Berkeley Design Technology, Inc. for architecting a continuous integration system using GitHub Actions that has enabled the Arm Virtual Hardware integration described in this article.


.png)