Optimizing TensorFlow Lite Runtime Memory

Optimizing TensorFlow Lite Runtime Memory

Posted by Juhyun Lee and Yury Pisarchyk, Software Engineers

Running inference on mobile and embedded devices is challenging due to tight resource constraints; one has to work with limited hardware under strict power requirements. In this article, we want to showcase improvements in TensorFlow Lite’s (TFLite) memory usage that make it even better for running inference at the edge.

Intermediate Tensors

Typically, a neural network can be thought of as a computational graph consisting of operators, such as CONV_2D or FULLY_CONNECTED, and tensors holding the intermediate computation results, called intermediate tensors. These intermediate tensors are typically pre-allocated to reduce the inference latency at the cost of memory space. However, this cost, when implemented naively, can’t be taken lightly in a resource-constrained environment; it can take up a significant amount of space, sometimes even several times larger than the model itself. For example, the intermediate tensors in MobileNet v2 take up 26MB memory (Figure 1) which is about twice as large as the model itself.

Figure 1. The intermediate tensors of MobileNet v2 (top) and a mapping of their sizes onto a 2D memory space (bottom). If each intermediate tensor uses a dedicated memory buffer (depicted with 65 distinct colors), they take up ~26MB of runtime memory.

The good news is that these intermediate tensors don’t have to co-exist in memory thanks to data dependency analysis. This allows us to reuse the memory buffers of the intermediate tensors and reduce the total memory footprint of the inference engine. If the network has the shape of a simple chain, two large memory buffers are sufficient as they can be swapped back and forth interchangeably throughout the network. However, for arbitrary networks forming complicated graphs, this NP-complete resource allocation problem requires a good approximation algorithm.

We have devised a number of different approximation algorithms for this problem, and they all perform differently depending on the neural network and the properties of memory buffers, but they all use one thing in common: tensor usage records. A tensor usage record of an intermediate tensor is an auxiliary data structure that contains information about how big the tensor is and when it is used for the first and the last time in a given execution plan of the network. With the help of these records, the memory manager is able to compute the intermediate tensor usages at any moment in the network’s execution and optimize its runtime memory for the smallest footprint possible.

Shared Memory Buffer Objects

In TFLite GPU OpenGL backend, we employ GL textures for these intermediate tensors. These come with a couple of interesting restrictions: (a) A texture’s size can’t be modified after its creation, and (b) only one shader program gets exclusive access to the texture object at a given time. In this Shared Memory Buffer Objects mode, the objective is to minimize the sum of the sizes of all created shared memory buffer objects in the object pool. This optimization is similar to the well-known register allocation problem, except that it’s much more complicated due to the variable size of each object.

With the aforementioned tensor usage records, we have devised 5 different algorithms as shown in Table 1. Except for Min-Cost Flow, they are greedy algorithms, each using a different heuristic, but still reaching or getting very close to the theoretical lower bound. Some algorithms perform better than others depending on the network topology, but in general, GREEDY_BY_SIZE_IMPROVED and GREEDY_BY_BREADTH produce the object assignments with the smallest memory footprint.

Table 1. Memory footprint of Shared Objects strategies (in MB; best results highlighted in green). The first 5 rows are our strategies, and the last 2 serve as a baseline (Lower Bound denotes an approximation of the best number possible which may not be achievable, and Naive denotes the worst number possible with each intermediate tensor assigned its own memory buffer).

Coming back to our opening example, GREEDY_BY_BREADTH performs best on MobileNet v2 which leverages each operator’s breadth, i.e. the sum of all tensors in the operator’s profile. Figure 2, especially when compared to Figure 1, highlights how big of a gain one can get when employing a smart memory manager.

Figure 2. The intermediate tensors of MobileNet v2 (top) and a mapping of their sizes onto a 2D memory space (bottom). If the intermediate tensors share memory buffers (depicted with 4 distinct colors), they only take up ~7MB of runtime memory.

Memory Offset Calculation

For TFLite running on the CPU, the memory buffer properties applicable to GL textures don’t apply. Thus, it is more common to allocate a huge memory arena upfront and have it shared among all readers and writers which access it by a given offset that does not interfere with other read and writes. The objective in this Memory Offset Calculation approach is to minimize the size of the memory arena.

We have devised 3 different algorithms for this optimization problem and have also explored prior work (Strip Packing by Sekiyama et al. 2018). Similar to the Shared Objects approach, some algorithms perform better than others depending on the network as shown in Table 2. One takeaway from this investigation is that the Offset Calculation approach has a smaller footprint than the Shared Objects approach in general, and thus, one should prefer the former over the latter if applicable.

Table 2. Memory footprint of Offset Calculation strategies (in MB; best results highlighted in green). The first 3 rows are our strategies, the next 1 is prior work, and the last 2 serve as baseline (Lower Bound denotes an approximation of the best number possible which may not be achievable, and Naive denotes the worst number possible with each intermediate tensor assigned its own memory buffer).

These memory optimizations, for both CPU and GPU, have shipped by default with the last few stable TFLite releases, and have proven valuable in supporting more demanding, state-of-the-art models like MobileBERT. You can find more details about the implementation by looking at the GPU implementation and CPU implementation directly.

Acknowledgements

Matthias Grundmann, Jared Duke, Sarah Sirajuddin, and special thanks to Andrei Kulik for initial brainstorming and Terry Heo for the final implementation in TFLite.

Read More

Boosting quantum computer hardware performance with TensorFlow

Boosting quantum computer hardware performance with TensorFlow

A guest article by Michael J. Biercuk, Harry Slatyer, and Michael Hush of Q-CTRL

Google recently announced the release of TensorFlow Quantum – a toolset for combining state-of-the-art machine learning techniques with quantum algorithm design. This was an important step to build tools for developers working on quantum applications – users operating primarily at the “top of the stack”.

In parallel we’ve been building a complementary TensorFlow-based toolset working from the hardware level up – from the bottom of the stack. Our efforts have focused on improving the performance of quantum computing hardware through the integration of a set of techniques we call quantum firmware.

In this article we’ll provide an overview of the fundamental driver for this work – combating noise and error in quantum computers – and describe how the team at Q-CTRL uses TensorFlow to efficiently characterize and suppress the impact of noise and imperfections in quantum hardware. These are key challenges in the global effort to make quantum computers useful.

Q-CTRL image

The Achilles heel of quantum computers – noise and error

Quantum computing, simply put, is a new way to process information using the laws of quantum physics – the rules that govern nature on tiny size scales. Through decades of effort in science and engineering we’re now ready to put this physics to work solving problems that are exceptionally difficult for regular computers.

Realizing useful computations on today’s systems requires a recognition that performance is predominantly limited by hardware imperfections and failures, not system size. Susceptibility to noise and error remains the Achilles heel of quantum computers, and ultimately limits the range and utility of algorithms run on quantum computing hardware.

As a broad community average, most quantum computer hardware can run just a few dozen calculations over a time much less than one millisecond before requiring a reset due to the influence of noise. Depending on the specifics that’s about 1024 times worse than the hardware in a laptop!

This is the heart of why quantum computing is really hard. In this context, “noise” describes all of the things that cause interference in a quantum computer. Just like a mobile phone call can suffer interference leading it to break up, a quantum computer is susceptible to interference from all sorts of sources, like electromagnetic signals coming from WiFi or disturbances in the Earth’s magnetic field.

When qubits in a quantum computer are exposed to this kind of noise, the information in them gets degraded just the way sound quality is degraded by interference on a call. In a quantum system this process is known as decoherence. Decoherence causes the information encoded in a quantum computer to become randomized – and this leads to errors when we execute an algorithm. The greater the influence of noise, the shorter the algorithm that can be run.

So what do we do about this? To start, for the past two decades teams have been working to make their hardware more passively stable – shielding it from the noise that causes decoherence. At the same time theorists have designed a clever algorithm called Quantum Error Correction that can identify and fix errors in the hardware, based in large part on classical error correction codes. This is essential in principle, but the downside is that to make it work you have to spread the information in one qubit over lots of qubits; it may take 1000 or more physical qubits to realize just one error-corrected “logical qubit”. Today’s machines are nowhere near capable of getting benefits from this kind of Quantum Error Correction.

Q-CTRL adds something extra – quantum firmware – which can stabilize the qubits against noise and decoherence without the need for extra resources. It does this by adding new solutions at the lowest layer of the quantum computing stack that improve the hardware’s robustness to error.

Building quantum firmware with TensorFlow

Quantum firmware graphic

Quantum firmware describes a set of protocols whose purpose is to deliver quantum hardware with augmented performance to higher levels of abstraction in the quantum computing stack. The choice of the term firmware reflects the fact that the relevant routines are usually software-defined but embedded proximal to the physical layer and effectively invisible to higher layers of abstraction.

Quantum computing hardware generally relies on a form of precisely engineered light-matter interaction in order to enact quantum logic operations. These operations in a sense constitute the native machine language for a quantum computer; a timed pulse of microwaves on resonance with a superconducting qubit can translate to an effective bit-flip operation while another pulse may implement a conditional logic operation between a pair of qubits. An appropriate composition of these electromagnetic signals then implements the target quantum algorithm.

Quantum firmware determines how the physical hardware should be manipulated, redefining the hardware machine language in a way that improves stability against decoherence. Key to this process is the calculation of noise-robust operations using information gleaned from the hardware itself.

Building in TensorFlow was essential to moving beyond “home-built’’ code to commercial-grade products for Q-CTRL. Underpinning these techniques (formally coming from the field of quantum control) are tools allowing us to perform complex gradient-based optimizations. We express all optimization problems as data flow graphs, which describe how optimization variables (variables that can be tuned by the optimizer) are transformed into the cost function (the objective that the optimizer attempts to minimize). We combine custom convenience functions with access to TensorFlow primitives in order to efficiently perform optimizations as used in many different parts of our workflow. And critically, we exploit TensorFlow’s efficient gradient calculation tools to address what is often the weakest link in home-built implementations, especially as the analytic form of the relevant function is often nonlinear and contains many complex dependencies.

For example, consider the case of defining a numerically optimized error-robust quantum bit flip used to manipulate a qubit – the analog of a classical NOT gate. As mentioned above, in a superconducting qubit this is achieved using a pulse of microwaves. We have the freedom to “shape” various aspects of the envelope of the pulse in order to enact the same mathematical transformation in a way that exhibits robustness against common noise sources, such as fluctuations in the strength or frequency of the microwaves.

To do this we first define the data flow graph used to optimize the manipulation of this qubit – it includes objects that describe available “knobs” to adjust, the sources of noise, and the target operation (here a Hadamard gate).

data flow graph

The data flow graph used to optimize quantum controls. The loop at left is run through our TensorFlow optimization engine

Once the graph has been defined inside our context manager, an object must be created that ties together the objective function (in this case minimizing the resultant gate error) and the desired outputs defining the shape of the microwave pulse. With the graph object created, an optimization can be run using a service that returns a new graph object containing the results of the optimization.

This structure allows us to simply create helper functions which enable physically motivated constraints to be built directly into the graph. For instance, these might be symmetry requirements, limits on how a signal changes in time, or even incorporation of characteristics of the electronics systems used to generate the microwave pulses. Any other capabilities not directly covered by this library of helper functions can also be directly coded as TensorFlow primitives.

With this approach we achieve an extremely flexible and high-performance optimization engine; our direct benchmarking has revealed order-of-magnitude benefits in time to solution relative to the best available alternative architectures.

The capabilities enabled by this toolkit span the space of tasks required to stabilize quantum computing hardware and reduce errors at the lowest layer of the quantum computing stack. And importantly they’re experimentally verified on real quantum computing hardware; quantum firmware has been shown to reduce the likelihood of errors, mitigate system performance variations across devices, stabilize hardware against slowly drifting out of calibration, and even make quantum logic operations more compatible with higher level abstractions in quantum computing such as quantum error correction. All of these capabilities and real hardware demonstrations are accessible via our publicly available User Guides and Application Notes in executable Jupyter notebook form.

Ultimately, we believe that building and operating large-scale quantum computing systems will be effectively impossible without the integration of the capabilities encapsulated in quantum firmware. There are many concepts to be drawn from across the fields of machine learning and robotic control in the drive for performance and autonomy, and TensorFlow has proven an efficient language to support the development of the critical toolsets.

A brief history of QC, from Shor to quantum machine learning

The quantum computing boom started in 1994 with the discovery of Shor’s algorithm for factoring large numbers. Public key cryptosystems — which is to say, most encryption — rely on the mathematical complexity of factoring primes to keep messages safe from prying computers. By virtue of their approach to encoding and processing information, however, quantum computers are conjectured to be able to factor primes faster — exponentially faster — than a classical machine. In principle this poses an existential threat not only to national security, but also emerging technologies such as cryptocurrencies.

This realization set in motion the development of the entire field of quantum computing. Shor’s algorithm spurred the NSA to begin one of its first ever open, University-driven research programs asking the question of whether such systems could be built. Fast forward to 2020 and quantum supremacy has been achieved, meaning that a real quantum computing hardware system has performed a task that’s effectively impossible for even the world’s largest supercomputers.

Quantum supremacy is an important technical milestone whose practical importance in solving problems of relevance to end users remains a bit unclear. Our community is continuing to make great progress towards quantum advantage – a threshold indicating that it’s actually cheaper or faster to use a quantum computer for a problem of practical relevance. And for the right problems, we think that within the next 5-10 years we’ll cross that threshold with a quantum computer that isn’t that much bigger than the ones we have today. It just needs to perform much better.

So, which problems are the right problems for quantum computers to address first?

In many respects, Shor’s algorithm has receded in importance as the scale of the challenge emerged. A recent technical analysis suggests that we’re unlikely to see Shor deployed at a useful scale until 2039. Today, small-scale machines with a couple of dozen interacting qubits exist in labs around the world, built from superconducting circuits, individual trapped atoms, or similarly exotic materials. The problem is that these early machines are just too small and too fragile to solve problems relevant to factoring.

To factor a number sufficiently large to be relevant in cryptography, one would need a system composed of thousands of qubits capable of handling trillions of operations each. This is nothing for a conventional machine where hardware can run for a billion years at a billion operations per second and never be likely to suffer a fault. But as we’ve seen it’s quite a different story for quantum computers.

These limits have driven the emergence of a new class of applications in materials science and chemistry that could prove equally impactful, using much smaller systems. Quantum computing in the near term could also help develop new classes of artificial intelligence systems. Recent efforts have demonstrated a strong and unexpected link between quantum computation and artificial neural networks, potentially portending new approaches to machine learning.

This class of problem can often be cast as optimizations where input into a classical machine learning algorithm comes from a small quantum computation, or where data is represented in the quantum domain and a learning procedure implemented. TensorFlow Quantum provides an exciting toolset for developers seeking new and improved ways to exploit the small quantum computers existing now and in the near future.

Still, even those small machines don’t perform particularly well. Q-CTRL’s quantum firmware enables users to extract maximum performance from hardware. Thus we see that TensorFlow has a critical role to play across the emerging quantum computing software stack – from quantum firmware through to algorithms for quantum machine learning.

Resources if you’d like to learn more

We appreciate that members of the TensorFlow community may have varying levels of familiarity with quantum computing, and that this overview was only a starting point. To help readers interested in learning more about quantum computing we’re happy to provide a few resources:

  • For those knowledgeable about machine learning, Q-CTRL has also produced a series of webinars introducing the concept of Robust Control in quantum computing and even demonstrating reinforcement learning to discover gates on real quantum hardware.
  • If you need to start from zero, Q-CTRL has produced a series of introductory video tutorials helping the uninitiated begin their quantum journey via our learning center. We also offer a visual interface enabling new users to discover and build intuition for the core concepts underlying quantum computing – including the impact of noise on quantum hardware.
  • Jack Hidary from X wrote a great text focused on linking the foundations of quantum computing with how teams today write code for quantum machines.
  • The traditional “formal” starting point for those interested in quantum computing is the timeless textbook from “Mike and Ike

Read More

Towards ML Engineering: A Brief History Of TensorFlow Extended (TFX)

Towards ML Engineering: A Brief History Of TensorFlow Extended (TFX)

Posted by Konstantinos (Gus) Katsiapis on behalf of the TFX Team

Table of Contents

TFX logo

Abstract

Software Engineering, as a discipline, has matured over the past 5+ decades. The modern world heavily depends on it, so the increased maturity of Software Engineering was an eventuality. Practices like testing and reliable technologies help make Software Engineering reliable enough to build industries upon. Meanwhile, Machine Learning (ML) has also grown over the past 2+ decades. ML is used more and more for research, experimentation and production workloads. ML now commonly powers widely-used products integral to our lives.

But ML Engineering, as a discipline, has not widely matured as much as its Software Engineering ancestor. Can we take what we have learned and help the nascent field of applied ML evolve into ML Engineering the way Programming evolved into Software Engineering?

In this article we will give a whirlwind tour of Sibyl and TensorFlow Extended (TFX), two successive end-to-end (E2E) ML platforms at Alphabet. We will share the lessons learned from over a decade of applied ML built on these platforms, explain both their similarities and their differences, and expand on the shifts (both mental and technical) that helped us on our journey. In addition, we will highlight some of the capabilities of TFX that help realize several aspects of ML Engineering. We argue that in order to unlock the gains ML can bring, organizations should advance the maturity of their ML teams by investing in robust ML infrastructure and promoting ML Engineering education. We also recommend that before focusing on cutting-edge ML modeling techniques, product leaders should invest more time in adopting interoperable ML platforms for their organizations. In closing, we will also share a glimpse into the future of TFX.

Where We Are Coming From

Applied ML has been an integral part of Google products and services over the last decade, and is becoming more so over time. We discovered early on from our endeavors to apply ML in production that while ML algorithms are important, they are usually insufficient in realizing the successful application of ML in a product. In particular, E2E ML platforms, which help with all aspects of the ML lifecycle, are usually needed to both accelerate ML adoption and make its use durable and sustainable.

Sibyl (2007 – 2020)

E2E ML platforms are not a new thing at Google. Sibyl, founded in 2007, was a platform that enabled massive-scale ML, catered to production use. Sibyl offered a decent amount of modeling flexibility on top of “wide” models (linear, logistic, poisson regression and later factorization machines) coupled with non-linear transformations and customizable loss functions and regularization. Importantly, Sibyl also offered tools for several aspects of the ML workflow including Data Ingestion, Data Analysis and Validation, Training (of course), Model Analysis, and Training-Serving Skew Detection. All these were packaged as a single integrated product that allowed for iterative experimentation. This holistic product offering, coupled with the Sibyl team’s user focus, rendered Sibyl to, once upon a time, be one of the most widely used E2E ML platforms at Google. Sibyl has since been decommissioned. It was in production for ~14 years, and the vast majority of its workloads migrated to TFX.

TFX (2017 – ?)

While several of us were still working on Sibyl, a notable revolution was happening in the ML algorithms fields with the popularization of Deep Learning (DL). In 2015, Google publicly released TensorFlow (which was itself a successor to a previous system called DistBelief). Since its inception, TensorFlow supported a variety of applications with a focus on DL training and inference. Its flexible programming model allowed it to be used for a lot more than DL and its popularity in both research and production positioned it as the lingua franca for authoring ML algorithms. While TensorFlow offered flexibility, it lacked a complete end-to-end production system. On the other hand, Sibyl had robust end-to-end capabilities, but lacked flexibility. It became apparent that we needed an E2E ML platform for TensorFlow in order to accelerate ML at Google; in 2017, nearly a decade after the birth of Sibyl, we launched TFX within Google. TFX is now the most widely used, general purpose E2E ML platform at Alphabet, including Google.

In the 3 years since its launch, TFX has enabled Alphabet to realize what might be described as “industrial-scale” ML: TFX is used by thousands of users within Alphabet, and it powers hundreds of popular Alphabet products, including Cloud AI services on Google Cloud Platform (GCP). On any given day there are thousands of TFX pipelines running, which are processing exabytes of data and producing tens of thousands of models, which in turn are performing hundreds of millions of inferences per second. TFX’s widespread adoption helps Alphabet realize the flow of research into production and enables very diverse use cases for both direct and indirect TFX users. This widespread adoption also enables teams to focus on model development rather than ML platform development, allowing ML to be more easily used in novel product areas, and creating a virtuous cycle of ML platform evolution from ML applications.

Based on our internal success, and the expectation that equivalents of ML engineering will be needed by organizations and individuals everywhere in the world, we decided to publicly describe the design and initial deployment of TFX within Google and to, step by step, make more of our learnings and our technology publicly available (including open source), while we continue building more of each. We were able to accomplish this in part because, like Sibyl, TFX built upon robust infrastructural dependencies. For example, Sibyl made heavy use of MapReduce and its successor Flume for its distributed data processing, and now TFX heavily uses their portable successor, Apache Beam, for the same.

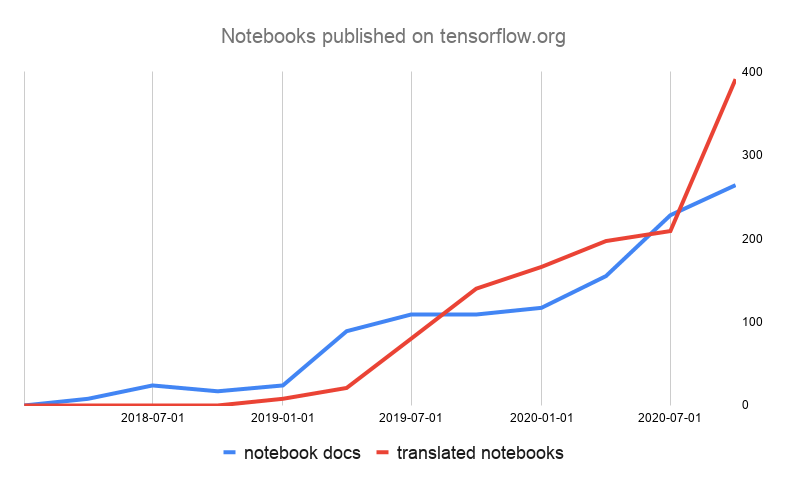
Following in TensorFlow’s footsteps, the public TFX offering was released in early 2019 and widely adopted in under a year across environments including on-premises and GCP with Cloud AI Platform Pipelines. Some of our partners have also publicly shared their use cases powered by TFX, including how it radically improved their applied ML velocity.

Lessons From Our 10+ Year Journey Of ML Platform Evolution

Though the journey of ML Platform(s) evolution at Google has been a long and exciting one, we expect that the majority of excitement is yet to come! To that end, we want to share a summary of our learnings, some of which were more painfully gained than others. The learnings fall into two categories, namely what remained the same as part of the evolution, but also what changed, and why! We present the learnings in the context of two successive platforms, Sibyl and TFX, though we believe them to be widely applicable.

What Remains The Same And Why

The areas discussed in this section capture a few examples of things that seem enduring and pass the test of time. As such, we expect these to also remain applicable in the future, across different incarnations of ML platforms and frameworks. We look at these from both an applied ML perspective and an infrastructure perspective.

Applied ML

The Rules Of Machine Learning

Successfully applying ML to a product is very much a discipline. It involves a steep learning curve and necessitates some mental model shifts (or perhaps augmentations). To make this challenging task easier, we have publicly shared The Rules of Machine Learning. These are rules that represent learnings from iteratively applying ML to a lot of products at Google. Notably, the adoption of ML in Google products illustrates a common evolution:

  • Start with simple rules and heuristics, and generate data to learn from; this journey usually starts from the serving side.
  • Move to simple ML (i.e., simple models) and realize large gains; this is usually the entry point for introduction of ML pipelines.
  • Move to ML with more features and more advanced models to realize decent gains.
  • Move to state-of-the-art ML, manage refinement and complexity (for solutions to the problems that are worth it), and realize small gains.
  • Apply the above launch-and-iterate cycle to more aspects of products and to solve more problems, bearing in mind return on investment (and diminishing returns).

We have found The Rules of Machine Learning to be steadfast across platforms and time and we hope they end up being as valuable to others as they have been to us and our users. In particular, we believe that following the rules will help others be better at the discipline of ML engineering, including helping them avoid the mistakes that we and our users have made in the past. TFX is an attempt to codify these rules, quite literally, in code. We hope to benefit ourselves but also accelerate ML, done well, for the entire industry.

The Discipline Of ML Engineering

In developing The Rules of Machine Learning, we realized that the discipline for building robust systems where the core logic is produced by complex processes involving both code and data requires additional scrutiny beyond that which software engineering provides. As such, we define ML Engineering as a superset of the discipline of software engineering designed to handle the unique complexities of the practical application of ML.

Attempting to summarize the totality of the discipline of ML engineering would be somewhat difficult, if not impossible, especially given how our understanding of it is still limited, and the discipline itself continues to evolve. We do take solace in the following though:

  • The limited understanding we do have seems to be enduring across platforms and time.
  • Analogy can be a powerful tool, so several aspects of the better understood discipline of software engineering have helped us draw parallels of how ML engineering could evolve from ML programming, much like how software engineering evolved from programming.

An early realization we had was the following: artifacts are first class citizens in ML, on par with the processes that produce and consume them.

This realization affected the implementation and evolution of Sibyl; it was entrenched in TFX by the time we publicly wrote about it and was ultimately generalized and formalized in ML Metadata, now powering TFX.

Below we present fundamental elements of ML engineering, some examples of ML artifacts and their first class citizenship, and make an attempt to draw analogies with software engineering where possible.

Data

Similarly to how code is at the heart of software, data is at the heart of ML. Data management represents serious challenges in production ML. Perhaps the simplest analogy would be to think about what constitutes a unit test for data. Unit tests verify expectations on how code should behave, by testing the contracts of the pertinent code and instilling trustworthiness in said contracts. Similarly, setting explicit expectations on the form of the data (including its schema, invariants and value distributions), and checking that the data agrees with implicit expectations embedded in the training code can, more so together, make the data trustworthy enough to train models with. Though unit tests can be exhaustive and verify strong contracts, data contracts are in general a lot weaker even if they are necessary. Though unit tests can be exhaustively consumed and verified by humans, data can usually be meaningful to humans only in summarized fashion.

Just as code repositories and version control are pillars for managing code evolution in software engineering, systems for managing data evolution and understanding are pillars of ML engineering.

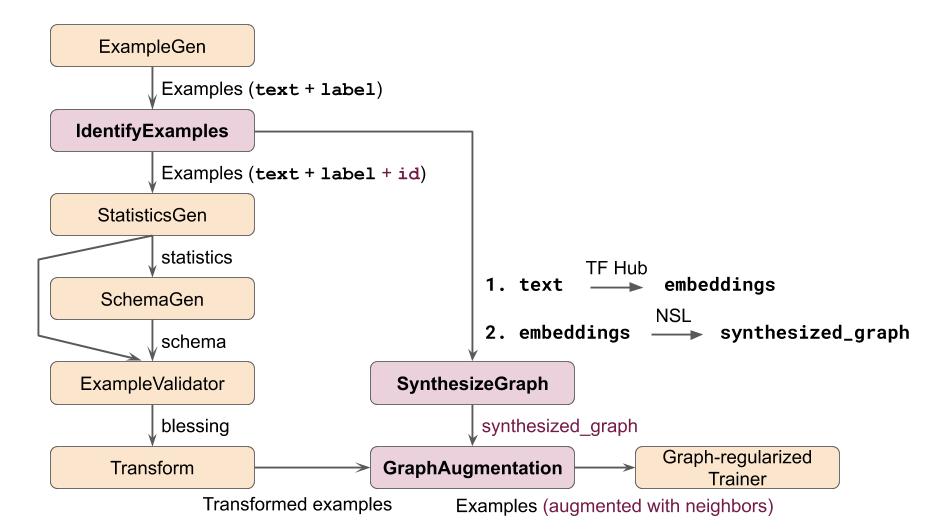
TFX’s ExampleGen, StatisticsGen, SchemaGen and ExampleValidator components help one treat data as first class citizens, by enabling data management, analysis and validation in (continuous) ML pipelines.

Models

Similarly to how a software engineer produces code that is compiled into programs, an ML engineer produces data and code which is “compiled” into ML programs, more commonly known as models. These two kinds of programs are however very different in nature. Though programs that come out of software usually have strong contracts, models have much weaker contracts. These weak contracts are usually statistical in nature and as such only verifiable in some summarized form (such as a model having sufficient accuracy on a subset of labeled data). This is not at all surprising since models are the product of code and data, and the latter itself doesn’t have strong contracts and is also only digestible in summarized form.

Just as code and data evolve over time, models also evolve over time. However, model evolution is more complicated than the evolution of its constituent code and data. For example, high test coverage (with fuzzing) can give good confidence in both the correctness and the correct evolution of a piece of code, but out-of-distribution and counterfactual yet realistic data for model evaluation can be notoriously difficult to produce.

In the same way that putting together multiple programs in a system necessitates integration testing which is a pillar of software engineering, putting together code and data necessitates end-to-end model validation and understanding which is a pillar of ML engineering.

TFX’s Evaluator and InfraValidator components provide validation and understanding of models, treating them as first class citizens of ML engineering.

Mergeable Fragments

Similarly to how a software engineer merges together pre-existing libraries (or systems) with their code in order to build useful programs, an ML engineer merges together code fragments, data fragments, analysis fragments and model fragments on a regular basis in order to build useful ML pipelines. A notable difference between software engineering and ML engineering is that even when the code is fixed for the latter, data is usually volatile for it (e.g. new data arrives on a regular basis) and as such the downstream artifacts need to be produced frequently and efficiently. For example, a new version of a model usually needs to be produced if any part of its input data has changed. As such, it is important for ML pipelines to produce artifacts that are mergeable. For example, a summary of statistics from one dataset should be easily mergeable with that of another dataset such that it is easy to summarize the statistics of the union of the two datasets. Similarly, it should be easy to transfer the learnings of one model to another model in general, and the learnings of a previous version of a model to the next version of the same model in particular.

There is however a catch, which relates to the previous discussion regarding the equivalents of test coverage for models. Merging new fragments into a model could necessitate creation of novel out-of-distribution and counterfactual evaluation data, contributing to the difficulty of (efficient) model evolution, thus rendering it a lot harder than pure code evolution.

TFX’s ExampleGen, Transform, Trainer and Tuner components, together with TensorFlow Hub, help one treat artifacts as first class citizens by enabling production and consumption of mergeable fragments in workflows that perform data caching, analyzer caching, warmstarting and transfer learning.

Artifact Lineage

Despite all the advanced methodology and tooling that exists for software engineering, the programs and systems that are built invariably need to be debugged. The same holds for ML programs, but debugging them is notoriously harder because non-proximal effects are a lot more prevalent for ML programs due to the plethora of artifacts involved. A model might be inaccurate due to bad artifacts from several sources of error, including flaws in the code, the learning algorithm, the training data, the serving path, or the serving data, to name a few. Much like how stack traces are invaluable for identifying root causes of defects in software programs, the lineage of all artifacts produced and consumed by an ML pipeline is invaluable for identifying root causes of defects in ML models. Additionally, by knowing which downstream artifacts were produced from a problematic artifact, we can identify all impacted systems and users and take mitigating actions.

TFX’s use of ML Metadata (MLMD) helps treat artifacts as first class citizens. MLMD enables advanced cataloging and querying of metadata and lineage associated with artifacts which can together increase the confidence of sharing artifacts even outside the boundaries of a pipeline. MLMD also helps with advanced debugging and, when coupled with the underlying data storage layer, forms the foundation of TFX’s ML compliance mechanisms.

Continuous Learning And Unlearning

ML production pipelines operate in a dynamic environment:

  • New data can arrive continuously.
  • The modeling code can change, particularly in the early stages of model development.
  • The surrounding infrastructure can change, e.g., a new version of some underlying (ML) library.

When changes happen, a pipeline needs to react, often by rerunning its steps in the new environment. This dynamicity increases the importance of provenance tracking in order to facilitate debugging and root-cause analysis. As a simple example, to debug a model failure, it is necessary to know not only which data was used to train the model, but also the versions of the modeling code and any surrounding infrastructure.

ML pipelines must also support low-friction mechanisms to handle these changes. Consider for example the arrival of new data, which necessitates retraining the model. This is a natural requirement in rapidly changing environments, like recommender systems or adversarial systems. Requiring the user to manually retrain the model can be unrealistic, given that the data can arrive at a regular and frequent rate. Instead, we can employ automation by way of “continuous training”, where the pipeline detects the presence of new data and automatically schedules the generation of updated models. In turn, this functionality requires automatically: orchestrating work based on the presence of artifacts (including data), recovering from intermittent failures, and catching up to real-time when recovering. It is common for ML pipelines to run for years ingesting code and data, continuously producing models that make predictions that inform decisions.

Another example of a low-friction mechanism is support for “backfilling” an ML pipeline. In this case, the user might need to rerun the pipeline on existing artifacts but using updated versions of the components, such as rerunning the trainer on existing data using a new version of the modeling code/library. Another use of backfilling is rerunning the pipeline with new versions of existing data, say, to fix an error in the data. These backfills are orthogonal to continuous training and can be used together. For instance, the user can manually trigger a rerun of the trainer, and the generated model artifact can then automatically trigger model evaluation and validation.

TFX was built from the ground up in a way that enables continuous learning (and unlearning) which fundamentally shaped its design. At the same time, these advanced capabilities also allow it to be used in a “one-shot”, discontinuous, fashion. In fact, within Alphabet, both modes of deployment are widely used. Moreover, TFX also supports different types of backfill operations to enable fine-grained interventions during normal pipeline execution.

Even though the public TFX offering doesn’t yet offer continuous ML pipelines, we are actively working on making our existing technology portable so that it can be made publicly available (e.g RFC).

Infrastructure

Building On The Shoulders Of Giants

Realizing ambitious goals necessitates building on top of solid foundations, collaborating with others and leveraging each other’s work. TFX reuses many of Sibyl’s system designs, hardened over a decade of Sibyl’s production ML experience. Additionally, TFX incorporates new technologies in areas where robust standards emerged:

  • Similarly to how Sibyl built its algorithms and workflows on top of MapReduce, TFX leverages both TensorFlow and Apache Beam for its distributed training and data processing workflows.
  • Similarly to how Sibyl was columnar, TFX adopted Apache Arrow as the columnar in-memory representation for its compute-intensive libraries.

Taking dependencies where robust standards have emerged has allowed TFX and its users to achieve seamless performance and scalability. It also enables TFX to focus its energy on building the deltas of what is needed for applied ML, as opposed to re-implementing difficult-to-get-right technology. Some of our dependencies, like Kubeflow Pipelines or Apache Airflow, are selected by TFX’s users themselves when the value / features they get from them outweigh the costs that the additional dependencies entail.

Taking dependencies unfortunately incurs costs. We have found that taking dependencies requires effort that is super-linear to the number of dependencies. Said costs are often absorbed by us and our sister teams but can (and sometimes do) leak to our users, usually in the form of conflicting (version) dependencies or incompatibilities between environments and dependencies.

Interoperability And Positive Externalities

ML platforms do not operate in a vacuum. They instead operate within the context of a bigger system or infrastructure, connecting to data producing sources upstream and model consuming sinks downstream, which in turn frequently produce the data that feeds the ML platform, thereby closing the loop. Strong adoption of a platform usually necessitates interoperability with other important technologies in its environment.

  • Similarly to how Sibyl interoperated with Google’s Ads technology stack for data ingestion and model serving, TFX offers a plethora of connectors for data ingestion and allows serving the produced model in multiple deployment environments and devices.
  • Similarly to how Sibyl interoperated with Google’s compute stack, TFX leverages Apache Beam to execute on Apache Flink and Apache Spark clusters as well as serverless offerings like Google Cloud Dataflow.
  • TFX built an orchestration abstraction on top of MLMD and provides orchestration options on top of Apache Airflow, Apache Beam, Kubeflow Pipelines as well as the primitives to integrate with one’s custom orchestrator. MLMD itself works with several relational databases like SQLite and MySQL.

Interoperability necessitates some amount of abstraction and standardization and usually enables sum-greater-than-its-parts effects. TFX is both a beneficiary and a benefactor of the positive externalities created by said interoperability, both within and outside of Alphabet. TFX’s users are also beneficiaries of the interoperability as they can more easily deploy and use TFX on top of their existing installed base.

Interoperability also comes with costs. The combination of multiple technology stacks can lead to an exponential number of distinct deployment configurations. While we test some of the distinct deployment configurations end-to-end and at-scale, like for example TFX on GCP, we have neither the expertise nor the resources to do so for the combinatorial explosion of all possible deployment options. We thus encourage the community to work with us on the deployment configurations that are most useful for them.

What Is Different And Why

The areas discussed in this section capture a few examples of things that needed to change in order for our ML platform to adapt to a new reality and as such remain useful and impactful.

Environment And Device Portability

Sibyl was a massive scale ML platform designed to be deployed on Google’s large-scale cluster, namely Borg. This made sense as applied ML at Google was, originally, primarily used in products that were widely used. As ML expertise grew across the world, and ML could be applied to more use cases (large and small) across environments both within and outside of Google, the need for portability gradually but surely became a hard constraint.

  • While Sibyl ran only on Google’s datacenters, TFX runs on laptops, workstations, servers, datacenters, and public Clouds. In particular, when TFX runs on Google’s Cloud, it leverages automation and optimizations offered by GCP Services, enabled by Google’s unique infrastructure.
  • While Sibyl ran only on CPUs, TFX leverages TensorFlow to run on different kinds of hardware including CPUs, GPUs and Google’s TPUs.
  • While Sibyl’s models ran on servers, TFX leverages TensorFlow to produce models that run on laptops, workstations, and servers via TensorFlow Serving and Apache Beam, on mobile and IoT devices via TensorFlow Lite, and on browsers via TensorFlow JS.

TFX’s portability enabled it to be used in a very diverse set of environments and devices, in order to solve problems from small scale to massive scale.

Unfortunately, portability comes with costs. We have found that maintaining a portable core with environment-specific and device-specific specialization requires effort that is super-linear to the number of environments / devices. Said costs are however largely absorbed by us and our sister teams and as such are frequently not visible to our users.

Modularity And Layering

Even though Sibyl’s offering as an integrated product was immensely valuable, its structure and interface were somewhat monolithic, limiting it to a specific set of “direct” users who would have to adopt it wholesale. In contrast, TFX evolved to be a modular and layered architecture, and became more so over time as partnerships with other teams and products grew. Notable layers (with examples) in TFX include:

Layer Examples
ML Services
Pipelines

(of composable Components)

Binaries
Libraries

TFX’s layered architecture enables it to be used by a very diverse set of users whether that’s piecemeal via its libraries, wholesale via its pipelines (with or without the pertinent services), or in a fashion that’s completely oblivious to the end users (e.g. by them using ML services which TFX powers under the hood)!

Unfortunately, layering comes with costs. We have found that maintaining multiple publicly accessible layers of our product requires effort that is roughly linear to the number of layers. Said costs occasionally leak to our users in the form of confusion regarding what layer makes the most sense for them to use.

Multi-faceted Flexibility

Even though Sibyl was more flexible in terms of modeling capabilities compared to available alternatives at the time, aspects of its flexibility across several parts of the ML workflow fell short of Google’s needs for accelerating ML for novel use cases, which led to the development of TFX.

  • While Sibyl only offered specific kinds of data analysis, TFX’s StatisticGen component offers more built-in capabilities and the ability to realize custom analyses, via TensorFlow Data Validation.
  • While Sibyl only offered transformations that were pure composable mappers, TFX’s Transform component offers more mappers, custom mappers, more analyzers, custom analyzers, as well as arbitrarily composed (custom) mappers and (custom) analyzers, via TensorFlow Transform.
  • While Sibyl only offered “wide” models, TFX’s Trainer component offers any model that can be realized on top of TensorFlow, including models that can be shared and can transfer-learn, via TensorFlow Hub.
  • While Sibyl only offered automatic feature crossing (a.k.a. feature conjunctions) on top of “wide” models, TFX’s Tuner component allows for arbitrary hyper parameter optimization based on state of the art algorithms.
  • While Sibyl only offered specific kinds of model analysis, TFX’s Evaluator component offers more built-in metrics, custom metrics, confidence intervals and fairness indicators, via TensorFlow Model Analysis.
  • While Sibyl’s pipeline topology was fixed (albeit somewhat customizable), TFX’s SDK allows one to create custom (optionally containerized) components and use them together with standard components in a flexible and fully customizable pipeline topology.

The increase of flexibility in all these dimensions enabled improved experimentation, wider reach, more use cases, as well as accelerated flow from research to production.

Flexibility does not come without costs. A more flexible system is one that is harder to get right in the first place as well as harder for us to maintain and to evolve as developers of the ML platform. Users may also have to manage increased complexity as they take advantage of this flexibility. Furthermore, we might not be able to offer as strong of a support story on top of an ML platform that is Turing complete.

Where We Are Going

Armed with the knowledge of the past, we present a glimpse of what we plan for the future of TFX, as of 2020. We will continue our work on enabling ML Engineering in order to democratize applied ML, and help everyone practice responsible AI and apply it in a fashion that upholds Google’s AI Principles.

Drive Interoperability And Standards

In order to meet the demand for the burgeoning variety of ML solutions, we will continue to increase our technology’s interoperability. Our work on interoperability and standards as well as open-sourcing more of our technology, reflects our principle to “be socially beneficial” as well as to “be made available for uses that accord with these principles” by making it easier for everyone to follow these practices. As part of this mission, we will empower the industry to build advanced ML systems by open-sourcing more of our technology, and by standardizing ML artifacts and metadata. Some select examples of this work include:

  • TFX Standardized Inputs.
  • Advanced TFX DSL semantics, Data Model and IR.
  • Standardization of ML artifacts and metadata.
  • Standardization of distributed workloads on heterogeneous runtime environments.
  • Inference on distributed and streaming models.
  • Improvements to interoperability with mobile and edge ML deployments.
  • Improvements for ML framework interoperability and artifact sharing.

Increase Automation

Automation is the backbone of reliable production systems, and TFX is heavily invested in improving and expanding its use of automation. Our work in increased automation reflects our principles of helping make ML deployments “be built and tested for safety” and “avoid creating or reinforcing unfair bias”. Some upcoming efforts include a TFX Pipeline testing framework, automated model improvement in the TFX Tuner, auto-detecting surprising model behavior on multidimensional slices, facilitating automatic production of Model Cards and improving our training-serving skew detection capabilities. TFX on GCP will also continue driving requirements for new (and will better make use of existing) advanced automation features of pertinent services.

Improve ML Understanding

ML understanding is an important aspect of deploying production ML, and TFX is well positioned to provide significant gains in this field. Our work on improving ML understanding reflects our principles to help “avoid creating or reinforcing unfair bias” and help make ML deployments “be accountable to people”. Critical to understanding is to be able to track the lineage of artifacts used to produce a model, an area TFX will continue to invest in. Improvements to TFX technologies like struct2tensor will further enable training, serving, and analyzing models on structured data, thus allowing reasoning about models closer to the original data semantics. We also plan to utilize TFX as a vehicle to expand support for fairness evaluation, remediation, and documentation.

Uphold High Standards And Best Practices

As a vehicle for amplification of ML technology, TFX must continue to “uphold high standards of scientific excellence” and promote best practices. The team will continue publishing scientific papers and conducting public outreach via our existing channels, as well as offer educational courses in partnership with established institutions. We will also improve trust in our model analysis tools using integrated uncertainty measures by, for example, enabling scalable computation of confidence intervals for model metrics, and we will improve our training-serving skew detection capabilities. It’s also critical for research and production to be able to have reproducible ML artifacts, enabled by our work in precise provenance tracking for auditing and reproducing models. Also key is reproducibility of measurements, driven by efforts like NitroML, which will provide tooling for benchmarking AutoML pipelines.

Given that several of the areas where we expand our technology are new to us, we will make an effort to distinguish the battle-tested from the experimental aspects of our technology, in order to enable our users to confidently choose the set of capabilities that meet their desires and needs.

Improve Tooling

Despite TFX providing tools for aspects of ML engineering and several phases of the ML lifecycle, we believe this is still a nascent area. While improving tooling is a natural fit for TFX, it also reflects our principle of helping ML deployments “be made available for uses that accord with these principles”, “supporting scientific excellence,” and being “built and tested for safety” .

One area of improvement is applying ML to the data itself, be it through sensing anomalies or finding patterns in data or enriching data with predictions from ML models. Making it easy to enrich large volumes of data (especially critical streaming data used for low-latency, high volume actions) has always been a challenge. Bringing TFX capabilities into data processing frameworks is our first step here. We have already made it possible to enrich streaming events with labels or make predictions in Apache Beam and, by extension, Cloud Dataflow. We plan to follow this work by leveraging pre-built models (served out of Cloud AI Pipelines and TensorFlow Serving) to make adding a new field in a distributed dataset representing predictions from streams of models trivially easy.

Furthermore, while there are many tools for detecting, discovering, and auditing ML workflows, there is still a need for automated (or assisted) mitigation of discovered issues, and we will invest in this area. For example, proactively predicting which pipeline runs won’t result in better models based on the currently-executing pipeline, perhaps even before training, can significantly reduce time and resources spent on creating poor models.

A Joint Journey

Building TFX and exploring the fundamentals of ML engineering was the cumulative effort of many people over many years. As we continue to make strides and further develop this field, it’s important we recognize the collaborative effort of those who got us here.

Of course, it will take many more collaborations to drive the future of this field, and as such, we invite you to join us on this journey “Towards ML Engineering”!

The TFX Team

The TFX project is realized via collaboration of multiple organizations within Google. Different organizations usually focus on different technology and product layers, though there is a lot of overlap on the portable parts of our technology. Overall we consider ourselves a single team and below we present an alphabetically sorted list of current TFX team members who are contributors to the ideation, research, design, implementation, execution, deployment, management, and advocacy (to name a few) aspects of TFX; they continue to inspire, help, teach, and challenge each other to advance our field:

Abhijit Karmarkar, Adam Wood, Aleksandr Zaks, Alina Shinkarsky, Neoklis Polyzotis, Amy Jang, Amy McDonald Sandjideh, Amy Skerry-Ryan, Andrew Audibert, Andrew Brown, Andy Lou, Anh Tuan Nguyen, Anirudh Sriram, Anna Ukhanova, Anusha Ramesh, Archana Jain, Arun Venkatesan, Ashley Oldacre, Baishun Wu, Ben Mathes, Billy Lamberta, Chandni Shah, Chansoo Lee, Chao Xie, Charles Chen, Chi Chen, Chloe Chao, Christer Leusner, Christina Greer, Christina Sorokin, Chuan Yu Foo, CK Luk, Connie Huang, Daisy Wong, David Smalling, David Zats, Dayeong Lee, Dhruvesh Talati, Doojin Park, Elias Moradi, Emily Caveness, Eric Johnson, Evan Rosen, Florian Feldhaus, Gal Oshri, Gautam Vasudevan, Gene Huang, Goutham Bhat, Guanxin Qiao, Gus Katsiapis, Gus Martins, Haiming Bao, Huanming Fang, Hui Miao, Hyeonji Lee, Ian Nappier, Ihor Indyk, Irene Giannoumis, Jae Chung, Jan Pfeifer, Jarek Wilkiewicz, Jason Mayes, Jay Shi, Jiayi Zhao, Jingyu Shao, Jiri Simsa, Jiyong Jung, Joana Carrasqueira, Jocelyn Becker, Joe Liedtke, Jongbin Park, Jordan Grimstad, Josh Gordon, Josh Yellin, Jungshik Jang, Juram Park, Justin Hong, Karmel Allison, Kemal El Moujahid, Kenneth Yang, Khanh LeViet, Kostik Shtoyk, Lance Strait, Laurence Moroney, Li Lao, Liam Crawford, Magnus Hyttsten, Makoto Uchida, Manasi Joshi, Mani Varadarajan, Marcus Chang, Mark Daoust, Martin Wicke, Megha Malpani, Mehadi Hassen, Melissa Tang, Mia Roh, Mig Gerard, Mike Dreves, Mike Liang, Mingming Liu, Mingsheng Hong, Mitch Trott, Muyang Yu, Naveen Kumar, Ning Niu, Noah Hadfield-Menell, Noé Lutz, Nomi Felidae, Olga Wichrowska, Paige Bailey, Paul Suganthan, Pavel Dournov, Pedram Pejman, Peter Brandt, Priya Gupta, Quentin de Laroussilhe, Rachel Lim, Rajagopal Ananthanarayanan, Rene van de Veerdonk, Robert Crowe, Romina Datta, Ron Yang, Rose Liu, Ruoyu Liu, Sagi Perel, Sai Ganesh Bandiatmakuri, Sandeep Gupta, Sanjana Woonna, Sanjay Kumar Chotakur, Sarah Sirajuddin, Sheryl Luo, Shivam Jindal, Shohini Ghosh, Sina Chavoshi, Sydney Lin, Tanya Grunina, Thea Lamkin, Tianhao Qiu, Tim Davis, Tris Warkentin, Varshaa Naganathan, Vilobh Meshram, Volodya Shtenovych, Wei Wei, Wolff Dobson, Woohyun Han, Xiaodan Song, Yash Katariya, Yifan Mai, Yiming Zhang, Yuewei Na, Zhitao Li, Zhuo Peng, Zhuoshu Li, Ziqi Huang, Zoey Sun, Zohar Yahav

Thank you, all!

The TFX Team … Extended

Beyond the current TFX team members, there have been many collaborators both within and outside of Alphabet whose discussions, technology, as well as direct and indirect contributions, have materially influenced our journey. Below we present an alphabetically sorted list of these collaborators:

Abdulrahman Salem, Ahmet Altay, Ajay Gopinathan‎, Alexandre Passos, Alexey Volkov, Anand Iyer, Andrew Bernard‎, Andrew Pritchard‎, Chary Aasuri, Chenkai Kuang, Chenyu Zhao, Chiu Yuen Koo, Chris Harris, Chris Olston, Christine Robson, Clemens Mewald, Corinna Cortes, Craig Chambers, Cyril Bortolato, D. Sculley, Daniel Duckworth‎, Daniel Golovin, David Soergel, Denis Baylor, Derek Murray, Devi Krishna, Ed Chi, Fangwei Li, Farhana Bandukwala, Gal Elidan, Gary Holt, George Roumpos, Glen Anderson, Greg Steuck, Grzegorz Czajkowski, Haakan Younes, Heng-Tze Cheng, Hossein Attar, Hubert Pham, Hussein Mehanna, Irene Cai, James L. Pine, James Pine, James Wu, Jeffrey Hetherly, Jelena Pjesivac-Grbovic, Jeremiah Harmsen, Jessie Zhu, Jiaxiao Zheng, Joe Lee, Jordan Soyke, Josh Cai, Judah Jacobson, Kaan Ege Ozgun‎, Kenny Song, Kester Tong, Kevin Haas, Kevin Serafini, Kiril Gorovoy, Kostik Steuck, Kristen LeFevre, Kyle Weaver, Kym Hines, Lana Webb, Lichan Hong, Lukasz Lew, Mark Omernick, Martin Zinkevich, Matthieu Monsch, Michel Adar, Michelle Tsai‎, Mike Gunter, Ming Zhong, Mohamed Hammad, Mona Attariyan, Mustafa Ispir, Neda Mirian, Nicholas Edelman‎, Noah Fiedel, Panagiotis Voulgaris‎, Paul Yang, Peter Dolan, Pushkar Joshi‎, Rajat Monga, Raz Mathias‎, Reiner Pope, Rezsa Farahani, Robert Bradshaw, Roberto Bayardo, Rohan Khot, Salem Haykal, Sam McVeety, Sammy Leong, Samuel Ieong, Shahar Jamshy, Slaven Bilac, Sol Ma, Stan Jedrus, Steffen Rendle, Steven Hemingray‎, Steven Ross, Steven Whang, Sudip Roy, Sukriti Ramesh, Susan Shannon, Tal Shaked, Tushar Chandra, Tyler Akidau, Venkat Basker, Vic Liu, Vinu Rajashekhar, Xin Zhang, Yan Zhu‎, Yaxin Liu, Younghee Kwon, Yury Bychenkov‎, Zhenyu Tan

Thank you, all!

Read More

Bringing the Mona Lisa Effect to Life with TensorFlow.js

Bringing the Mona Lisa Effect to Life with TensorFlow.js

A guest post by Emily Xie, Software Engineer

Background

Urban legend says that Mona Lisa’s eyes will follow you as you move around the room. This is known as the “Mona Lisa effect.” For fun, I recently programmed an interactive digital portrait that brings this phenomenon to life through your browser and webcam.

At its core, the project leverages TensorFlow.js, deep learning, and some image processing techniques. The general idea is as follows: first, we must generate a sequence of images of Mona Lisa’s head, with eyes gazing from the left to right. From this pool, we’ll continuously select and display a single frame in real-time based on the viewer’s location.

In this post, I’ll walk through the specifics of the project’s technical design and implementation.

Animating the Mona Lisa with Deep Learning

Image animation is a technique that allows one to puppeteer a still image through a driving video. Using a deep-learning-based approach, I was able to generate a highly convincing animation of Mona Lisa’s gaze.

Specifically, I used the First Order Motion Model (FOMM), released by Aliaksandr Siarohin et al. in 2019. At a very high level, this method is composed of two modules: one for motion extraction, and another for image generation. The motion module detects keypoints and local affine transformations from the driving video. Diffs of these values between consecutive frames are then used as input to a network that predicts a dense motion field, along with an occlusion mask which specifies the image regions that either need to be modified or contextually inferred. The image generation network, then, detects facial landmarks and produces the final output––the source image, warped and in-painted according to the results of the motion module.

I chose FOMM in particular because of its ease of use. Prior models in this domain had been “object-specific”, meaning that they required detailed data of the object to be animated, whereas FOMM operated agnostically to this. More importantly, the authors released an open-source, out-of-the-box implementation with pre-trained weights for facial animation. Because of this, applying the model to the Mona Lisa became a surprisingly straightforward endeavor: I simply cloned the repo into a Colab notebook, produced a short driving video of me with my eyes moving around, and fed it through the model along with a screenshot of La Gioconda’s head. The resulting movie was stellar. From this, I ultimately sampled just 33 images to constitute the final animation.

Example of a driving video and the image animation predictions generated by FOMM.
A subsample of the final animation frames, produced using the First Order Motion Model.

Image Blending

While I could’ve re-trained the model for my project’s purposes, I decided to work within the constraints of Siarohin’s weights in order to avoid the time and computational resources that would’ve been otherwise required. This, however, meant that the resulting frames were fixed at a lower resolution than desired, and consisted of just the subject’s head. But since I wanted the final visual to include the entirety of Mona Lisa––hands, torso, and background included––my plan was to simply superimpose the output head frames onto an image of the painting.

Mona Lisa
An example of a head frame overlaid on top of the underlying image. To best illustrate the problem, the version shown here is from an earlier iteration of the project where there was further resolution loss in the head frame.

This, however, produced its own set of challenges. If you look at the example above, you’ll notice that the lower-resolution output of the model––coupled with some subtle collateral background changes due to FOMM’s warping procedure––causes the head frame to visually jut out. In other words, it was a bit obvious that this was just a picture on top of another picture. To address this, I did some image processing in Python to “blend” the head image into the underlying one.

First, I resized the head frame to its original resolution. From there, I created a new frame using a weighted average of these blurred out pixels and the corresponding pixels in the underlying image, where the weight––or alpha––of a pixel in the head frame decreases as it moves away from the midpoint.

The function to determine alpha was adapted from a 2D sigmoid, and is expressed as:

Where j determines the logistic function’s slope, k is the inflection point, and m is the midpoint of the input values. Graphed out, the function looks like:

Function graph

After I applied the above procedure to all 33 frames in the animation set, the resulting superimpositions each appeared to be a single image to the unsuspecting eye:

Tracking the Viewer’s Head via BlazeFace

All that was left at this point was to determine how to track the user via the webcam and display the corresponding frame.

Naturally, I turned to TensorFlow.js for the job. The library offered a fairly robust set of models to detect the presence of a human given visual input, but after some research and thinking, I landed on BlazeFace as my method of choice.

BlazeFace is a deep-learning based object recognition model that detects human faces and facial landmarks. It is specifically trained for using mobile camera input. This worked well for my use case, as I expected most viewers to be using their webcam in a similar manner––with their heads in frame, front-facing, and fairly close to the camera––whether through their mobile devices or on their laptops.

My foremost consideration in selecting this model, however, was its extraordinary speed of detection. To make this project convincing, I needed to be able to run the entire animation in real time, including the facial recognition step. BlazeFace adapts the single-shot detection (SSD) model, a deep-learning-based object detection algorithm that simultaneously proposes bounding boxes and detects objects in just one forward pass of the network. BlazeFace’s lightweight detector is capable of recognizing facial landmarks at speeds as fast as 200 frames per second.

A demo of what BlazeFace can capture given an input image: bounding boxes for a human head, along with facial landmarks.

Having settled on the model, I then wrote code to continually pipe the user’s webcam data into BlazeFace. On each run, the model outputted an array of facial landmarks and their corresponding 2D coordinate positions. Using this, I approximated the X coordinate of the face’s center by calculating the midpoint between the eyes.

Finally, I mapped this result to an integer between 0 and 32. These values, as you may recall, each represented a frame in the animated sequence––with 0 depicting Mona Lisa with her eyes to the left, and 32 with her eyes to the right. From there, it was just a matter of displaying the frame on the screen.

Try it out!

You can play with the project at monalisaeffect.com. To follow more of my work, feel free to check out my personal website, Github, or Twitter.

Acknowledgements

Thanks to Andrew Fu for reading this post and providing me feedback, to Nick Platt for lending his ear and thoughts on a frontend bug, and to Jason Mayes along with the rest of the team at Google for their work in reaching out and amplifying this project.

Read More

Introducing TensorFlow Recommenders

Introducing TensorFlow Recommenders

Posted by Maciej Kula and James Chen, Google Brain

From recommending movies or restaurants to coordinating fashion accessories and highlighting blog posts and news articles, recommender systems are an important application of machine learning, surfacing new discoveries and helping users find what they love.

At Google, we have spent the last several years exploring new deep learning techniques to provide better recommendations through multi-task learning, reinforcement learning, better user representations and fairness objectives. These and other advancements have allowed us to greatly improve our recommendations.

Today, we’re excited to introduce TensorFlow Recommenders (TFRS), an open-source TensorFlow package that makes building, evaluating, and serving sophisticated recommender models easy.

Built with TensorFlow 2.x, TFRS makes it possible to:

TFRS is based on TensorFlow 2.x and Keras, making it instantly familiar and user-friendly. It is modular by design (so that you can easily customize individual layers and metrics), but still forms a cohesive whole (so that the individual components work well together). Throughout the design of TFRS, we’ve emphasized flexibility and ease-of-use: default settings should be sensible; common tasks should be intuitive and straightforward to implement; more complex or custom recommendation tasks should be possible.

TensorFlow Recommenders is open-source and available on Github. Our goal is to make it an evolving platform, flexible enough for conducting academic research and highly scalable for building web-scale recommender systems. We also plan to expand its capabilities for multi-task learning, feature cross modeling, self-supervised learning, and state-of-the-art efficient approximate nearest neighbours computation.

Example: building a movie recommender

To get a feel for how to use TensorFlow Recommenders, let’s start with a simple example. First, install TFRS using pip:

!pip install tensorflow_recommenders

We can then use the MovieLens dataset to train a simple model for movie recommendations. This dataset contains information on what movies a user watched, and what ratings users gave to the movies they watched.

We will use this dataset to build a model to predict which movies a user watched, and which they didn’t. A common and effective pattern for this sort of task is the so-called two-tower model: a neural network with two sub-models that learn representations for queries and candidates separately. The score of a given query-candidate pair is simply the dot product of the outputs of these two towers.

This model architecture is quite flexible. The inputs can be anything: user ids, search queries, or timestamps on the query side; movie titles, descriptions, synopses, lists of starring actors on the candidate side.

In this example, we’re going to keep things simple and stick to user ids for the query tower, and movie titles for the candidate tower.

To start with, let’s prepare our data. The data is available in TensorFlow Datasets.

import tensorflow as tf

import tensorflow_datasets as tfds
import tensorflow_recommenders as tfrs
# Ratings data.
ratings = tfds.load("movielens/100k-ratings", split="train")
# Features of all the available movies.
movies = tfds.load("movie_lens/100k-movies", split="train")

Out of all the features available in the dataset, the most useful are user ids and movie titles. While TFRS can use arbitrarily rich features, let’s only use those to keep things simple.

ratings = ratings.map(lambda x: {
"movie_title": x["movie_title"],
"user_id": x["user_id"],
})
movies = movies.map(lambda x: x["movie_title"])

When using only user ids and movie titles our simple two-tower model is very similar to a typical matrix factorization model. To build it, we’re going to need the following:

  • A user tower that turns user ids into user embeddings (high-dimensional vector representations).
  • A movie tower that turns movie titles into movie embeddings.
  • A loss that maximizes the predicted user-movie affinity for watches we observed, and minimizes it for watches that did not happen.

TFRS and Keras provide a lot of the building blocks to make this happen. We can start with creating a model class. In the __init__ method, we set up some hyper-parameters as well as the primary components of the model.

class TwoTowerMovielensModel(tfrs.Model):
"""MovieLens prediction model."""

def __init__(self):
# The `__init__` method sets up the model architecture.
super().__init__()

# How large the representation vectors are for inputs: larger vectors make
# for a more expressive model but may cause over-fitting.
embedding_dim = 32
num_unique_users = 1000
num_unique_movies = 1700
eval_batch_size = 128

The first major component is the user model: a set of layers that describe how raw user features should be transformed into numerical user representations. Here, we use the Keras preprocessing layers to turn user ids into integer indices, then map those into learned embedding vectors:

 # Set up user and movie representations.
self.user_model = tf.keras.Sequential([
# We first turn the raw user ids into contiguous integers by looking them
# up in a vocabulary.
tf.keras.layers.experimental.preprocessing.StringLookup(
max_tokens=num_unique_users),
# We then map the result into embedding vectors.
tf.keras.layers.Embedding(num_unique_users, embedding_dim)
])

The movie model looks similar, translating movie titles into embeddings:

self.movie_model = tf.keras.Sequential([
tf.keras.layers.experimental.preprocessing.StringLookup(
max_tokens=num_unique_movies),
tf.keras.layers.Embedding(num_unique_movies, embedding_dim)
])

Once we have both user and movie models we need to define our objective and its evaluation metrics. In TFRS, we can do this via the Retrieval task (using the in-batch softmax loss):

# The `Task` objects has two purposes: (1) it computes the loss and (2)
# keeps track of metrics.
self.task = tfrs.tasks.Retrieval(
# In this case, our metrics are top-k metrics: given a user and a known
# watched movie, how highly would the model rank the true movie out of
# all possible movies?
metrics=tfrs.metrics.FactorizedTopK(
candidates=movies.batch(eval_batch_size).map(self.movie_model)
)
)

We use the compute_loss method to describe how the model should be trained.

def compute_loss(self, features, training=False):
# The `compute_loss` method determines how loss is computed.

# Compute user and item embeddings.
user_embeddings = self.user_model(features["user_id"])
movie_embeddings = self.movie_model(features["movie_title"])

# Pass them into the task to get the resulting loss. The lower the loss is, the
# better the model is at telling apart true watches from watches that did
# not happen in the training data.
return self.task(user_embeddings, movie_embeddings)

We can fit this model using standard Keras fit calls:

model = MovielensModel()
model.compile(optimizer=tf.keras.optimizers.Adagrad(0.1))

model.fit(ratings.batch(4096), verbose=False)

To sanity-check the model’s recommendations we can use the TFRS BruteForce layer. The BruteForce layer is indexed with precomputed representations of candidates, and allows us to retrieve top movies in response to a query by computing the query-candidate score for all possible candidates:

index = tfrs.layers.ann.BruteForce(model.user_model)
index.index(movies.batch(100).map(model.movie_model), movies)

# Get recommendations.
_, titles = index(tf.constant(["42"]))
print(f"Recommendations for user 42: {titles[0, :3]}")

Of course, the BruteForce layer is only suitable for very small datasets. See our full tutorial for an example of using TFRS with Annoy, an approximate nearest neighbours library.

We hope this gave you a taste of what TensorFlow Recommenders offers. To learn more, check out our tutorials or the API reference. If you’d like to get involved in shaping the future of TensorFlow recommender systems, consider contributing! We will also shortly be announcing a TensorFlow Recommendations Special Interest Group, welcoming collaboration and contributions on topics such as embedding learning and distributed training and serving. Stay tuned!

Acknowledgments

TensorFlow Recommenders is the result of a joint effort of many folks at Google and beyond. We’d like to thank Tiansheng Yao, Xinyang Yi, Ji Yang for their core contributions to the library, and Lichan Hong and Ed Chi for their leadership and guidance. We are also grateful to Zhe Zhao, Derek Cheng, Sagar Jain, Alexandre Passos, Francois Chollet, Sandeep Gupta, Eric Ni, and many, many others for their suggestions and support of this project.Read More

What’s new in TensorFlow Lite for NLP

What’s new in TensorFlow Lite for NLP

Posted by Tian Lin, Yicheng Fan, Jaesung Chung and Chen Cen

TensorFlow Lite has been widely adopted in many applications to provide machine learning features on edge devices such as mobile phones, microcontroller units, and Edge TPUs. Among all popular applications that make people’s life easier and more productive, Natural Language Understanding is one of the key areas that attracts much attention from both the research community and the industry. After the demo of the on-device question-answering use case at TensorFlow World in 2019, we got a lot of interest and feedback from the community on making more such NLP models available for on-device inference.

Inspired by that feedback, today we are delighted to announce an end-to-end support for NLP tasks based on TensorFlow Lite. With this infrastructure work, more and more NLP models are able to run on mobile phones, and users can enjoy the advantage of NLP models, while keeping their personal data on-device. In this blog, we will introduce the new features that allow: (1) Using new pre-trained NLP Models, (2) Creating your own NLP models, (3) Better support for converting TensorFlow NLP Models to TensorFlow Lite format and (4) Deploying these models on mobile devices.

Using new pre-trained NLP models

Reference apps

Reference apps are a set of open-source mobile applications that encapsulate pretrained machine learning models, inference code and runnable demos. We provide a series of NLP reference apps that are integrated with Android Studio and XCode, so developers can build with just one click and deploy on Android or iOS phones.

Using the NLP reference apps below, mobile developers can learn the end to end flow of integrating existing NLP models (powered by BERT, MobileBERT or ALBERT), transforming raw text data, and connecting the model’s inputs and outputs to generate prediction results,

  • Text classification: The model predicts labels based on given text data.
  • Question answering app: Given an article and a user question, the model can answer the question within the article.
  • Smart reply app: Given previous context, the model can predict and generate potential auto replies.

The pretrained models used in the above reference apps are available in TensorFlow Hub. The chart below shows a comparison of the latency, size and F1 score between the models.

Benchmark on Pixel 4 CPU, 4 Threads, March 2020
Model hyper parameters: Sequence length 128, Vocab size 30K

Optimizing NLP Models for on-device use cases

On-device models have different constraints compared to server-side models. They run on devices with less memories and slower chips and hence need to be optimized for size and inference speed.Here are several examples of how we optimize models for NLP tasks.

Quantized MobileBERT

MobileBERT is a compact BERT model open sourced on GitHub. It is 4.3x smaller & 5.5x faster than BERT base (float32) while achieving comparable results on GLUE and SQuAD datasets.
After the initial release, we further improved the model by using quantization to optimize its model size and performance, so that it can utilize accelerators like GPU/DSP if available. The quantized MobileBERT is 16x smaller & 8x faster than the BERT base, with little accuracy loss. The MLPerf for Mobile community is leveraging the quantized MobileBERT model for mobile inference benchmarking, and the model can also run in Chrome using TensorFlow.js.
Compared with the original BERT base model (416MB), the below table shows the performance of quantized MobileBERT under the same setting.

Embedding-free NLP models with projection methods

Language Identification is a type of problems to classify the language of a given text. Recently we open source two models using projection methods, namely SGNN and PRADO.
We used SGNN to show how easy and efficient to use Tensorflow Lite for NLP Tasks. SGNN projects texts to fixed-length features followed by fully connected layers. With annotations to tell TensorFlow Lite converter to fuse TF.Text API, we can get a more efficient model for inference on TensorFlow Lite. Previously, the model took 1332.87 μs to run on benchmark; and after fusion, we see 64.06 μs on the same machine. This brings the magic of 20x speed-up.
We also demonstrate a model architecture called PRADO. PRADO first computes trainable projected features from the sequence of word tokens, then applies convolution and attention to map features to a fixed-length encoding. By combining a projection layer, a convolutional and attention encoder mechanism, PRADO achieves similar accuracy as LSTM, but with 100x smaller model size.
The idea behind these models is to use projection to compute features from texts, so that the model does not need to maintain a big embedding table to convert text features to embeddings. In this way, we’ve proven the model will be much smaller than embedding based models, while maintaining similar performance and inference latency.

Creating your own NLP Models

In addition to using pre-trained models, TensorFlow Lite also provides you with tools such as Model Maker to customize existing models for your own data.

TensorFlow Lite Model Maker: Transfer Learning Toolkit for machine learning beginners

TensorFlow Lite Model Maker is an easy-to-use transfer learning tool to adapt state-of-the-art machine learning models to your dataset. It allows mobile developers to create a model without any machine learning expertise, reduces the required training data and shortens the training time through transfer learning.
After the initial release focusing on vision tasks, we recently added two new NLP tasks to Model Maker. You can follow the colab and guide for Text Classification and Question Answer. To install Model Maker:

pip install tflite-model-maker

To customize the model, developers need to write a few lines of python code as follow:

# Loads Data.
train_data = TextClassifierDataLoader.from_csv(train_csv_file, mode_spec=spec)
test_data = TextClassifierDataLoader.from_csv(test_csv_file, mode_spec=spec)

# Customize the TensorFlow model.
model = text_classifier.create(train_data, model_spec=spec)

# Evaluate the model.
loss, acc = model.evaluate(test_data)

# Export as a TensorFlow Lite model.
model.export(export_dir, quantization_config=config)

Conversion: Better support to convert NLP models to TensorFlow Lite

Since the TensorFlow Lite builtin operator library only supports a subset of TensorFlow operators, you may have run into issues while converting your NLP model to TensorFlow Lite, either due to missing ops or unsupported data types (like RaggedTensor support, hash table support, and asset file handling, etc.). Here are a few tips on how to resolve the conversion issues in such cases.

Run TensorFlow ops and TF.text ops in TensorFlow Lite

We have enhanced Select TensorFlow ops to support various cases. With Select TF ops, developers can leverage TensorFlow ops to run models on TensorFlow Lite, when there are no built-in TensorFlow Lite equivalent ops. For example, it’s common to use TF.Text ops and RaggedTensor when training TensorFlow models, and now those models can be easily converted to TensorFlow Lite and run with necessary ops.
Furthermore, we provide the solution of using op selectively building, so that we get a trimmed binary for mobile deployment. It can select a small set of used ops in the final build target, and thus reduces the binary size in deployment.

More efficient and friendly custom ops

In TensorFlow Lite, we provide a few new mobile-friendly ops for NLP, such as Ngram, SentencePieceTokenizer, WordPieceTokenizer and WhitespaceTokenizer.
Previously, there were several restrictions blocking models with SentencePiece from being converted to TensorFlow Lite. The new SentencePieceTokenizer API for mobile resolves these challenges, and simultaneously optimizes the implementation to make it run faster.
Similarly, Ngram and WhitespaceTokenizer are now not only supported, but will also be executed more efficiently on devices.
TensorFlow Lite recently announced operation fusion with MLIR. We used the same mechanism to fuse TF.Text APIs into custom TensorFlow Lite ops, improving inference efficiency significantly. For example, the WhitespaceTokenizer API was made up of multiple ops, and took 0.9ms to run in the original graph in TensorFlow Lite. After fusing these ops into a single op, it finishes in 0.04ms, a 23x speed-up. This approach has been proven to bring a huge gain in inference latency in the SGNN model mentioned above.

Hash table support

Hash table is important for many NLP models, since we usually need to utilize numeric computation in the language model by transforming words into token IDs and vice versa. Hash table will be enabled in TensorFlow Lite soon. It is supported by handling asset files natively in the TensorFlow Lite format and delivering op kernels as TensorFlow Lite built-in operators.

Deployment: How to run NLP models on-device

Running inference with TensorFlow Lite is now much easier than before. You can use pre-built inference APIs to integrate your model within 5 lines of code, or use utilities to build your own Android/iOS inference APIs.

Simple model deployment using TensorFlow Lite Task Library

The TensorFlow Lite Task Library is a powerful and easy-to-use task-specific library that provides out of the box pre- and post-processing utilities required for ML inference, enabling app developers to easily create machine learning features with TensorFlow Lite. There are three text APIs supported in the Task Library, which correspond to the use cases and models mentioned above:

  • NLClassifier: classifies the input text to a set of known categories.
  • BertNLClassifier: classifies text optimized for BERT-family models.
  • BertQuestionAnswerer: answers questions based on the content of a given passage with BERT-family models.

The Task Library works cross-platform on both Android and iOS. The following example shows inference with a BertQA model in Java/Swift:

// Initialization
BertQuestionAnswerer answerer = BertQuestionAnswerer.createFromFile(androidContext, modelFile);
// Answer a question
List answers = answerer.answer(context, question);
Java code for Android
// Initialization
let mobileBertAnswerer = TFLBertQuestionAnswerer.mobilebertQuestionAnswerer(modelPath: modelPath)
// Answer a question
let answers = mobileBertAnswerer.answer(context: context, question: question)
Swift code for iOS

Customized Inference APIs

If your use case is not supported by the existing task libraries, you can also leverage the Task API Infrastructure and build your own C++/Android/iOS inference APIs using common NLP utilities such as Wordpiece and Sentencepiece tokenizers in the same repo.

Conclusion

In this article, we introduced the new support for NLP tasks in TensorFlow Lite. With the latest update of TensorFlow Lite, developers can easily create, convert and deploy NLP models on-device. We will continue providing more useful tools, and accelerate the development of on-device NLP models from research to production. We would love to hear your feedback, and suggestions for newer NLP tools and utilities. Please email tflite@tensorflow.org or create a TensorFlow Lite support GitHub issue.

Acknowledgments

We like to thank Khanh LeViet, Arun Venkatesan, Max Gubin, Robby Neale, Terry Huang, Peter Young, Gaurav Nemade, Prabhu Kaliamoorthi, Ping Yu, Renjie Liu, Lu Wang, Xunkai Zhang, Yuqi Li, Sijia Ma, Thai Nguyen, Xingying Song, Chung-Ching Chang, Shuangfeng Li to contribute to the blogpost.Read More

Introduction to TFLite On-device Recommendation

Introduction to TFLite On-device Recommendation

Posted by Ellie Zhou, Tian Lin, Cong Li, Shuangfeng Li and Sushant Prakash

Introduction & Motivation

We are excited to open source an end-to-end solution for TFLite on-device recommendation tasks. We invite developers to build on-device models using our solution that provides personalized, low-latency and high-quality recommendations, while preserving users’ privacy.

Generating personalized high-quality recommendations is crucial to many real-world applications, such as music, videos, merchandise, apps, news, etc. Currently, a typical recommender system is fully constructed at the server side, including collecting user activity logs, training recommendation models using the collected logs, and serving recommendation models.

While purely server-based recommender systems have been proven to be powerful, we explore and showcase a more lightweight approach to serve an recommendation model by deploying it on device. We demonstrate that such an on-device recommendation solution enjoys low latency inference that is orders of magnitude faster than server-side models. It enables user experiences that cannot be achieved by traditional server-based recommender systems, such as updating rankings and UI responding to every user tap or interaction.

Moreover, on-device model inference respects user privacy without sending user data to a server to do predictions, instead keeping all needed data on the device. It is possible to train the model on public data or via an existing proxy dataset to avoid collecting user data for each new use case, which is demonstrated in our solution. For on-device training, we would refer interested readers to Federated Learning or TFLite model personalization as an alternative.

Please find our solution includes the following components:

  • Source code that constructs and trains high quality personalized recommendation models for on-device scenarios.
  • A movie recommendation demo app that runs the model on device.
  • We also provided source code for preparing training examples and a pretrained model in Github repo.

Model

Recommendation problems are typically formulated as future-activity prediction problems. A recommendation model is therefore trained to predict the user’s future activities, given their previous activities happened before. Our published model is constructed with the following architecture: At the context side, each user activity, such as a movie watch, is embedded into an embedding vector. Embedding vectors from past user activities are aggregated by the encoder to generate the context embedding. We support three different types of encoders:

  • Bag-of-Words: activity embeddings are simply averaged.
  • CNN: 1-D convolution is applied to activity embeddings followed by max-pooling.
  • RNN: LSTM is applied to activity embeddings.

At the label side, the label item, such as the next movie that the user watched or is interested in, is considered as “positive”, while all other items (e.g. all other movies the user didn’t watch) are considered as “negative” through negative sampling. Both positive and negative items are embedded, and the dot product combines the context embedding to produce logits and feed to the loss of softmax cross entropy. Other modeling situations where labels are not binary will be supported in future. After training, the model can be exported and deployed on device for serving. We take the top-K recommendations which are simply the K-highest logits between the context embedding and all label embeddings.

Example

To demonstrate the quality and the user experience of an on-device recommendation model, we trained an example movie recommendation model using the MovieLens dataset and developed a demo app. (Both the model and the app are for demonstration purposes only.) The MovieLens 1M dataset contains ratings from 6039 users across 3951 movies, with each user rating only a small subset of movies. For simplification, we ignore the rating score, and train a model to predict which movies will get rated given N previous movies, where N is referred to as the history length.
The model’s performance on all the three encoders with different history lengths is shown below: We can find that all models achieve high recall metric, while CNN and RNN models usually perform better for a longer history length. In practice, developers may conduct experiments with different history lengths and encoder types, and find out the best for the specific recommendation problem they want to solve.
We want to highlight that all the published on-device models have very low inference latency. For example, for the CNN model with N=10 which we integrated with our demo app, the inference latency on Pixel 4 phones is only 0.05ms in our experiment. As stated in the introduction, such a low latency allows developing immediate and smooth response to every user interaction on the phone, as is demonstrated in our app:

Future Work

We welcome different kinds of extensions and contributions. The currently open sourced model does not support more than one feature column to represent each user’s activity. In the next version, we are going to support multiple features as the activity representation. Moreover, we are planning more advanced user encoders, such as Transformer-based (Vaswani, A., et al., 2017).

References

Vaswani, A., et al. “Attention is all you need. arXiv 2017.” arXiv preprint arXiv:1706.03762 (2017), https://arxiv.org/abs/1706.03762.

Read More

Easy ML mobile development with TensorFlow Lite Task Library

Easy ML mobile development with TensorFlow Lite Task Library

Posted by Lu Wang, Chen Cen, Arun Venkatesan, Khanh LeViet

Overview

Running inference with TensorFlow Lite models on mobile devices is much more than just interacting with a model, but also requires extra code to handle complex logic, such as data conversion, pre/post processing, loading associated files and more.

Today, we are introducing the TensorFlow Lite Task Library, a set of powerful and easy-to-use model interfaces, which handles most of the pre- and post-processing and other complex logic on your behalf. The Task Library comes with support for popular machine learning tasks, including Image Classification and Segmentation, Object Detection and Natural Language Processing. The model interfaces are specifically designed for each task to achieve the best performance and usability – inference on pre trained and custom models for supported tasks can now be done with just 5 lines of code! The Task Library has been widely used in production for many Google products.

Supported ML Tasks

The TensorFlow Lite Task Library currently supports six ML tasks including Vision and NLP use cases. Here is the brief introduction for each of them.

  • ImageClassifier
    Image classification is a common use of machine learning to identify what an image represents. For example, we might want to know what type of animal appears in a given picture. The ImageClassifier API supports common image processing and configurations. It also allows displaying labels in specific supported locales and filtering results based on label allowlist and denylist.
  • ObjectDetector
    Object detectors can identify which of a known set of objects might be present and provide information about their positions within the given image or a video stream. The ObjectDetector API supports similar image processing options as ImageClassifer. The output is a list of the top-k detected objects with label, bounding box, and probability.
  • ImageSegmenter
    Image segmenters predict whether each pixel of an image is associated with a certain class. This is in contrast to object detection, which detects objects in rectangular regions, and image classification, which classifies the overall image. Besides image processing, ImageSegmenter also supports two types of output masks, category mask and confidence mask.
  • NLClassifier & BertNLClassifier
    NLClassifier classifies input text into different categories. This versatile API can be configured to load any TFLite model with text input and score output.

    BertNLClassifier is similar to NLClassifier, except that this API is specially tailored for BERT related models that requires Wordpiece and Sentencepiece tokenizations outside the TFLite model.

  • BertQuestionAnswerer
    BertQuestionAnswerer loads a BERT model and answers question based on the content of a given passage. It currently supports MobileBERT and ALBERT. Similar to BertNLClassifier, BertQuestionAnswerer encapsulates complex tokenization processing for input text. You can simply pass in contexts and questions in string to BertQuestionAnswerer.

Supported Models

The Task Library is compatible with the following known sources of models:

The Task Library also supports custom models that fit the model compatibility requirements of each Task API. The associated files (i.e. label maps and vocab files) and processing parameters, if applicable, should be properly populated into the Model Metadata. See the documentation on TensorFlow website for each API for more details.

Run inference with the Task Library

The Task Library works cross-platform and is supported on Java, C++ (experimental), and Swift (experimental). Running inference with the Task Library can be as easy as just writing a few lines of code. For example, you can use the DeepLab v3 TFLite model to segment an airplane image (Figure 1) in Android as follows:

// Create the API from a model file and options
String modelPath = "path/to/model.tflite"
ImageSegmenterOptions options = ImageSegmenterOptions.builder().setOutputType(OutputType.CONFIDENCE_MASK).build();

ImageSegmenter imageSegmenter = ImageSegmenter.createFromFileAndOptions(context, modelPath, options);

// Segment an image
TensorImage image = TensorImage.fromBitmap(bitmap);
List results = imageSegmenter.segment(image);
Figure 1. ImageSegmenter input image.
Figure 2. Segmented mask.

You can then use the colored labels and category mask in the results to construct the segmented mask image as shown in Figure 2.
Swift is supported for the three text APIs. To perform Question and Answer in iOS with the SQuAD v1 TFLite model on a given context and a question, you could run:

static let modelPath = "path/to/model.tflite"

// Create the API from a model file
let mobileBertAnswerer = TFLBertQuestionAnswerer.mobilebertQuestionAnswerer(modelPath: modelPath)

static let context = """
The Amazon rainforest, alternatively, the Amazon Jungle, also known in
English as Amazonia, is a moist broadleaf tropical rainforest in the
Amazon biome that covers most of the Amazon basin of South America. This
basin encompasses 7,000,000 square kilometers(2,700,000 square miles), of
which 5,500,000 square kilometers(2,100,000 square miles) are covered by
the rainforest. This region includes territory belonging to nine nations.
"""
static let question = "Where is Amazon rainforest?"
// Answer a question
let answers = mobileBertAnswerer.answer(context: context, question: question)
// answers.[0].text could be “South America.”

Build a Task API for your use case

If your use case is not supported by the existing Task libraries, you can leverage the Task API infrastructure and build your custom C++/Android/iOS inference APIs. See this guide for more details.

Future Work

We will continue improving the user experience for the Task Library. Here is the roadmap for the near future:

  • Improve the usability of the C++ Task Library, such as providing prebuilt binaries and creating user-friendly workflows for users who want to build from source code.
  • Publish reference examples using the Task Library.
  • Enable more machine learning use cases via new task types.
  • Improve cross-platform support and enable more tasks for iOS.

Feedback

We would love to hear your feedback, and suggestions for newer use cases to be supported in the Task Library. Please email tflite@tensorflow.org or create a TensorFlow Lite support GitHub issue.

Acknowledgments

This work would not have been possible without the efforts of

  • Cédric Deltheil and Maxime Brénon, the main contributors for the Task Library Vision API.
  • Chen Cen, the main contributor for the Task Library native/Android/iOS infrastructure and Text API.
  • Xunkai and YoungSeok Yoon, the main contributors for the dev infra and releasing process.

We would like to thank Tian Lin, Sijia Ma, YoungSeok Yoon, Yuqi Li, Hsiu Wang, Qifei Wang, Alec Go, Christine Kaeser-Chen, Yicheng Fan, Elizabeth Kemp, Willi Gierke, Arun Venkatesan, Amy Jang, Mike Liang, Denis Brulé, Gaurav Nemade, Khanh LeViet, Luiz GUStavo Martins, Shuangfeng Li, Jared Duke, Erik Vee, Sarah Sirajuddin, Tim Davis for their active support of this work.Read More

How to Create a Cartoonizer with TensorFlow Lite

How to Create a Cartoonizer with TensorFlow Lite

A guest post by ML GDEs Margaret Maynard-Reid (Tiny Peppers) and Sayak Paul (PyImageSearch)

This is an end-to-end tutorial on how to convert a TensorFlow model to TensorFlow Lite (TFLite) and deploy it to an Android app for cartoonizing an image captured by the camera.

We created this end-to-end tutorial to help developers with these objectives:

  • Provide a reference for the developers looking to convert models written in TensorFlow 1.x to their TFLite variants using the new features of the latest (v2) converter — for example, the MLIR-based converter, more supported ops, and improved kernels, etc.
    (In order to convert TensorFlow 2.x models in TFLite please follow this guide.)
  • How to download the .tflite models directly from TensorFlow Hub if you are only interested in using the models for deployment.
  • Understand how to use the TFLite tools such as the Android Benchmark Tool, Model Metadata, and Codegen.
  • Guide developers on how to create a mobile application with TFLite models easily, with ML Model Binding feature from Android Studio.

Please follow along with the notebooks here for model saving/conversion, populating metadata; and the Android code on GitHub here. If you are not familiar with the SavedModel format, please refer to the TensorFlow documentation for details. While this tutorial discusses the steps of how to create the TFLite models , feel free to download them directly from TensorFlow Hub here and get started using them in your own applications.
White-box CartoonGAN is a type of generative adversarial network that is capable of transforming an input image (preferably a natural image) to its cartoonized representation. The goal here is to produce a cartoonized image from an input image that is visually and semantically aesthetic. For more details about the model check out the paper Learning to Cartoonize Using White-box Cartoon Representations by Xinrui Wang and Jinze Yu. For this tutorial, we used the generator part of White-box CartoonGAN.

Create the TensorFlow Lite Model

The authors of White-box CartoonGAN provide pre-trained weights that can be used for making inference on images. However, those weights are not ideal if we were to develop a mobile application without having to make API calls to fetch them. This is why we will first convert these pre-trained weights to TFLite which would be much more suitable to go inside a mobile application. All of the code discussed in this section is available on GitHub here. Here is a step-by-step summary of what we will be covering in this section:

  • Generate a SavedModel out of the pre-trained model checkpoints.
  • Convert SavedModel with post-training quantization using the latest TFLiteConverter.
  • Run inference in Python with the converted model.
  • Add metadata to enable easy integration with a mobile app.
  • Run model benchmark to make sure the model runs well on mobile.

Generate a SavedModel from the pre-trained model weights

The pre-trained weights of White-box CartoonGAN come in the following format (also referred to as checkpoints) –

├── checkpoint
├── model-33999.data-00000-of-00001
└── model-33999.index

As the original White-box CartoonGAN model is implemented in TensorFlow 1, we first need to generate a single self-contained model file in the SavedModel format using TensorFlow 1.15. Then we will switch to TensorFlow 2 later to convert it to the lightweight TFLite format. To do this we can follow this workflow –

  • Create a placeholder for the model input.
  • Instantiate the model instance and run the input placeholder through the model to get a placeholder for the model output.
  • Load the pre-trained checkpoints into the current session of the model.
  • Finally, export to SavedModel.

Note that the aforementioned workflow will be based on TensorFlow 1.x.
This is how all of this looks in code in TensorFlow 1.x:

with tf.Session() as sess:
input_photo = tf.placeholder(tf.float32, [1, None, None, 3], name='input_photo')

network_out = network.unet_generator(input_photo)
final_out = guided_filter.guided_filter(input_photo, network_out, r=1, eps=5e-3)
final_out = tf.identity(final_out, name='final_output')

all_vars = tf.trainable_variables()
gene_vars = [var for var in all_vars if 'generator' in var.name]
saver = tf.train.Saver(var_list=gene_vars)
sess.run(tf.global_variables_initializer())
saver.restore(sess, tf.train.latest_checkpoint(model_path))

# Export to SavedModel
tf.saved_model.simple_save(
sess,
saved_model_directory,
inputs={input_photo.name: input_photo},
outputs={final_out.name: final_out}
)

Now that we have the original model in the SavedModel format, we can switch to TensorFlow 2 and proceed toward converting it to TFLite.

Convert SavedModel to TFLite

TFLite provides support for three different post-training quantization strategies

  • Dynamic range
  • Float16
  • Integer

Based on one’s use-case a particular strategy is determined. In this tutorial, however, we will be covering all of these different quantization strategies to give you a fair idea.

TFLite models with dynamic-range and float16 quantization

The steps to convert models to TFLite using these two quantization strategies are almost identical except during float16 quantization, you need to specify an extra option. The steps for model conversion are demonstrated in the code below –

# Create a concrete function from the SavedModel 
model = tf.saved_model.load(saved_model_dir)
concrete_func = model.signatures[
tf.saved_model.DEFAULT_SERVING_SIGNATURE_DEF_KEY]

# Specify the input shape
concrete_func.inputs[0].set_shape([1, IMG_SHAPE, IMG_SHAPE, 3])

# Convert the model and export
converter = tf.lite.TFLiteConverter.from_concrete_functions([concrete_func])
converter.optimizations = [tf.lite.Optimize.DEFAULT]
converter.target_spec.supported_types = [tf.float16] # Only for float16
tflite_model = converter.convert()
open(tflite_model_path, 'wb').write(tflite_model)

A couple of things to note from the code above –

  • Here, we are specifying the input shape of the model that will be converted to TFLite. However, note that TFLite supports dynamic shaped models from TensorFlow 2.3. We used fixed-shaped inputs in order to restrict the memory usage of the models running on mobile devices.
  • In order to convert the model using dynamic-range quantization, one just needs to comment this line converter.target_spec.supported_types = [tf.float16].

TFLite models with integer quantization

In order to convert the model using integer quantization, we need to pass a representative dataset to the converter so that the activation ranges can be calibrated accordingly. TFLite models generated using this strategy are known to sometimes work better than the other two that we just saw. Integer quantized models are generally smaller as well.
For the sake of brevity, we are going to skip the representative dataset generation part but you can refer to it in this notebook.
In order to let the TFLiteConverter take advantage of this strategy, we need to just pass converter.representative_dataset = representative_dataset_gen and remove converter.target_spec.supported_types = [tf.float16].
So after we generated these different models here’s how we stand in terms of model size – You might feel tempted to just go with the model quantized with integer quantization but you should also consider the following things before finalizing this decision –

  • Quality of the end results of the models.
  • Inference time (the lower the better).
  • Hardware accelerator compatibility.
  • Memory usage.

We will get to these in a moment. If you want to dig deeper into these different quantization strategies refer to the official guide here.
These models are available on TensorFlow Hub and you can find them here.

Running inference in Python

After you have generated the TFLite models, it is important to make sure that models perform as expected. A good way to ensure that is to run inference with the models in Python before integrating them in mobile applications.
Before feeding an image to our White-box CartoonGAN TFLite models it’s important to make sure that the image is preprocessed well. Otherwise, the models might perform unexpectedly. The original model was trained using BGR images, so we need to account for this fact in the preprocessing steps as well. You can find all of the preprocessing steps in this notebook.
Here is the code to use a TFLite model for making inference on a preprocessed input image –

interpreter = tf.lite.Interpreter(model_path=tflite_model_path)
input_details = interpreter.get_input_details()

interpreter.allocate_tensors()
interpreter.set_tensor(input_details[0]['index'],
preprocessed_source_image)
interpreter.invoke()

raw_prediction = interpreter.tensor(
interpreter.get_output_details()[0]['index'])()

As mentioned above, the output would be an image but with BGR channel ordering which might not be visually appropriate. So, we would need to account for that fact in the postprocessing steps.
After the postprocessing steps are incorporated here is how the final image would look like alongside the original input image – Again, you can find all of the postprocessing steps in this notebook.

Add metadata for easy integration with a mobile app

Model metadata in TFLite makes the life of mobile application developers much easier. If your TFLite model is populated with the right metadata then it becomes a matter of only a few keystrokes to integrate that model into a mobile application. Discussing the code to populate a TFLite model with metadata is out of the scope for this tutorial, and please refer to the metadata guide. But in this section, we are going to provide you with some of the important pointers about metadata population for the TFLite models we generated. You can follow this notebook to refer to all the code. Two of the most important parameters we discovered during metadata population are mean and standard deviation with which the results should be processed. In our case, mean and standard deviation need to be used for both preprocessing postprocessing. For normalizing the input image the metadata configuration should be like the following –

input_image_normalization.options.mean = [127.5]
input_image_normalization.options.std = [127.5]

This would make the pixel range in an input image to [-1, 1]. Now, during postprocessing, the pixels need to be scaled back to the range of [0, 255]. For this, the configuration would go as follows –

output_image_normalization.options.mean = [-1]
output_image_normalization.options.std = [0.00784313] # 1/127.5

There are two files created from the “add metadata process”:

  • A .tflite file with the same name as the original model, with metadata added, including model name, description, version, input and output tensor, etc.
  • To help to display metadata, we also export the metadata into a .json file so that you can print it out. When you import the model into Android Studio, metadata can be displayed as well.

The models that have been populated with metadata make it really easy to import in Android Studio which we will discuss later under the “Model deployment to an Android” section.

Benchmark models on Android (Optional)

As an optional step, we used the TFLite Android Model Benchmark tool to get an idea of the runtime performance on Android before deploying it.
There are two options of using the benchmark tool, one with a C++ binary running in background and another with an Android APK running in foreground.
Here ia a high-level summary using the benchmark C++ binary:
1. Configure Android SDK/NDK prerequisites
2. Build the benchmark C++ binary with bazel

bazel build -c opt 
--config=android_arm64
tensorflow/lite/tools/benchmark:benchmark_model

3. Use adb (Android Debug Bridge) to push the benchmarking tool binary to device and make executable

adb push benchmark_model /data/local tmp
adb shell chmod +x /data/local/tmp/benchmark_model

4. Push the whitebox_cartoon_gan_dr.tflite model to device

adb push whitebox_cartoon_gan_dr.tflite /data/local/tmp

5. Run the benchmark tool

adb shell /data/local/tmp/android_aarch64_benchmark_model        
--graph=/data/local/tmp/whitebox_cartoon_gan_dr.tflite
--num_threads=4

You will see a result in the terminal like this: Repeat above steps for the other two tflite models: float16 and int8 variants.
In summary, here is the average inference time we got from the benchmark tool running on a Pixel 4: Refer to the documentation of the benchmark tool (C++ binary | Android APK) for details and additional options such as how to reduce variance between runs and how to profile operators, etc. You can also see the performance values of some of the popular ML models on the TensorFlow official documentation here.

Model deployment to Android

Now that we have the quantized TensorFlow Lite models with metadata by either following the previous steps (or by downloading the models directly from TensorFlow Hub here), we are ready to deploy them to Android. Follow along with the Android code on GitHub here.
The Android app uses Jetpack Navigation Component for UI navigation and CameraX for image capture. We use the new ML Model Binding feature for importing the tflite model and then Kotlin Coroutine for async handling of the model inference so that the UI is not blocked while waiting for the results.
Let’s dive into the details step by step:

  • Download Android Studio 4.1 Preview.
  • Create a new Android project and set up the UI navigation.
  • Set up the CameraX API for image capture.
  • Import the .tflite models with ML Model Binding.
  • Putting everything together.

Download Android Studio 4.1 Preview

We need to first install Android Studio Preview (4.1 Beta 1) in order to use the new ML Model Binding feature to import a .tflite model and auto code generation. You can then explore the tfllite models visually and most importantly use the generated classes directly in your Android projects.
Download the Android Studio Preview here. You should be able to run the Preview version side by side with a stable version of Android Studio. Make sure to update your Gradle plug-in to at least 4.1.0-alpha10; otherwise the ML Model Binding menu may be inaccessible.

Create a new Android Project

First let’s create a new Android project with an empty Activity called MainActivity.kt which contains a companion object that defines the output directory where the captured image will be stored.
Use Jetpack Navigation Component to navigate the UI of the app. Please refer to the tutorial here to learn more details about this support library.
There are 3 screens in this sample app:

  • PermissionsFragment.kt handles checking the camera permission.
  • CameraFragment.kt handles camera setup, image capture and saving.
  • CartoonFragment.kt handles the display of input and cartoon image in the UI.

The navigation graph in nav_graph.xml defines the navigation of the three screens and data passing between CameraFragment and CartoonFragment.

Set up CameraX for image capture

CameraX is a Jetpack support library which makes camera app development much easier.
Camera1 API was simple to use but it lacked a lot of functionality. Camera2 API provides more fine control than Camera1 but it’s very complex — with almost 1000 lines of code in a very basic example.
CameraX on the other hand, is much easier to set up with 10 times less code. In addition, it’s lifecycle aware so you don’t need to write the extra code to handle the Android lifecycle.
Here are the steps to set up CameraX for this sample app:

  • Update build.gradle dependencies
  • Use CameraFragment.kt to hold the CameraX code
  • Request camera permission
  • Update AndroidManifest.ml
  • Check permission in MainActivity.kt
  • Implement a viewfinder with the CameraX Preview class
  • Implement image capture
  • Capture an image and convert it to a Bitmap

CameraSelector is configured to be able to take use of the front facing and rear facing camera since the model can stylize any type of faces or objects, and not just a selfie.
Once we capture an image, we convert it to a Bitmap which is passed to the TFLite model for inference. Navigate to a new screen CartoonFragment.kt where both the original image and the cartoonized image are displayed.

Import the TensorFlow Lite models

Now that the UI code has been completed. It’s time to import the TensorFlow Lite model for inference. ML Model Binding takes care of this with ease. In Android Studio, go to File > New > Other > TensorFlow Lite Model:

  • Specify the .tflite file location.
  • “Auto add build feature and required dependencies to gradle” is checked by default.
  • Make sure to also check “Auto add TensorFlow Lite gpu dependencies to gradle” since the GAN models are complex and slow, and so we need to enable GPU delegate.

This import accomplishes two things:

  • automatically create a ml folder and place the model file .tflite file under there.
  • auto generate a Java class under the folder: app/build/generated/ml_source_out/debug/[package-name]/ml, which handles all the tasks such as model loading, image pre-preprocess and post-processing, and run model inference for stylizing the input image.

Once the import completes, we see the *.tflite display the model metadata info as well as code snippets in both Kotlin and Java that can be copy/pasted in order to use the model: Repeat the steps above to import the other two .tflite model variants.

Putting everything together

Now that we have set up the UI navigation, configured CameraX for image capture, and the tflite models are imported, let’s put all the pieces together!

  • Model input: capture a photo with CameraX and save it
  • Run inference on the input image and create a cartoonized version
  • Display both the original photo and the cartoonized photo in the UI
  • Use Kotlin coroutine to prevent the model inference from blocking UI main thread

First we capture a photo with CameraX in CameraFragment.kt under imageCaptue?.takePicture(), then in ImageCapture.OnImageSavedCallback{}, onImageSaved() convert the .jpg image to a Bitmap, rotate if necessary, and then save it to an output directory defined in MainActivity earlier.
With the JetPack Nav Component, we can easily navigate to CartoonFragment.kt and pass the image directory location as a string argument, and the type of tflite model as an integer. Then in CartoonFragment.kt, retrieve the file directory string where the photo was stored, create an image file then convert it to be Bitmap which can be used as the input to the tflite model.
In CartoonFragment.kt, also retrieve the type of tflite model that was chosen for inference. Run model inference on the input image and create a cartoon image. We display both the original image and the cartoonized image in the UI.
Note: the inference takes time so we use Kotlin coroutine to prevent the model inference from blocking the UI main thread. Show a ProgressBar till the model inference completes.
Here is what we have once all pieces are put together and here are the cartoon images created by the model: This brings us to the end of the tutorial. We hope you have enjoyed reading it and will apply what you learned to your real-world applications with TensorFlow Lite. If you have created any cool samples with what you learned here, please remember to add it to awesome-tflite – a repo with TensorFlow Lite samples, tutorials, tools and learning resources.

Acknowledgments

This Cartoonizer with TensorFlow Lite project with end-to-end tutorial was created with the great collaboration by ML GDEs and the TensorFlow Lite team. This is the one of a series of end-to-end TensorFlow Lite tutorials. We would like to thank Khanh LeViet and Lu Wang (TensorFlow Lite), Hoi Lam (Android ML), Trevor McGuire (CameraX) and Soonson Kwon (ML GDEs Google Developers Experts Program), for their collaboration and continuous support.
Also thanks to the authors of the paper Learning to Cartoonize Using White-box Cartoon Representations: Xinrui Wang and Jinze Yu.
When developing applications, it’s important to consider recommended practices for responsible innovation; check out Responsible AI with TensorFlow for resources and tools you can use. Read More

Supercharging the TensorFlow.js WebAssembly backend with SIMD and multi-threading

Supercharging the TensorFlow.js WebAssembly backend with SIMD and multi-threading

Posted by Ann Yuan and Marat Dukhan, Software Engineers at Google

In March we introduced a new WebAssembly (Wasm) accelerated backend for TensorFlow.js (scroll further down to learn more about Wasm and why this is important). Today we are excited to announce a major performance update: as of TensorFlow.js version 2.3.0, our Wasm backend has become up to 10X faster by leveraging SIMD (vector) instructions and multithreading via XNNPACK, a highly optimized library of neural network operators.

Benchmarks

SIMD and multithreading bring major performance improvements to our Wasm backend. Below are benchmarks in Google Chrome that demonstrate the improvements on BlazeFace – a light model with 0.1 million parameters and about 20 million multiply-add operations:

(times listed are milliseconds per inference)

Larger models, such as MobileNet V2, a medium-sized model with 3.5 million parameters and roughly 300 million multiply-add operations, attain even greater speedups:

*Note: Benchmarks for the TF.js multi-threaded Wasm backend are not available for Pixel 4 because multi-threading support in mobile browsers is still a work-in-progress. SIMD support in iOS is also still under development.

**Note: Node support for the TF.js multi-threaded Wasm backend is coming soon.

The performance gains from SIMD and multithreading are independent of each other. These benchmarks show that SIMD brings a 1.7-4.5X performance improvement to plain Wasm, and multithreading brings another 1.8-2.9X speedup on top of that.

Usage

SIMD is supported as of TensorFlow.js 2.1.0, and multithreading is supported as of TensorFlow.js 2.3.0.

At runtime we test for SIMD and multithreading support and serve the appropriate Wasm binary. Today we serve a different binary for each of the following cases:

  • Default: The runtime does not support SIMD or multithreading
  • SIMD: The runtime supports SIMD but not multithreading
  • SIMD + multithreading: The runtime supports SIMD and multithreading

Since most runtimes that support multi-threading also support SIMD, we decided to omit the multi-threading-only runtime to keep our bundle size down. This means that if your runtime supports multithreading but not SIMD, you will be served the default binary. There are two ways to use the Wasm backend:

  1. With NPM
    // Import @tensorflow/tfjs or @tensorflow/tfjs-core
    const tf = require('@tensorflow/tfjs');
    // Add the WAsm backend to the global backend registry.
    require('@tensorflow/tfjs-backend-wasm');

    // Set the backend to WAsm and wait for the module to be ready.
    tf.setBackend('wasm').then(() => main());

    The library expects the Wasm binaries to be located relative to the main JS file. If you’re using a bundler such as parcel or webpack, you may need to manually indicate the location of the Wasm binaries with our setWasmPaths helper:

    import {setWasmPaths} from '@tensorflow/tfjs-backend-wasm';
    setWasmPaths(yourCustomFolder);
    tf.setBackend('wasm').then(() => {...});

    See the “Using bundlers” section in our README for more information.

  2. With script tags
    <!-- Import @tensorflow/tfjs or @tensorflow/tfjs-core -->
    <script src="https://cdn.jsdelivr.net/npm/@tensorflow/tfjs"></script>

    <!-- Adds the WAsm backend to the global backend registry -->
    <script src="https://cdn.jsdelivr.net/npm/@tensorflow/tfjs-backend-wasm/dist/tf-backend-wasm.js"></script>

    <script>
    tf.setBackend('wasm').then(() => main());
    </script>

    NOTE: TensorFlow.js defines a priority for each backend and will automatically choose the best supported backend for a given environment. Today, WebGL has the highest priority, followed by Wasm, then the vanilla JS backend. To always use the Wasm backend, we need to explicitly call tf.setBackend(‘wasm’).

Demo

To see the performance improvements for yourself, check out this demo of our BlazeFace model, which has been updated to use the new Wasm backend: https://tfjs-wasm-simd-demo.netlify.app/ To compare against the unoptimized binary, try this version of the demo, which manually turns off SIMD and multithreading support.

What is Wasm?

WebAssembly (Wasm) is a cross-browser binary format that brings near-native code execution speed to the web. Wasm serves as a compilation target for programs written in statically typed high level languages, such as C, C++, Go, and Rust. In TensorFlow.js, we implement our Wasm backend in C++ and compile with Emscripten. The XNNPACK library provides a heavily optimized implementation of neural network operators underneath.
Wasm has been supported by Chrome, Safari, Firefox, and Edge since 2017, and is supported by 90% of devices worldwide.
The WebAssembly specification is evolving quickly and browsers are working hard to support a growing number of experimental features. You can visit this site to see which features are supported by your runtime, including:

  1. SIMD
    SIMD stands for Single Instruction, Multiple Data, which means that SIMD instructions operate on small fixed-size vectors of elements rather than individual scalars. The Wasm SIMD proposal makes the SIMD instructions supported by modern processors usable inside Web browsers, unlocking significant performance gains.

    Wasm SIMD is a phase 3 proposal, and is available via an origin trial in Chrome 84-86. This means developers can opt in their websites to Wasm SIMD and all their visitors will enjoy its benefits without needing to explicitly enable the feature in their browser settings. Besides Google Chrome, Firefox Nightly supports Wasm SIMD by default.

  2. Multi-threading
    Nearly all modern processors have multiple cores, each of which is able to carry out instructions independently and concurrently. WebAssembly programs can spread their work across cores via the threads proposal for performance. This proposal allows multiple Wasm instances in separate web workers to share a single WebAssembly.Memory object for fast communication between workers.

    Wasm threads is a phase 2 proposal, and has been available in Chrome desktop by default since version 74. There is an ongoing cross-browser effort to enable this functionality for mobile devices as well.

To see which browsers support SIMD, threads, and other experimental features, check out the WebAssembly roadmap.

Other improvements

Since the original launch of our Wasm backend in March, we have extended operator coverage and now support over 70 operators. Many of the new operators are accelerated through the XNNPACK library, and unlock support for additional models, like the HandPose model.

Looking ahead

We expect the performance of our Wasm backend to keep improving. We’re closely following the progress of several evolving specifications in WebAssembly, including flexible vectors for wider SIMD, quasi fused multiply-add, and pseudo-minimum and maximum instructions. We’re also looking forward to ES6 module support for WebAssembly modules. As with SIMD and multithreading, we intend to take advantage of these features as they become available with no implications for TF.js user code.

More information

Acknowledgements

We would like to thank Daniel Smilkov and Nikhil Thorat for laying the groundwork of the WebAssembly backend and the integration with XNNPACK, Matsvei Zhdanovich for collecting Pixel 4 benchmark numbers, and Frank Barchard for implementing low-level Wasm SIMD optimizations in XNNPACK.Read More